Prerequisites
Before you add and set up the source connector, you need to set up the database for change data capture (CDC), as explained in the following sections. Limitations: The following capabilities are not supported in :- remote journals or failover functionality
- large objects such as CLOB, XML, TEXT, BLOB
Set Up for CDC
Journaling records database changes in journal receivers, which the change data capture (CDC) process uses to capture and replicate those changes to other systems in real-time or near real-time synchronization. A journal is a database object that serves as a tracking mechanism, capturing metadata about changes made to specific database objects. Each journal is linked to one or more journal receivers, which physically store the detailed change records, including before-and-after images of the data as well as metadata and transaction details. Because CDC depends on journaling to supply detailed change records, creating a journal and journal receiver and setting user permissions are the first steps in enabling CDC for , as explained in the next sections.Create the Journal Receiver and Journal and Enable Journaling on Tables
Run the following command-line (CL) commands to create the journal receiver, journal, and enable journaling on tables:Set Required User Permissions
To verify all permissions for the user to which you are connected, submit the following query:To execute the commands through a Java Database Connectivity (JDBC) tool, use this command:
CALL QSYS2.QCMDEXC(‘CL COMMAND’);Add the DB2 for i Connector
Authenticate to DB2 for i
After you add the connector, you need to set the required properties.- Server: Enter the address or host name of the server. The default server is localhost.
- Database: Enter the name of your database.
- Port: Enter the port number for your server. The default port is 446.
- User: Enter the username that you use to authenticate to the database.
- Password: Enter the password that you use to authenticate to the database.
Complete Your Connection
To complete your connection:- Define advanced connection settings on the Advanced tab. (In most cases, though, you should not need these settings.)
- Click Create & Test to create your connection.
Create a Change Data Capture (CDC) Job with Journal and Schema Selections
This section explains how to create a change data capture (CDC) job for and how to configure row identification for tables without primary keys.Create the CDC Job
Follow these steps to create a CDC job for :- Enter a name for your job.
- Select your source.
- Select your destination.
-
Specify values for the following fields:
- Journal Library
- Journal Name
- Source Schema
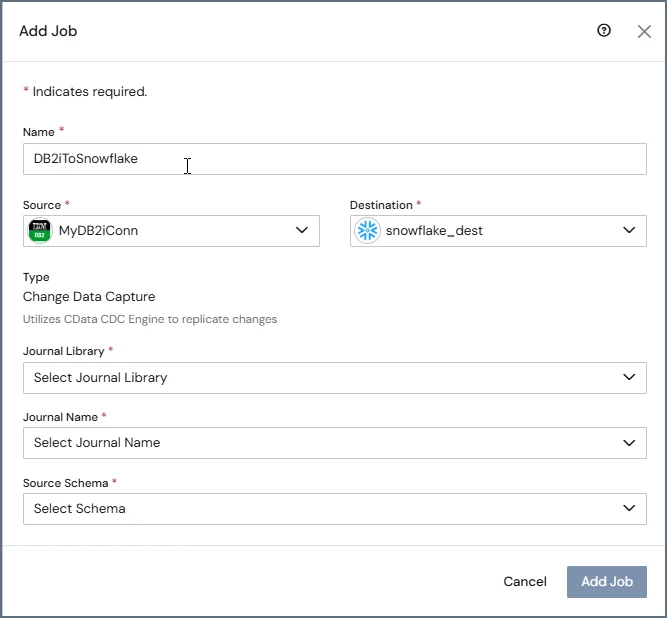
- Click Add Job. After the job is created, the journal settings are displayed in the CDC engine settings and cannot be modified.
-
Continue to the job’s Task tab for table selection. Only tables that meet the following criteria are displayed:
- The table is journaled.
- The table is associated with the selected journal.
- The table belongs to the selected schema.
When you create DB2 for i CDC jobs through the API, you must provide the journal library and journal name.
Configure Row Identification for Tables without Primary Keys
When you configure a change data capture (CDC) job for , you can use the relative record number (RRN) as the value for the_cdatasync_id column. This approach provides a stable identifier for tables that do not have a primary key.
To use the RRN as the identifier, set the following option:
SyncIdSourceColumn=Db2Rrn
When you set this option, uses the RRN instead of the default MD5-based row hash to generate the _cdatasync_id value.
For jobs that you create in v26.2, the RRN is set as the identifier by default.
-
The
_cdatasync_idcolumn is represented as a BigInt data type. - The identifier is derived directly from the physical row location in the source table.
-
The
_cdatasync_idcolumn can be used as a partition key for destinations that support partitioning.