Add the Salesforce Connector
Authenticate to Salesforce
After you add the connector, you need to set the required properties. supports authenticating to in several ways. Select your authentication method below to proceed to the relevant section that contains the authentication details.Basic
To connect with user credentials and a security token, specify the following settings:- Auth Scheme: Select Basic.
- User: Enter the username that you use to authenticate to your account.
- Password: Enter the password that you use to authenticate to your account.
-
Security Token: Enter the security token for your account. If you do not know your security token, you can reset it as follows:
- Open your personal information page on the https://www.salesforce.com/ website.
- Click the link to reset your security token. The token will be emailed to you.
OAuth
OAuth Password
To connect with OAuth credentials, specify the following settings:- Auth Scheme: Select OAuthPassword.
- User: Enter the username that you use to authenticate to your account.
- Password: Enter the password that you use to authenticate to your account.
-
Security Token: Enter the security token for your account. If you do not know your security token, you can reset it as follows:
- Open your personal information page on the https://www.salesforce.com/ website.
- Click the link to reset your security token. The token will be emailed to you.
OAuth JWT
To connect with JWT, specify the following settings:- Auth Scheme: Select OAuthJWT.
- OAuth JWT Cert: Enter your Java web tokens (JWT) certificate store.
- OAuth JWT Cert Type: Enter the type of key store that contains your JWT Certificate. The default type is PEMKEY_BLOB.
- OAuth JWT Issuer: Enter the issuer of your Java web token. Typically, the issuer is either the client Id or the email address of the OAuth application.
- OAuth JWT Cert Password: Enter the password for your OAuth JWT certificate.
- OAuth JWT Cert Subject: Enter the subject of your OAuth JWT certificate.
- OAuth JWT Subject: Enter the user subject for which the application is requesting delegated access.
OneLogin
To connect with single sign-on (SSO) via OneLogin, specify the following settings:- Auth Scheme: Select OneLogin.
- User: Enter the username for your PingFederate account.
- Password: Enter the password for your PingFederate account.
- SSO Login URL: Enter the login URL for your single sign-on (SSO) provider.
- SSO Properties: Enter the SSO properties that you want to use (for example, SSOProperty1=Value1;SSOProperty2=Value2;…).
- SSO Exchange URL: Enter the OAuth 2.0 token endpoint for the identity provider (for example, https://MyOrganization.My.Acct.com/services/oauth2/token).
PingFederate
To connect with single sign-on (SSO) via PingFederate, specify the following settings:- Auth Scheme: Select PingFederate.
- User: Enter the username for your OneLogin account.
- Password: Enter the password for your OneLogin account.
- SSO Properties: Enter the single sign-on (SSO) properties that you want to use (for example, SSOProperty1=Value1;SSOProperty2=Value2;…).
- SSO Exchange URL: Enter the OAuth 2.0 token endpoint for the identity provider (for example, https://MyOrganization.My.Acct.com/services/oauth2/token).
OKTA
To connect with single sign-on (SSO) via Okta, specify the following properties:- Auth Scheme: Select OKTA.
- User: Enter the username for your OKTA account.
- Password: Enter the password for your OKTA account.
- SSO Login URL: Enter the login URL for your single sign-on (SSO) provider.
- SSO Properties: Enter the single sign-on (SSO) properties that you want to use (for example, SSOProperty1=Value1;SSOProperty2=Value2;…).
- SSO Exchange URL: Enter the OAuth 2.0 token endpoint for the identity provider (for example, https://MyOrganization.My.Acct.com/services/oauth2/token).
ADFS
To connect with single sign-on (SSO) via ADFS, specify the following properties:- Auth Scheme: Select ADFS.
- User: Enter the username for your ADFS account.
- Password: Enter the password for your ADFS account.
- SSO Login URL: Enter the login URL for your single sign-on (SSO) provider.
- SSO Properties: Enter the single sign-on (SSO) properties that you want to use (for example, SSOProperty1=Value1;SSOProperty2=Value2;…).
- SSO Exchange URL: Enter the OAuth 2.0 token endpoint for the identity provider (for example, https://MyOrganization.My.Acct.com/services/oauth2/token).
Azure Active Directory
To connect with single sign-on via Azure Active Directory, specify the following settings:- Auth Scheme: Select AzureAD.
- SSO Properties: Enter the single sign-on (SSO) properties that you want to use (for example, SSOProperty1=Value1;SSOProperty2=Value2;…).
- SSO Exchange URL: Enter the OAuth 2.0 token endpoint for the identity provider (for example, https://MyOrganization.My.Acct.com/services/oauth2/token).
- OAuth Client Id: Enter the client Id that you were assigned when you registered your application with an OAuth authorization server.
- OAuth Client Secret: Enter the client secret that you were assigned when you registered your application with an OAuth authorization server.
Replicating Formula Fields
The application provides a dedicated _Formulas schema to help you manage the replication of formula fields separately from standard fields. This schema ensures that formula fields are always refreshed with the latest calculations. formula fields differ from standard fields in their replication behavior. Specifically, when the definition of a formula changes, does not update the record’sSystemModStamp column. This behavior can cause issues with data synchronization that relies solely on incremental replication.
addresses this issue by providing two schemas ( and _Formulas) that allow you to apply different replication strategies to standard and formula fields.
Configure Tasks with the _Formulas Schema
When you add or edit a task in a job, displays the two schema options, and _Formulas, in the Add Tasks dialog box.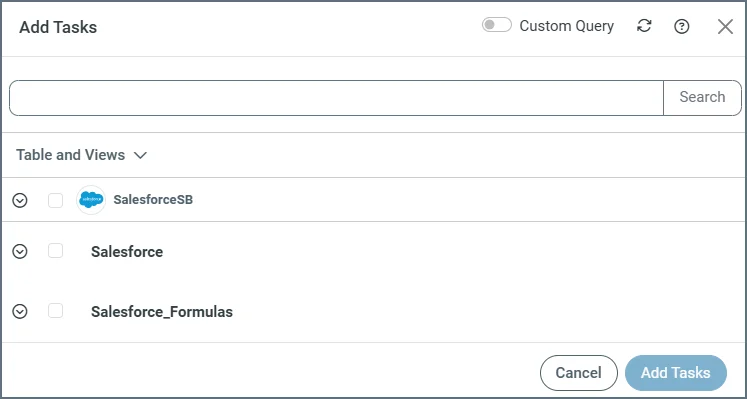
- Truncate and reload formula fields on each run.
- Automatically add new formula fields as they are created in when you enable the Alter Schema property (available when you add or edit tasks from a job’s Task tab).
Configure Tasks with the Schema
Use the schema when you want to replicate non-formula fields incrementally. When you use this schema, you can also control whether formula fields are included by using the Skip Formula Fields property. This property is available on the on the Advanced tab of the connection page, under the Miscellaneous category.- If you set Skip Formula Fields to True, formula fields are excluded from the schema.
- If you set Skip Formula Fields to False, formula fields are included in the schema.
Changing the Skip Formula Fields property affects only the schema. It does not change what the _Formulas schema returns.
Complete Your Connection
To complete your connection:-
Specify the following properties:
- (Optional) API Version: Enter your API version. The default version is 56.0.
- (Optional) Login URL: Enter your login URL for .
- Use Sandbox: Select whether you want to enable the sandbox. By default, the Enable checkbox is not selected.
- Define advanced connection settings on the Advanced tab. (In most cases, though, you should not need these settings.)
- Connect to to connect to your account.
- Click Create & Test to create your connection.