

コネクタを追加する
への認証
コネクタを追加したら、必要なプロパティを設定します。 は、いくつかの方法で への認証をサポートしています。以下から認証方法を選択し、認証の詳細を含む該当セクションに進みます。Basic
ユーザー資格情報およびセキュリティトークンで接続するには、次を指定します:- Auth Scheme: Basic を選択。
- User: アカウントへの認証に使用するユーザー名を入力。
- Password: アカウントへの認証に使用するパスワードを入力。
- Security Token: アカウントのセキュリティトークンを入力。セキュリティトークンがわからない場合は、次の手順でリセットできます:
- https://www.salesforce.com/ Web サイトで個人情報ページを開きます。
- セキュリティトークンをリセットするためのリンクをクリックします。トークンがE メールで送信されます。
OAuth
OAuth Password
OAuth 資格情報で接続するには、次を指定します:- Auth Scheme: OAuthPassword を選択。
- User: アカウントへの認証に使用するユーザー名を入力。
- Password: アカウントへの認証に使用するパスワードを入力。
- Security Token: アカウントのセキュリティトークンを入力。セキュリティトークンがわからない場合は、次の手順でリセットできます:
- https://www.salesforce.com/ Web サイトで個人情報ページを開きます。
- セキュリティトークンをリセットするためのリンクをクリックします。トークンがE メールで送信されます。
OAuth JWT
JWT で接続するには、次を指定します:- Auth Scheme: OAuthJWT を選択。
- OAuth JWT Cert: Java web token(JWT)証明書ストアを入力。
- OAuth JWT Cert Type: JWT 証明書を格納するキーストアの種類を入力。デフォルトの種類はPEMKEY_BLOB です。
- OAuth JWT Issuer: Java web token の発行者を入力。通常、発行者はOAuth アプリケーションのクライアントId またはE メールアドレスです。
- OAuth JWT Cert Password: OAuth JWT 証明書のパスワードを入力。
- OAuth JWT Cert Subject: OAuth JWT 証明書のサブジェクトを入力。
- OAuth JWT Subject: アプリケーションが委任されたアクセスを要求するユーザーサブジェクトを入力。
OneLogin
OneLogin を介したシングルサインオン(SSO)で接続するには、次を指定します:- Auth Scheme: OneLogin を選択。
- User: PingFederate アカウントのユーザー名を入力。
- Password: PingFederate アカウントのパスワードを入力。
- SSO Login URL: シングルサインオン(SSO)プロバイダーのログインURL を入力。
- SSO Properties: 使用するSSO プロパティを入力(例えば、SSOProperty1=Value1;SSOProperty2=Value2;…)。
- SSO Exchange URL: ID プロバイダーの OAuth 2.0 トークンエンドポイントを入力(例えば、https://MyOrganization.My.Acct.com/services/oauth2/token)。
PingFederate
PingFederate を介したシングルサインオン(SSO)で接続するには、次を指定します:- Auth Scheme: PingFederate を選択。
- User: OneLogin アカウントのユーザー名を入力。
- Password: OneLogin アカウントのパスワードを入力。
- SSO Properties: 使用するシングルサインオン(SSO)プロパティを入力(例えば、SSOProperty1=Value1;SSOProperty2=Value2;…)。
- SSO Exchange URL: ID プロバイダーの OAuth 2.0 トークンエンドポイントを入力(例えば、https://MyOrganization.My.Acct.com/services/oauth2/token)。
OKTA
Okta を介したシングルサインオン(SSO)で接続するには、次のプロパティを指定します:- Auth Scheme: OKTA を選択。
- User: OKTA アカウントのユーザー名を入力。
- Password: OKTA アカウントのパスワードを入力。
- SSO Login URL: シングルサインオン(SSO)プロバイダーのログインURL を入力。
- SSO Properties: 使用するシングルサインオン(SSO)プロパティを入力(例えば、SSOProperty1=Value1;SSOProperty2=Value2;…)。
- SSO Exchange URL: ID プロバイダーの OAuth 2.0 トークンエンドポイントを入力(例えば、https://MyOrganization.My.Acct.com/services/oauth2/token)。
ADFS
ADFS を介したシングルサインオン(SSO)で接続するには、次のプロパティを指定します:- Auth Scheme: ADFS を選択。
- User: ADFS アカウントのユーザー名を入力。
- Password: ADFS アカウントのパスワードを入力。
- SSO Login URL: シングルサインオン(SSO)プロバイダーのログインURL を入力。
- SSO Properties: 使用するシングルサインオン(SSO)プロパティを入力(例えば、SSOProperty1=Value1;SSOProperty2=Value2;…)。
- SSO Exchange URL: ID プロバイダーの OAuth 2.0 トークンエンドポイントを入力(例えば、https://MyOrganization.My.Acct.com/services/oauth2/token)。
Azure Active Directory
Azure Active Directory を介したシングルサインオンで接続するには、次を指定します:- Auth Scheme: AzureAD を選択。
- SSO Properties: 使用するシングルサインオン(SSO)プロパティを入力(例えば、SSOProperty1=Value1;SSOProperty2=Value2;…)。
- SSO Exchange URL: ID プロバイダーの OAuth 2.0 トークンエンドポイントを入力(例えば、https://MyOrganization.My.Acct.com/services/oauth2/token)。
- OAuth Client Id: OAuth 認証サーバーにアプリケーションを登録した際に割り当てられたクライアントId を入力。
- OAuth Client Secret: OAuth 認証サーバーにアプリケーションを登録した際に割り当てられたクライアントシークレットを入力。
接続を完了する
接続を完了するには:- 次のプロパティを指定します:
- (オプション)API Version: API バージョンを入力。デフォルトバージョンは56.0です。
- (オプション)Login URL: のログインURL を入力。
- Use Sandbox: サンドボックスを有効にするかどうかを選択。デフォルトでは、Enable チェックボックスはオフです。
- Advanced タブで詳細な接続設定を定義します。(ただし、ほとんどの場合、これらの設定は必要ありません。)
- への接続をクリックして アカウントに接続します。
- 作成およびテストをクリックして接続を作成します。
Salesforce 数式項目のレプリケーション
は、数式項目を標準フィールドとは別に管理するための専用スキーマ _Formulas を提供しています。このスキーマにより、数式項目は常に最新の計算結果で更新されます。 の数式項目は、レプリケーションの動作において標準フィールドと異なります。具体的には、フォーミュラの定義が変更されても、 はレコードのSystemModStamp カラムを更新しません。この動作は、差分レプリケーションのみに依存したデータ同期で問題を引き起こす可能性があります。
はこの問題に対処するために、標準フィールドと数式項目に異なるレプリケーション戦略を適用できる2つのスキーマ( と _Formulas)を提供しています。
Salesforce_Formulas スキーマでタスクを設定する
ジョブでタスクを追加または編集すると、 はタスクを追加ダイアログボックスに と _Formulas の2つのスキーマオプションを表示します。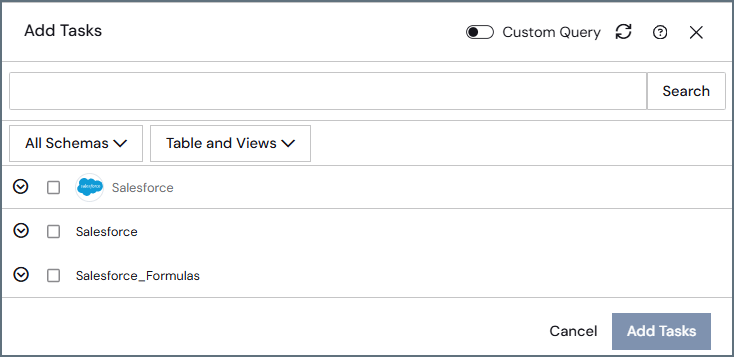
- 実行のたびに数式項目をトランケートして再ロードする。
- Alter Schema プロパティを有効にすると(ジョブのタスクタブでタスクを追加または編集するときに使用可能)、 で新しい数式項目が作成されたときに自動的に追加する。
Salesforce スキーマでタスクを設定する
非数式項目を差分でレプリケートする場合は、 スキーマを使用します。このスキーマでは、Skip Formula Fields プロパティを使用して数式項目を含めるかどうかを制御することもできます。このプロパティは、 接続ページの Advanced タブの Miscellaneous カテゴリにあります。- Skip Formula Fields を True に設定すると、 スキーマから数式項目が除外されます。
- Skip Formula Fields を False に設定すると、数式項目が スキーマに含まれます。
Skip Formula Fields プロパティを変更しても、 スキーマにのみ影響します。_Formulas スキーマが返す内容は変わりません。
制限事項
はGetDeleted 操作を過去 28 日以内に削除されたレコードに限定します。差分レプリケーションのチェックポイントが 28 日以上前の場合、 は削除されたレコードを取得できず、対象テーブルの差分レプリケーションを続行できません。
エラー: SQL [60004] The GetDeleted operation can only get deleted data from the last 28 days.
解決方法: 対象テーブルを再同期してフルリロードを実行し、新しい差分レプリケーションのチェックポイントを設定してください。
推奨事項: 差分レプリケーションジョブを 28 日以内に少なくとも 1 回実行するようにスケジュールしてください。