> ## Documentation Index
> Fetch the complete documentation index at: https://docs.sync.cdata.com/llms.txt
> Use this file to discover all available pages before exploring further.
# Salesforce
export const CommonAuthSchemeOauthEmbedded = ({siteName = "CData Sync", siteNameShort = "Sync", datasource = "the data source"}) => {
return <>
{siteName} は、接続するための組み込みOAuth アプリケーションを提供します。アプリケーションを使用するには、Auth Scheme でOAuth を選択します。追加のプロパティは必要ありません。
;
};
export const CommonDatasourceMoreInformation = ({datasource = "the data source", advancedurl = "", siteName = "CData Sync", driverVersion = ""}) => {
return <>
{siteName} と{datasource} の連携について、詳しくは{' '}
{datasource} Connector for {siteName}
を参照してください。
;
};
export const CommonDatasourceAddConnector = ({datasource = "the data source", title = "the connector", destination = false, siteNameShort = "Sync"}) => {
return <>
{siteNameShort} で{datasource} のデータを使用できるようにするには、まず以下の手順でコネクタを追加する必要があります:
- {siteNameShort} のダッシュボードから接続ページを開きます。
- 接続を追加をクリックしてコネクタを選択ページを開きます。
-
{destination ? "同期先" : "データソース"}タブをクリックして
{title} 行に移動します。
-
行末にある接続を設定アイコンをクリックして、新しい接続ページを開きます。この操作により、{' '}
接続を追加ダイアログボックスが開きます。
Note: 接続を設定アイコンが表示されない場合は、コネクタをダウンロードアイコンをクリックして {title} コネクタをインストールしてください。
- 接続を追加ダイアログボックスに接続名を入力します。
- 追加をクリックして、コネクタの設定タブを開きます。
新しいコネクタのインストールについての詳細は、{' '}
接続を参照してください。
;
};
export const CommonDatasourceIntroSource = ({datasource = "the data source", siteName = "CData Sync"}) => {
return
{siteName} アプリケーションから{datasource} コネクタを使用して、{datasource} からデータを取得してサポートされている任意の同期先に移動できます。これを行うには、コネクタを追加し、コネクタへの認証を行い、接続を完了する必要があります。
;
};
export const driverVersion = "M";
export const siteNameShort = "Sync";
export const siteName = "CData Sync";
export const datasource = "Salesforce";
export const pageTitle = "Salesforce";
export const advancedurl = "RF";
export const oauthschemes = "OAuth or AzureAD";
## {datasource} コネクタを追加する
## {datasource} への認証
コネクタを追加したら、必要なプロパティを設定します。
{siteName} は、いくつかの方法で{pageTitle} への認証をサポートしています。以下から認証方法を選択し、認証の詳細を含む該当セクションに進みます。
* [**Basic**](#basic)
* [**OAuth**](#oauth)
* [**OAuth Password**](#oauth-password)
* [**OAuth JWT**](#oauth-jwt)
* [**OneLogin**](#onelogin)
* [**PingFederate**](#pingfederate)
* [**OKTA**](#okta)
* [**ADFS**](#adfs)
* [**Azure Active Directory**](#azure-active-directory)
### Basic
ユーザー資格情報およびセキュリティトークンで接続するには、次を指定します:
* **Auth Scheme:** **Basic** を選択。
* **User:** {datasource} アカウントへの認証に使用するユーザー名を入力。
* **Password:** {datasource} アカウントへの認証に使用するパスワードを入力。
* **Security Token:** {datasource} アカウントのセキュリティトークンを入力。セキュリティトークンがわからない場合は、次の手順でリセットできます:
1. [https://www.salesforce.com/](https://www.salesforce.com/) Web サイトで個人情報ページを開きます。
2. セキュリティトークンをリセットするためのリンクをクリックします。トークンがE メールで送信されます。
### OAuth
### OAuth Password
OAuth 資格情報で接続するには、次を指定します:
* **Auth Scheme:** **OAuthPassword** を選択。
* **User:** {datasource} アカウントへの認証に使用するユーザー名を入力。
* **Password:** {datasource} アカウントへの認証に使用するパスワードを入力。
* **Security Token:** {datasource} アカウントのセキュリティトークンを入力。セキュリティトークンがわからない場合は、次の手順でリセットできます:
1. [https://www.salesforce.com/](https://www.salesforce.com/) Web サイトで個人情報ページを開きます。
2. セキュリティトークンをリセットするためのリンクをクリックします。トークンがE メールで送信されます。
### OAuth JWT
JWT で接続するには、次を指定します:
* **Auth Scheme:** **OAuthJWT** を選択。
* **OAuth JWT Cert:** Java web token(JWT)証明書ストアを入力。
* **OAuth JWT Cert Type:** JWT 証明書を格納するキーストアの種類を入力。デフォルトの種類は**PEMKEY\_BLOB** です。
* **OAuth JWT Issuer:** Java web token の発行者を入力。通常、発行者はOAuth アプリケーションのクライアントId またはE メールアドレスです。
* **OAuth JWT Cert Password:** OAuth JWT 証明書のパスワードを入力。
* **OAuth JWT Cert Subject:** OAuth JWT 証明書のサブジェクトを入力。
* **OAuth JWT Subject:** アプリケーションが委任されたアクセスを要求するユーザーサブジェクトを入力。
### OneLogin
OneLogin を介したシングルサインオン(SSO)で接続するには、次を指定します:
* **Auth Scheme:** **OneLogin** を選択。
* **User:** PingFederate アカウントのユーザー名を入力。
* **Password:** PingFederate アカウントのパスワードを入力。
* **SSO Login URL:** シングルサインオン(SSO)プロバイダーのログインURL を入力。
* **SSO Properties:** 使用するSSO プロパティを入力(例えば、*SSOProperty1*=*Value1*;*SSOProperty2*=*Value2*;...)。
* **SSO Exchange URL:** ID プロバイダーの{datasource} OAuth 2.0 トークンエンドポイントを入力(例えば、https\://*MyOrganization*.*My.{datasource}Acct*.com/services/oauth2/*token*)。
### PingFederate
PingFederate を介したシングルサインオン(SSO)で接続するには、次を指定します:
* **Auth Scheme:** **PingFederate** を選択。
* **User:** OneLogin アカウントのユーザー名を入力。
* **Password:** OneLogin アカウントのパスワードを入力。
* **SSO Properties:** 使用するシングルサインオン(SSO)プロパティを入力(例えば、*SSOProperty1*=*Value1*;*SSOProperty2*=*Value2*;...)。
* **SSO Exchange URL:** ID プロバイダーの{datasource} OAuth 2.0 トークンエンドポイントを入力(例えば、https\://*MyOrganization*.*My.{datasource}Acct*.com/services/oauth2/*token*)。
### OKTA
Okta を介したシングルサインオン(SSO)で接続するには、次のプロパティを指定します:
* **Auth Scheme:** **OKTA** を選択。
* **User:** OKTA アカウントのユーザー名を入力。
* **Password:** OKTA アカウントのパスワードを入力。
* **SSO Login URL:** シングルサインオン(SSO)プロバイダーのログインURL を入力。
* **SSO Properties:** 使用するシングルサインオン(SSO)プロパティを入力(例えば、*SSOProperty1*=*Value1*;*SSOProperty2*=*Value2*;...)。
* **SSO Exchange URL:** ID プロバイダーの{datasource} OAuth 2.0 トークンエンドポイントを入力(例えば、https\://*MyOrganization*.*My.{datasource}Acct*.com/services/oauth2/*token*)。
### ADFS
ADFS を介したシングルサインオン(SSO)で接続するには、次のプロパティを指定します:
* **Auth Scheme:** **ADFS** を選択。
* **User:** ADFS アカウントのユーザー名を入力。
* **Password:** ADFS アカウントのパスワードを入力。
* **SSO Login URL:** シングルサインオン(SSO)プロバイダーのログインURL を入力。
* **SSO Properties:** 使用するシングルサインオン(SSO)プロパティを入力(例えば、*SSOProperty1*=*Value1*;*SSOProperty2*=*Value2*;...)。
* **SSO Exchange URL:** ID プロバイダーの{datasource} OAuth 2.0 トークンエンドポイントを入力(例えば、https\://*MyOrganization*.*My.{datasource}Acct*.com/services/oauth2/*token*)。
### Azure Active Directory
Azure Active Directory を介したシングルサインオンで接続するには、次を指定します:
* **Auth Scheme:** **AzureAD** を選択。
* **SSO Properties:** 使用するシングルサインオン(SSO)プロパティを入力(例えば、*SSOProperty1*=*Value1*;*SSOProperty2*=*Value2*;...)。
* **SSO Exchange URL:** ID プロバイダーの{datasource} OAuth 2.0 トークンエンドポイントを入力(例えば、https\://*MyOrganization*.*My.{datasource}Acct*.com/services/oauth2/*token*)。
* **OAuth Client Id:** OAuth 認証サーバーにアプリケーションを登録した際に割り当てられたクライアントId を入力。
* **OAuth Client Secret:** OAuth 認証サーバーにアプリケーションを登録した際に割り当てられたクライアントシークレットを入力。
## Replicating {datasource} Formula Fields
The {siteNameShort} application provides a dedicated **{datasource}\_Formulas** schema to help you manage the replication of formula fields separately from standard fields. This schema ensures that formula fields are always refreshed with the latest calculations.
{datasource} formula fields differ from standard fields in their replication behavior. Specifically, when the definition of a formula changes, {datasource} does not update the record's `SystemModStamp` column. This behavior can cause issues with data synchronization that relies solely on incremental replication.
{siteNameShort} addresses this issue by providing two schemas (**{datasource}** and **{datasource}\_Formulas**) that allow you to apply different replication strategies to standard and formula fields.
### Configure Tasks with the {datasource}\_Formulas Schema
When you add or edit a task in a {datasource} job, {siteNameShort} displays the two schema options, **{datasource}** and **{datasource}\_Formulas**, in the **Add Tasks** dialog box.
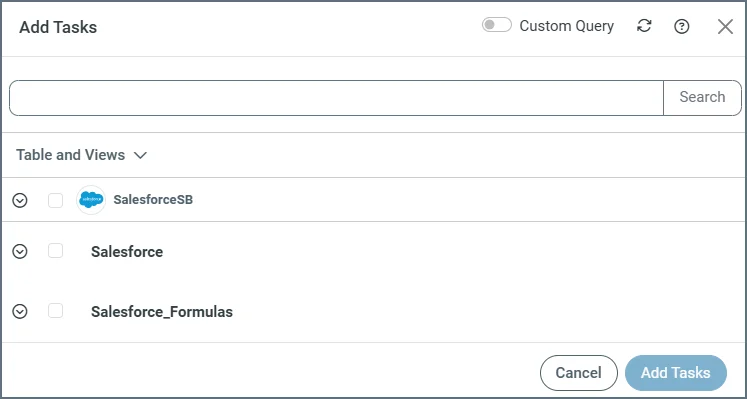 When you select the **{datasource}\_Formulas** schema, only the **Id** and formula fields are available. This is in contrast to the **{datasource}** schema, where all standard fields (and formula fields, depending on the connection setting) are available.
Use the **{datasource}\_Formulas** schema when you want {siteNameShort} to perform the following tasks:
* Truncate and reload formula fields on each run.
* Automatically add new formula fields as they are created in {datasource} **when** you enable the **Alter Schema** property (available when you add or edit tasks from a job's **Task** tab).
### Configure Tasks with the {datasource} Schema
Use the {datasource} schema when you want {siteNameShort} to replicate non-formula fields incrementally. When you use this schema, you can also control whether formula fields are included by using the **Skip Formula Fields** property. This property is available on the on the **Advanced** tab of the {datasource} connection page, under the **Miscellaneous** category.
* If you set **Skip Formula Fields** to **True**, formula fields are excluded from the {datasource} schema.
* If you set **Skip Formula Fields** to **False**, formula fields are included in the {datasource} schema.
Changing the **Skip Formula Fields** property affects only the {datasource} schema. It does not change what the **{datasource}\_Formulas** schema returns.
## 接続を完了する
接続を完了するには:
1. 次のプロパティを指定します:
* (オプション)**API Version:** API バージョンを入力。デフォルトバージョンは**56.0**です。
* (オプション)**Login URL:** {pageTitle} のログインURL を入力。
* **Use Sandbox:** サンドボックスを有効にするかどうかを選択。デフォルトでは、**Enable** チェックボックスはオフです。
2. **Advanced** タブで詳細な接続設定を定義します。(ただし、ほとんどの場合、これらの設定は必要ありません。)
3. {oauthschemes ? `${oauthschemes} で認証する場合は、` : ""}**{datasource} への接続**をクリックして{pageTitle} アカウントに接続します。
4. **作成およびテスト**をクリックして接続を作成します。
## 詳細について
When you select the **{datasource}\_Formulas** schema, only the **Id** and formula fields are available. This is in contrast to the **{datasource}** schema, where all standard fields (and formula fields, depending on the connection setting) are available.
Use the **{datasource}\_Formulas** schema when you want {siteNameShort} to perform the following tasks:
* Truncate and reload formula fields on each run.
* Automatically add new formula fields as they are created in {datasource} **when** you enable the **Alter Schema** property (available when you add or edit tasks from a job's **Task** tab).
### Configure Tasks with the {datasource} Schema
Use the {datasource} schema when you want {siteNameShort} to replicate non-formula fields incrementally. When you use this schema, you can also control whether formula fields are included by using the **Skip Formula Fields** property. This property is available on the on the **Advanced** tab of the {datasource} connection page, under the **Miscellaneous** category.
* If you set **Skip Formula Fields** to **True**, formula fields are excluded from the {datasource} schema.
* If you set **Skip Formula Fields** to **False**, formula fields are included in the {datasource} schema.
Changing the **Skip Formula Fields** property affects only the {datasource} schema. It does not change what the **{datasource}\_Formulas** schema returns.
## 接続を完了する
接続を完了するには:
1. 次のプロパティを指定します:
* (オプション)**API Version:** API バージョンを入力。デフォルトバージョンは**56.0**です。
* (オプション)**Login URL:** {pageTitle} のログインURL を入力。
* **Use Sandbox:** サンドボックスを有効にするかどうかを選択。デフォルトでは、**Enable** チェックボックスはオフです。
2. **Advanced** タブで詳細な接続設定を定義します。(ただし、ほとんどの場合、これらの設定は必要ありません。)
3. {oauthschemes ? `${oauthschemes} で認証する場合は、` : ""}**{datasource} への接続**をクリックして{pageTitle} アカウントに接続します。
4. **作成およびテスト**をクリックして接続を作成します。
## 詳細について