> ## Documentation Index
> Fetch the complete documentation index at: https://docs.sync.cdata.com/llms.txt
> Use this file to discover all available pages before exploring further.
# DB2 for i (Native)
export const CommonDatasourceAddConnector = ({datasource = "the data source", title = "the connector", destination = false, siteNameShort = "Sync"}) => {
return <>
{siteNameShort} で{datasource} のデータを使用できるようにするには、まず以下の手順でコネクタを追加する必要があります:
- {siteNameShort} のダッシュボードから接続ページを開きます。
- 接続を追加をクリックしてコネクタを選択ページを開きます。
-
{destination ? "同期先" : "データソース"}タブをクリックして
{title} 行に移動します。
-
行末にある接続を設定アイコンをクリックして、新しい接続ページを開きます。この操作により、{' '}
接続を追加ダイアログボックスが開きます。
Note: 接続を設定アイコンが表示されない場合は、コネクタをダウンロードアイコンをクリックして {title} コネクタをインストールしてください。
- 接続を追加ダイアログボックスに接続名を入力します。
- 追加をクリックして、コネクタの設定タブを開きます。
新しいコネクタのインストールについての詳細は、{' '}
接続を参照してください。
;
};
export const CommonDatasourceIntroSource = ({datasource = "the data source", siteName = "CData Sync"}) => {
return
{siteName} アプリケーションから{datasource} コネクタを使用して、{datasource} からデータを取得してサポートされている任意の同期先に移動できます。これを行うには、コネクタを追加し、コネクタへの認証を行い、接続を完了する必要があります。
;
};
export const driverVersion = "M";
export const siteNameShort = "Sync";
export const siteName = "CData Sync";
export const datasource = "DB2 for i";
export const pageTitle = "DB2 for i (Native)";
## Prerequisites
Before you add and set up the {datasource} source connector, you need to set up the {datasource} database for change data capture (CDC), as explained in the following sections.
**Limitations:**
The following capabilities are not supported in {siteNameShort}:
* remote journals or failover functionality
* large objects such as CLOB, XML, TEXT, BLOB
## Set Up {datasource} for CDC
*Journaling* records database changes in journal receivers, which the change data capture (CDC) process uses to capture and replicate those changes to other systems in real-time or near real-time synchronization.
A *journal* is a database object that serves as a tracking mechanism, capturing metadata about changes made to specific database objects. Each journal is linked to one or more journal receivers, which physically store the detailed change records, including before-and-after images of the data as well as metadata and transaction details.
Because CDC depends on journaling to supply detailed change records, creating a journal and journal receiver and setting user permissions are the first steps in enabling CDC for {datasource}, as explained in the next sections.
### Create the Journal Receiver and Journal and Enable Journaling on Tables
Run the following command-line (CL) commands to create the journal receiver, journal, and enable journaling on tables:
```sql theme={null}
-- 1. Create a journal receiver.
CRTJRNRCV /
-- 2. Create a journal.
CRTJRN / /
-- 3. Enable journaling on a file (table) by using the STRJRNPF command. As a best practice, capture both before-and-after images of the records to support features like auditing and recovery.
STRJRNPF / / IMAGES(*BOTH)
-- If you already started journaling and need to change the image settings, submit the CHGJRNOBJ command.
CHGJRNOBJ OBJ((/ *FILE)) ATR(*IMAGES) IMAGES(*BOTH)
-- To stop journaling for a specific physical file (table), use the ENDJRNPF command.
ENDJRNPF FILE(/) JRN(/)
```
To verify that journaling is enabled for a table, or for details about the journals and their journal receivers, execute the following queries:
```sql theme={null}
SELECT * FROM QSYS2.JOURNAL_RECEIVER_INFO WHERE JOURNAL_RECEIVER_LIBRARY = ;
SELECT * FROM QSYS2.JOURNAL_INFO WHERE JOURNAL_LIBRARY = '';
SELECT * FROM QSYS2.JOURNALED_OBJECTS WHERE JOURNAL_LIBRARY = '';
```
The following example creates the RCV01 journal receiver and the JRN1 journal. Then, it adds the PRODUCTS table for journaling by using QSYS2.QCMDEXC to call any CL command through the JDBC tool. All of the objects are created in the TEST2 schema/library.
```sql theme={null}
-- 1.Create a NEW journal receiver.
CALL QSYS2.QCMDEXC('CRTJRNRCV TEST2/RCV01');
-- 2. Create a journal.
CALL QSYS2.QCMDEXC('CRTJRN TEST2/JRN1 TEST2/RCV01');
-- 3. Start journaling tables/files.
CALL QSYS2.QCMDEXC('STRJRNPF FILE(TEST2/PRODUCTS) JRN(TEST2/JRN1) IMAGES(*BOTH)');
-- 4. Stop journaling tables/files.
CALL QSYS2.QCMDEXC('ENDJRNPF FILE(TEST2/PRODUCTS) JRN(TEST2/JRN1)');
VALUES CURRENT_SCHEMA; -- TEST2
SELECT * FROM QSYS2.JOURNAL_RECEIVER_INFO WHERE JOURNAL_RECEIVER_LIBRARY = CURRENT_SCHEMA;
SELECT * FROM QSYS2.JOURNAL_INFO WHERE JOURNAL_LIBRARY = CURRENT_SCHEMA;
SELECT * FROM QSYS2.JOURNALED_OBJECTS WHERE JOURNAL_LIBRARY = CURRENT_SCHEMA;
```
When you [create a CDC job](#create-a-change-data-capture-cdc-job-with-journal-and-schema-selections) in {siteNameShort}, you select the journal and schema to determine which tables are available for capture.
### Set Required User Permissions
To verify all permissions for the user to which you are connected, submit the following query:
```sql theme={null}
SELECT * FROM QSYS2.OBJECT_PRIVILEGES WHERE AUTHORIZATION_NAME = ''
```
If the user lacks privileges to the journal, journal receiver, or the schema (library) from which you want to capture changes, run the following CL commands:
```sql theme={null}
GRTOBJAUT OBJ() OBJTYPE(*LIB) USER() AUT(*EXECUTE)
GRTOBJAUT OBJ(/*ALL) OBJTYPE(*JRNRCV) USER() AUT(*USE)
GRTOBJAUT OBJ(/) OBJTYPE(*JRN) USER() AUT(*USE *OBJEXIST)
GRTOBJAUT OBJ() OBJTYPE(*LIB) USER() AUT(*EXECUTE)
GRTOBJAUT OBJ(/*ALL) OBJTYPE(*FILE) USER() AUT(*USE)
```
To execute the commands through a Java Database Connectivity (JDBC) tool, use this command:
CALL QSYS2.QCMDEXC('CL COMMAND');
## DB2 for i コネクタを追加
## DB2 for i への認証
After you add the connector, you need to set the required properties.
* **Server:** Enter the address or host name of the {datasource} server. The default server is **localhost**.
* **Database:** Enter the name of your {datasource} database.
* **Port:** Enter the port number for your server. The default port is **446**.
* **User:** Enter the username that you use to authenticate to the {datasource} database.
* **Password:** Enter the password that you use to authenticate to the {datasource} database.
## 接続を完了する
To complete your connection:
1. Define advanced connection settings on the **Advanced** tab. (In most cases, though, you should not need these settings.)
2. Click **Create & Test** to create your connection.
## Create a Change Data Capture (CDC) Job with Journal and Schema Selections
This section explains how to create a change data capture (CDC) job for {datasource} and how to configure row identification for tables without primary keys.
### Create the CDC Job
Follow these steps to create a CDC job for {datasource}:
1. Enter a name for your job.
2. Select your {datasource} source.
3. Select your destination.
4. Specify values for the following fields:
* **Journal Library**
* **Journal Name**
* **Source Schema**
You can select the values for each of these properties from their drop-down lists. {siteNameShort} validates these values against the {datasource} system to ensure that the journal exists and is properly configured.
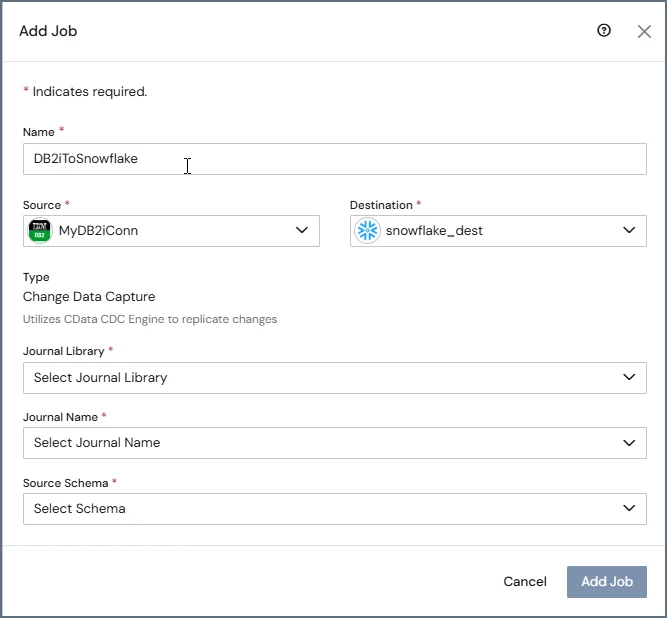 5. Click **Add Job**.
After the job is created, the journal settings are displayed in the CDC engine settings and cannot be modified.
6. Continue to the job's **Task** tab for table selection. Only tables that meet the following criteria are displayed:
* The table is journaled.
* The table is associated with the selected journal.
* The table belongs to the selected schema.
If you change the journal or schema, previously selected incompatible tables are automatically deselected.
When you create DB2 for i CDC jobs through the API, you must provide the journal library and journal name.
### Configure Row Identification for Tables without Primary Keys
When you configure a change data capture (CDC) job for {datasource}, you can use the relative record number (RRN) as the value for the `_cdatasync_id` column. This approach provides a stable identifier for tables that do not have a primary key.
By default, {siteNameShort} uses the RRN as the identifier for {datasource} records (the default value is `Db2Rrn`). To override this and use an MD5-based row hash instead, set the following [`SyncIdSourceColumn` job option](../../jobs/advanced-job-options#additional-options) in the **Additional Options** field on the job's **Advanced** tab:
```
SyncIdSourceColumn=RowHash
```
When you use the RRN-based identifier:
* The `_cdatasync_id` column is represented as a BigInt data type.
* The identifier is derived directly from the physical row location in the source table.
* The `_cdatasync_id` column can be used as a partition key for destinations that support partitioning.
Reorganizing the source table resets the RRN values for all rows. This change invalidates previously generated `_cdatasync_id` values because they no longer correspond to the same physical rows. To correct this issue, you must perform a full re-sync of the affected tables. For details, see [Re-Syncing Job Task Execution](../../getting-started/administration/jobs-page#re-syncing-job-task-execution).
5. Click **Add Job**.
After the job is created, the journal settings are displayed in the CDC engine settings and cannot be modified.
6. Continue to the job's **Task** tab for table selection. Only tables that meet the following criteria are displayed:
* The table is journaled.
* The table is associated with the selected journal.
* The table belongs to the selected schema.
If you change the journal or schema, previously selected incompatible tables are automatically deselected.
When you create DB2 for i CDC jobs through the API, you must provide the journal library and journal name.
### Configure Row Identification for Tables without Primary Keys
When you configure a change data capture (CDC) job for {datasource}, you can use the relative record number (RRN) as the value for the `_cdatasync_id` column. This approach provides a stable identifier for tables that do not have a primary key.
By default, {siteNameShort} uses the RRN as the identifier for {datasource} records (the default value is `Db2Rrn`). To override this and use an MD5-based row hash instead, set the following [`SyncIdSourceColumn` job option](../../jobs/advanced-job-options#additional-options) in the **Additional Options** field on the job's **Advanced** tab:
```
SyncIdSourceColumn=RowHash
```
When you use the RRN-based identifier:
* The `_cdatasync_id` column is represented as a BigInt data type.
* The identifier is derived directly from the physical row location in the source table.
* The `_cdatasync_id` column can be used as a partition key for destinations that support partitioning.
Reorganizing the source table resets the RRN values for all rows. This change invalidates previously generated `_cdatasync_id` values because they no longer correspond to the same physical rows. To correct this issue, you must perform a full re-sync of the affected tables. For details, see [Re-Syncing Job Task Execution](../../getting-started/administration/jobs-page#re-syncing-job-task-execution).