> ## Documentation Index
> Fetch the complete documentation index at: https://docs.sync.cdata.com/llms.txt
> Use this file to discover all available pages before exploring further.
# Apache Kafka
export const CommonDatasourceMoreInformation = ({datasource = "the data source", advancedurl = "", siteName = "CData Sync", driverVersion = ""}) => {
return <>
{siteName} と{datasource} の連携について、詳しくは{' '}
{datasource} Connector for {siteName}
を参照してください。
;
};
export const CommonDatasourceCompleteConnectionOauth = ({datasource = "the data source", title = "the connector", oauthschemes = "", start = 2}) => {
return
- Advanced タブで詳細な接続設定を定義します。(ただし、ほとんどの場合、これらの設定は不要です。)
- {oauthschemes ? <>{oauthschemes} で認証する場合は、 : <>}{datasource} への接続をクリックして {title} アカウントに接続します。
- 作成およびテストをクリックして接続を作成します。
;
};
export const CommonAuthSchemeAwsWorkloadIdentity = () => {
return <>
To connect with AWS Workload Identity federation credentials, specify the following properties:
;
};
export const CommonAuthSchemeGcpinstanceaccount = ({siteName = "CData Sync", siteNameShort = "Sync", datasource = "the data source"}) => {
return <>
GCP 仮想マシンで{siteName} を実行すると、{siteNameShort} は仮想マシンに紐づけられたサービスアカウントを使用して認証できます。そのアカウントを使用するには、Auth Scheme でGCPInstanceAccount を選択します。追加のプロパティは必要ありません。
;
};
export const CommonAuthSchemeAzureserviceprincipalcert = () => {
return <>
Azure サービスプリンシパルとクライアント証明書で接続するには、次のプロパティを設定します:
- Auth Scheme:AzureServicePrincipalCert を選択。
- Azure Tenant:接続するMicrosoft Online テナントを入力。
- OAuth Client Id:OAuth 認証サーバーにアプリケーションを登録した際に割り当てられたクライアントId を入力。
- OAuth JWT Cert:Java web token(JWT)証明書ストアを入力。
- OAuth JWT Cert Type:JWT 証明書を格納するキーストアの種類を入力。デフォルトの種類はPEMKEY_BLOB です。
- (オプション)OAuth JWT Cert Password:OAuth JWT 証明書のパスワードを入力。
- (オプション)OAuth JWT Cert Subject:OAuth JWT 証明書のサブジェクトを入力。
アプリケーションのOAuth 証明書を取得するには:
- Azure ポータルにログインします。
- 左ナビゲーションペインですべてのサービスを選択します。次にアプリの登録を検索し選択します。
- 新規登録をクリックします。
- アプリケーションの名前を入力して任意のAzure AD ディレクトリ - マルチテナントを選択します。
- アプリケーションを作成したら、概要セクションに表示されるアプリケーション (クライアント) ID の値をコピーします。この値をOAuth クライアントId として使用します。
- 証明書とシークレットセクションに移動して、証明書のアップロードを選択します。次に、ローカルマシンからアップロードする証明書を選択します。
- 有効期間を指定してクライアントシークレットを保存します。保存するとキーの値が表示されます。
- 値は一度しか表示されないので、コピーしておきます。この値をOAuth クライアントシークレットとして使用します。
- 認証タブで、必ずアクセストークン (暗黙的なフローに使用) を選択します。
;
};
export const CommonAuthSchemeAzureserviceprincipal = () => {
return <>
Azure サービスプリンシパルとクライアントシークレットで接続するには、次のプロパティを設定します:
- Auth Scheme:AzureServicePrincipal を選択。
- Azure Tenant:接続するMicrosoft Online テナントを入力。
- OAuth Client Id:OAuth 認証サーバーにアプリケーションを登録した際に割り当てられたクライアントId を入力。
- OAuth Client Secret:OAuth 認証サーバーにアプリケーションを登録した際に割り当てられたクライアントシークレットを入力。
アプリケーションのOAuth クライアントId およびクライアントシークレットを取得するには:
- Azure ポータルにログインします。
- 左ナビゲーションペインですべてのサービスを選択します。次にアプリの登録を検索し選択します。
- 新規登録をクリックします。
- アプリケーションの名前を入力して任意のAzure AD ディレクトリ - マルチテナントを選択します。
- アプリケーションを作成したら、概要セクションに表示されるアプリケーション (クライアント) ID の値をコピーします。この値をOAuth クライアントId として使用します。
- 証明書とシークレットセクションに移動して、アプリケーションの新しいクライアント シークレットを選択します。
- 有効期間を指定してクライアントシークレットを保存します。保存するとキーの値が表示されます。
- 値は一度しか表示されないので、コピーしておきます。この値をOAuth クライアントシークレットとして使用します。
- 認証タブで、必ずアクセストークン (暗黙的なフローに使用) を選択します。
;
};
export const CommonAuthSchemeAzuremsi = ({siteName = "CData Sync"}) => {
return <>
Azure 仮想マシン上で{siteName} が実行されている場合にAzure マネージドサービスID(MSI)を利用するには、Auth Scheme でAzure MSI を選択します。追加のプロパティは必要ありません。
;
};
export const CommonAuthSchemePlain = ({siteName = "CData Sync", siteNameShort = "Sync", datasource = "the data source"}) => {
return <>
プレーンテキストログインで接続するには、以下のプロパティを指定します:
- Auth Scheme:Plain を選択。
- User:{datasource} アカウントへの認証に使用するユーザー名を入力。
- Password:{datasource} アカウントへの認証に使用するパスワードを入力。
;
};
export const CommonAuthSchemeNone = ({siteName = "CData Sync", siteNameShort = "Sync", datasource = "the data source"}) => {
return <>
認証なしで接続するには、Auth Scheme でNone を選択します。追加のプロパティは必要ありません。
;
};
export const CommonDatasourceAddConnector = ({datasource = "the data source", title = "the connector", destination = false, siteNameShort = "Sync"}) => {
return <>
{siteNameShort} で{datasource} のデータを使用できるようにするには、まず以下の手順でコネクタを追加する必要があります:
- {siteNameShort} のダッシュボードから接続ページを開きます。
- 接続を追加をクリックしてコネクタを選択ページを開きます。
-
{destination ? "同期先" : "データソース"}タブをクリックして
{title} 行に移動します。
-
行末にある接続を設定アイコンをクリックして、新しい接続ページを開きます。この操作により、{' '}
接続を追加ダイアログボックスが開きます。
Note: 接続を設定アイコンが表示されない場合は、コネクタをダウンロードアイコンをクリックして {title} コネクタをインストールしてください。
- 接続を追加ダイアログボックスに接続名を入力します。
- 追加をクリックして、コネクタの設定タブを開きます。
新しいコネクタのインストールについての詳細は、{' '}
接続を参照してください。
;
};
export const CommonDatasourceIntroDestination = ({datasource = "the data source", siteName = "CData Sync"}) => {
return
{siteName} アプリケーションから{datasource} コネクタを使用して、サポートされている任意のデータソースから同期先の{datasource} へデータを移動できます。これを行うには、コネクタを追加し、コネクタへの認証を行い、接続を完了する必要があります。
;
};
export const driverVersion = "M";
export const siteNameShort = "Sync";
export const siteName = "CData Sync";
export const datasource = "Apache Kafka";
export const pageTitle = "Apache Kafka";
export const advancedurl = "SK";
export const oauthschemes = "AzureAD";
**Note:** With this connector, you can authenticate either to {datasource} or to Azure Event Hubs.
## Apache Kafka コネクタを追加
## Apache Kafka への認証
After you add the connector, you need to set the required properties.
**Bootstrap Servers:** Enter the address of the {datasource} Bootstrap servers to which you want to connect.
{siteName} supports authenticating to {datasource} in several ways. Select your authentication method below to proceed to the relevant section that contains the authentication details.
* [**None**](#none) (default)
* [**Plain**](#plain)
* [**SCRAM**](#scram)
* [**SCRAM-SHA-512**](#scram-sha-512)
* [**Kerberos**](#kerberos)
### None
### Plain
### SCRAM
To connect with SCRAM (SHA-256) credentials, specify these properties:
* **Auth Scheme:** Select **SCRAM**.
* **User:** Enter the username that you use to authenticate to your {datasource} account.
* **Password:** Enter the password that you use to authenticate to your {datasource} account.
### SCRAM-SHA-512
To connect with the SCRAM (SHA-512) credentials, specify these properties:
* **Auth Scheme:** Select SCRAM-SHA-512.
* **User:** Enter the username that you use to authenticate to your {datasource} account.
* **Password:** Enter the password that you use to authenticate to your {datasource} account.
### Kerberos
To connect with Kerberos, specify these properties:
* **Auth Scheme:** Select **Kerberos**.
* **Kerberos SPN:** Enter the service principal name (SPN) for the Kerberos domain controller.
* **Kerberos Service Name:** Enter the name of the Kerberos service with which you want to authenticate.
* (Optional) **Kerberos Keytab File:** Enter the keytab file that contains your pairs of the Kerberos principals and encrypted keys.
* (Optional) **Use Kerberos Ticket Cache:** Select **True** to use a ticket cache with the logged-in user instead of a keytab file. The default value is **False**.
## Azure Event Hubs への認証
After you add the connector, you need to set the following required properties to connect to Azure Event Hubs:
For **Bootstrap Servers,** enter the address of the {datasource} bootstrap servers to which you want to connect.
{siteName} supports authenticating to Apache Event Hubs in several ways. Select your authentication method below to proceed to the relevant section that contains the authentication details.
* [**SSL Certificate**](#ssl-certificate)
* [**Azure Active Directory**](#azure-active-directory)
* [**Azure Managed Service Identity**](#azure-managed-service-identity)
* [**Azure Service Principal**](#azure-service-principal)
* [**Azure Service Principal Certificate**](#azure-service-principal-certificate)
### SSL Certificate
To connect with a Secure Sockets Layer (SSL) client certificate, specify these properties:
* **Auth Scheme:** Select **SSLCertificate**.
* **SSL Client Cert:** Enter the SSL client certificate that is used to validate to the {datasource} broker.
* **SSL Client Cert Type:** Select the format of the SSL client certificate that is used to connect to the {datasource} broker:
* **JKSFILE**
* **PFXFILE**
* **PEMKEY\_FILE** (default)
* **PEMKEY\_BLOB**
* (Optional) **SSL Client Cert Password:** Enter the password that is used to decrypt the SSL client certificate.
### Azure Active Directory
To connect with Azure Active Directory (AD) credentials, specify the following properties:
* **Azure Tenant:** Enter the Microsoft Online tenant that is used to access data. If you do not specify a tenant, {siteNameShort} uses the default tenant.
* **OAuth Client Id:** Enter the client Id that you were assigned when you registered your application with an OAuth authorization server.
* **OAuth Client Secret:** Enter the client secret that you were assigned when you registered your application with an OAuth authorization server.
### Azure Managed Service Identity
### Azure Service Principal
### Azure Service Principal Certificate
## GCP Kafka への認証
After you add the connector, you need to set the following required properties to connect to GCP Kafka:
For **Bootstrap Servers,** enter the address of the {datasource} bootstrap servers to which you want to connect.
{siteName} supports authenticating to GCP Kafka in several ways. Select your authentication method below to proceed to the relevant section that contains the authentication details.
* [**OAuth JWT**](#oauth-jwt)
* [**GCP Instance Account**](#gcp-instance-account)
* [**AWS Workload Identity**](#aws-workload-identity)
### OAuth JWT
To connect with a {datasource} account using OAuth JWT, specify the following properties:
* **Auth Scheme:** Select OAuthJWT.
* **OAuth Client Id:** Enter the client Id that you were assigned when you registered your application with an OAuth authorization server.
* **OAuth Client Secret:** Enter the client secret that you were assigned when you registered your application with an OAuth authorization server.
* **OAuth JWT Cert:** Enter your JSON web tokens (JWT) certificate store.
* **OAuth JWT Cert Type:** Enter the type of key store that contains your JWT certificate. The default type is PEMKEY\_BLOB.
* **OAuth JWT Cert Password:** Enter the password for the OAuth JWT certificate that is used to access a password-protected certificate store. If the certificate store does not require a password, leave this property blank.
* (Optional) **OAuth JWT Cert Subject:** Enter the subject of your OAuth JWT certificate.
### GCP Instance Account
### AWS Workload Identity
## Extracting Metadata from Topics
{siteNameShort} models {datasource} topics as tables and messages as rows.
The **Type Detection Scheme** property controls how {siteNameShort} reads schema information from each topic. Details about **Type Detection Scheme** are provided in [Complete Your Connection](#complete-your-connection).
### Schema Registry
The schema registry contains a list of topics that have registered schemas. The list of tables and columns are simply read directly from the schema registry.
To connect to a service with a schema registry, specify the following properties:
* **Bootstrap Servers:** Enter the server (host name or IP address) and port (in the format *Server:Port*) of the {datasource} bootstrap servers.
* **Type Detection Scheme:** Select the detection scheme that you want to use. For complete details about using this scheme, see [Complete Your Connection](#complete-your-connection).
* (Optional) **Schema Merge Mode:** Select the mode by which you want to merge multiple schemas.
* **None** (default)
* **Simple**
#### Confluent Schema Registry
When you connect to Confluent Cloud, the registry URL corresponds to the Schema Registry endpoint value that is located in **Schemas > Schema Registry > Instructions**.
The Confluent schema registry supports several authentication options. Typically, Confluent Cloud deployments require that you set the **Registry Auth Scheme** property to **Basic**, along with a registry user and registry password. To find your user and password, navigate to **Schemas > Schema Registry > API Access** and locate the access-key and secret-key values.
On-premises deployments might not require authentication. In these configurations, you should set **Registry Auth Scheme** to **None**. These deployments might require SSL client certificates also. For that, you need to set the **SSL Certificate** registry auth scheme as well as the **Registry Client Cert** and **Registry Client Cert Type** options.
#### Amazon Web Services (AWS) Glue Schema Registry
When you connect to AWS Glue, the registry URL corresponds to the Amazon Resources Name (ARN) value of the registry.
The AWS Glue schema registry only supports the **Basic** registry auth scheme. You should set **Registry User** and **Registry Password**, respectively, to the access key and secret key of a user that has access to the registry.
## Topic Routing
You can control how source tables map to {datasource} topics when you create a job that uses the {datasource} destination. To do so, select one of the following options in the **Add Job** dialog when you create a job:
* **One topic per source table:** Each source table is written to its own topic. {siteNameShort} automatically names the topic using the format *SchemaName*\_*TableName*. If the source does not have a schema, the topic name is simply the table name.
* **All data to a single named topic:** All source data for a table is written to one topic. When you select this option, a **Topic** field is displayed, as shown below. You can either enter a topic name in the field or search and select a topic, if a topic list is available.
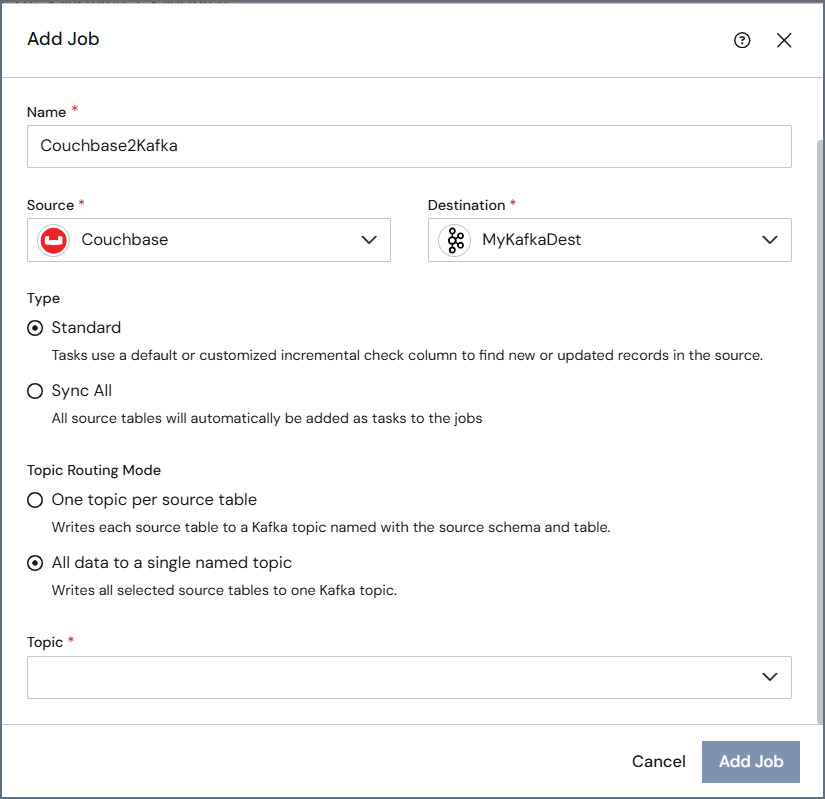 If a target topic does not exist when the job runs, {siteNameShort} either creates it automatically or returns an error, depending on your broker configuration.
## Message Partitioning
In {siteNameShort}, new {datasource} destination jobs automatically partition messages by the source table's primary key. This behavior controls how messages are distributed across partitions in the target topic.
* **Single primary key:** {siteNameShort} uses the primary key value as the {datasource} message key. All messages with the same key value are written to the same partition, so downstream consumers see changes for a given key in the order they were written.
* **No primary key:** {siteNameShort} distributes messages across partitions in a round-robin pattern (each message goes to the next partition in sequence). No {datasource} message key is assigned.
- Automatic key-based partitioning does not support tables with composite (multiple-column) primary keys. To partition by a single key, update your query to include only one primary key column.
- Existing {datasource} destination jobs (prior to release 26.3) are not affected by this change.
## 接続を完了する
To complete your connection:
1. Specify the following properties:
* **Type Detection Scheme:** Select the detection scheme that you want to use.
* (Default) **RowScan**—Scans messages from the topic to infer column names and data types. No additional configuration is required.
* **SchemaRegistry**—Reads schema definitions from a Confluent-compatible schema registry. When you select this option, additional schema registry properties appear. For this scheme, specify the following properties:
* **Registry Url:** Enter the URL to the server for the schema registry. When you specify this property, {siteNameShort} reads the {datasource} schema from the server.
* **Registry Service:** Select the Schema Registry service that you want to use for working with topic schemas.
* **Confluent** (default)
* **AWSGlue**
* **Registry Auth Scheme:** Select the scheme that you want to use to authenticate to the schema registry.
* (Default) **None:** This scheme specifies that no authentication is used.
* **Basic:** For this scheme, specify the following properties:
* **Registry User:** Enter the username that you use to authenticate with the server that you specified earlier for **Registry Url**.
* **Registry Password:** Enter the password that you use to authenticate with the server that you specified earlier for **Registry Url**.
* **SSLCertificate:** This scheme specifies that SSL client-certificate authentication should be used. For this setting, you must specify the following:
* **Registry Client Cert:** Enter the TLS/SSL client certificate store for SSL client authentication (two-way SSL) with the schema registry.
* (Optional) **Registry Client Cert Password:** Enter the password for your TLS/SSL client certificate.
* (Optional) **Registry Client Cert Subject** Enter the subject of your TLS/SSL client certificate.
* **Use SSL:** Select whether you want to enable Secure Sockets Layer (SSL). By default, the **Enable** checkbox is not selected.
If a target topic does not exist when the job runs, {siteNameShort} either creates it automatically or returns an error, depending on your broker configuration.
## Message Partitioning
In {siteNameShort}, new {datasource} destination jobs automatically partition messages by the source table's primary key. This behavior controls how messages are distributed across partitions in the target topic.
* **Single primary key:** {siteNameShort} uses the primary key value as the {datasource} message key. All messages with the same key value are written to the same partition, so downstream consumers see changes for a given key in the order they were written.
* **No primary key:** {siteNameShort} distributes messages across partitions in a round-robin pattern (each message goes to the next partition in sequence). No {datasource} message key is assigned.
- Automatic key-based partitioning does not support tables with composite (multiple-column) primary keys. To partition by a single key, update your query to include only one primary key column.
- Existing {datasource} destination jobs (prior to release 26.3) are not affected by this change.
## 接続を完了する
To complete your connection:
1. Specify the following properties:
* **Type Detection Scheme:** Select the detection scheme that you want to use.
* (Default) **RowScan**—Scans messages from the topic to infer column names and data types. No additional configuration is required.
* **SchemaRegistry**—Reads schema definitions from a Confluent-compatible schema registry. When you select this option, additional schema registry properties appear. For this scheme, specify the following properties:
* **Registry Url:** Enter the URL to the server for the schema registry. When you specify this property, {siteNameShort} reads the {datasource} schema from the server.
* **Registry Service:** Select the Schema Registry service that you want to use for working with topic schemas.
* **Confluent** (default)
* **AWSGlue**
* **Registry Auth Scheme:** Select the scheme that you want to use to authenticate to the schema registry.
* (Default) **None:** This scheme specifies that no authentication is used.
* **Basic:** For this scheme, specify the following properties:
* **Registry User:** Enter the username that you use to authenticate with the server that you specified earlier for **Registry Url**.
* **Registry Password:** Enter the password that you use to authenticate with the server that you specified earlier for **Registry Url**.
* **SSLCertificate:** This scheme specifies that SSL client-certificate authentication should be used. For this setting, you must specify the following:
* **Registry Client Cert:** Enter the TLS/SSL client certificate store for SSL client authentication (two-way SSL) with the schema registry.
* (Optional) **Registry Client Cert Password:** Enter the password for your TLS/SSL client certificate.
* (Optional) **Registry Client Cert Subject** Enter the subject of your TLS/SSL client certificate.
* **Use SSL:** Select whether you want to enable Secure Sockets Layer (SSL). By default, the **Enable** checkbox is not selected.
## 詳細について