> ## Documentation Index
> Fetch the complete documentation index at: https://docs.sync.cdata.com/llms.txt
> Use this file to discover all available pages before exploring further.
# はじめてのレプリケーションジョブの設定
export const siteName = "CData Sync";
export const siteNameShort = "Sync";
サーバーを起動すると、最初のレプリケーションジョブを構成できます。*レプリケーションジョブ*は、データソース接続、同期先接続、タスクのリストで構成されます。次のセクションでは、接続の作成、ジョブの作成、タスクの追加、最初のレプリケーションジョブの設定、ジョブの実行について、順を追って説明します。
## 接続を作成
ログインしたら、使用するデータソースおよび同期先への接続を設定する必要があります。特定のデータソースまたは同期先への接続を確立する方法の詳細は、[接続](../connections/connections)を参照してください。
接続を作成するには、次の手順に従ってください。
1. ナビゲーションバーの**接続**をクリックして**接続**ページを開きます。
2. **接続を追加**ボタンをクリックします。このアクションにより、**コネクタを選択**ページが開きます。
3. 作成するコネクタの種類に応じて、**データソース**タブもしくは**同期先**タブのいずれかを選択します。
4. 追加したいコネクタに移動して、行の右端にある**コネクタをインストール**アイコン( )をクリックします。このアクションにより、**コネクタをインストール**ダイアログボックスが開き、コネクタを自動または手動(ローカルファイルシステムを使用)でインストールできます。
すでにインストールされているコネクタを再構成する必要がある場合は、行末にある**コネクタをアップデート**アイコン(
)をクリックします。このアクションにより、**コネクタをインストール**ダイアログボックスが開き、コネクタを自動または手動(ローカルファイルシステムを使用)でインストールできます。
すでにインストールされているコネクタを再構成する必要がある場合は、行末にある**コネクタをアップデート**アイコン( )をクリックします。
5. ダイアログボックスの**コネクタを自動インストール**を選択し、**インストール**をクリックします。
ローカルファイルシステムからコネクタを手動でインストールする必要がある場合(例えば、{siteNameShort} バンドルにまだ含まれていないコネクタの場合)は、[接続](../connections/connections)を参照してください。
6. コネクタ行の末尾にある**接続を設定**の矢印(→)をクリックして、**新しい接続**ページを開きます。
7. **新しい接続**ページの**設定**タブで、接続の設定を入力します。
1. 接続名を入力します。この名前は、ジョブの作成時にこの接続を参照するために使用されます。同じデータソースまたは同期先に複数の接続がある場合、この接続の目的を説明する名前を入力してください。
2. 認証の詳細および他の接続プロパティを入力します。
3. **高度な設定**タブで接続の高度な設定を定義します。(ただし、ほとんどの場合これらの設定は必要ありません。)
8. **作成およびテスト**をクリックして、接続の設定が正しいことを確認します。成功した場合、{siteNameShort} はその旨のメッセージを表示します。テスト接続に失敗した場合は、接続設定が正しかどうかを確認してください。確認後、接続を再テストします。
接続をテストすると、**作成およびテスト**ボタンは**オプション**メニューと**テスト**ボタンに置き換わります。**オプション**メニューには、以下のオプションが表示されます:
* **クローン:** 接続をクローンできます。
* **コネクタをアップデート:** 接続プロパティを更新できます。
* **移動:** 接続を新しいワークスペースに移動できます。
* **削除:** 接続を完全に削除します。
9. ページ右上にある**接続**リンクをクリックして(またはブラウザの戻る矢印を使用して)、**接続**ページに戻ります。
## 新しいジョブを追加
必要な[接続を作成](#接続を作成)後、以下の手順に従って最初の[ジョブ](../jobs/jobs)を追加します。
新しいジョブを追加するには:
1. ナビゲーションバーの**ジョブ**をクリックして、**ジョブ**ページを開きます。
2. **ジョブを追加**(右上隅)をクリックして、メニューから**新しいジョブを追加**を選択します。このアクションにより、ジョブ情報を入力できる**ジョブを追加**ダイアログボックスが開きます。
3. ジョブ名を入力し、データソース接続および同期先接続を選択します。
ジョブ名に不正な文字を含めることはできません。不正な文字を使用した場合、{siteNameShort} はエラーメッセージを生成します。
)をクリックします。
5. ダイアログボックスの**コネクタを自動インストール**を選択し、**インストール**をクリックします。
ローカルファイルシステムからコネクタを手動でインストールする必要がある場合(例えば、{siteNameShort} バンドルにまだ含まれていないコネクタの場合)は、[接続](../connections/connections)を参照してください。
6. コネクタ行の末尾にある**接続を設定**の矢印(→)をクリックして、**新しい接続**ページを開きます。
7. **新しい接続**ページの**設定**タブで、接続の設定を入力します。
1. 接続名を入力します。この名前は、ジョブの作成時にこの接続を参照するために使用されます。同じデータソースまたは同期先に複数の接続がある場合、この接続の目的を説明する名前を入力してください。
2. 認証の詳細および他の接続プロパティを入力します。
3. **高度な設定**タブで接続の高度な設定を定義します。(ただし、ほとんどの場合これらの設定は必要ありません。)
8. **作成およびテスト**をクリックして、接続の設定が正しいことを確認します。成功した場合、{siteNameShort} はその旨のメッセージを表示します。テスト接続に失敗した場合は、接続設定が正しかどうかを確認してください。確認後、接続を再テストします。
接続をテストすると、**作成およびテスト**ボタンは**オプション**メニューと**テスト**ボタンに置き換わります。**オプション**メニューには、以下のオプションが表示されます:
* **クローン:** 接続をクローンできます。
* **コネクタをアップデート:** 接続プロパティを更新できます。
* **移動:** 接続を新しいワークスペースに移動できます。
* **削除:** 接続を完全に削除します。
9. ページ右上にある**接続**リンクをクリックして(またはブラウザの戻る矢印を使用して)、**接続**ページに戻ります。
## 新しいジョブを追加
必要な[接続を作成](#接続を作成)後、以下の手順に従って最初の[ジョブ](../jobs/jobs)を追加します。
新しいジョブを追加するには:
1. ナビゲーションバーの**ジョブ**をクリックして、**ジョブ**ページを開きます。
2. **ジョブを追加**(右上隅)をクリックして、メニューから**新しいジョブを追加**を選択します。このアクションにより、ジョブ情報を入力できる**ジョブを追加**ダイアログボックスが開きます。
3. ジョブ名を入力し、データソース接続および同期先接続を選択します。
ジョブ名に不正な文字を含めることはできません。不正な文字を使用した場合、{siteNameShort} はエラーメッセージを生成します。
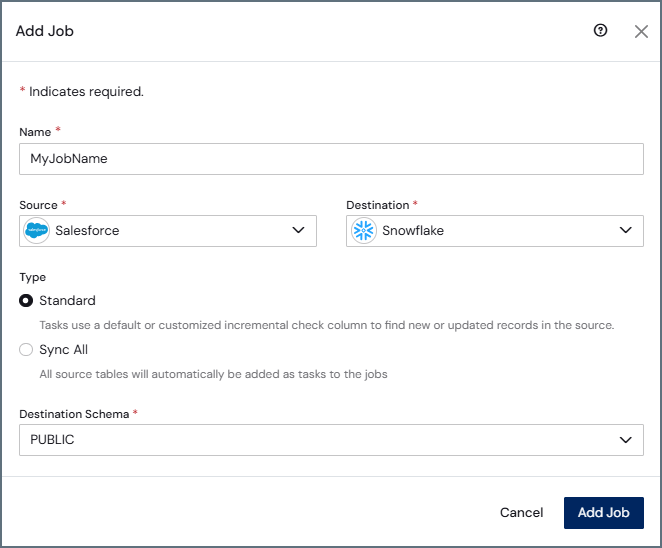 4. ジョブの種類を選択します。デフォルト設定は**標準(個別設定)** です。
* **標準(個別設定):** この種類を選択すると、{siteNameShort} は1つ以上のデータソーステーブルをタスクとしてジョブに追加します。各タスクは、デフォルトまたはカスタマイズされた差分チェックカラムのいずれかを使用して、データソース内の新規または更新されたレコードを見つけます。
* **変更データキャプチャ:** この種類では、各タスクは、データソースのネイティブな変更データキャプチャ(CDC)メカニズムを使用して変更点を取得します。
このテキストボックスは、変更データキャプチャをサポートする次のコネクタでのみ表示されます:Informix (Native), MariaDB, Microsoft Dynamics 365, MySQL, Oracle, PostgreSQL, SQL Server
* **すべて同期:** このジョブの種類を選択すると、{siteNameShort} はすべてのデータソーステーブルをタスクとしてジョブに自動的に追加します。
* **フォルダをロード:** このジョブの種類では、{siteNameShort} はフォルダやコンテナ内のすべてのファイルを、実行中に単一の同期先テーブルに読み込みます。
このテキストボックスは、**フォルダをロード**処理をサポートする次のコネクタでのみ表示されます:Amazon S3, Azure Blob Storage, Azure Data Lake Storage, Google Cloud Storage, Local File Storage, Microsoft Onelake
5. **ジョブを追加**をクリックして、新しいジョブを作成します。
特定のジョブページから(**ジョブ > *YourJobName***)、ジョブを[スケジュールに従って実行](../jobs/scheduling-jobs)、[差分レプリケーションを設定](./configuring-jobs#最初のレプリケーションジョブの設定を定義)、および[E メールアラートの作成](../jobs/notifications)ができます。加えて、[ログとジョブ履歴](../jobs/logging-history)を表示して、詳細情報を取得したりエラーをトラブルシューティングしたりできます。
## ジョブにタスクを追加
ジョブを追加したら、ジョブに1つ以上のタスクを追加できます。
タスクを追加するには:
1. ジョブを選択して**タスク**タブをクリックします。
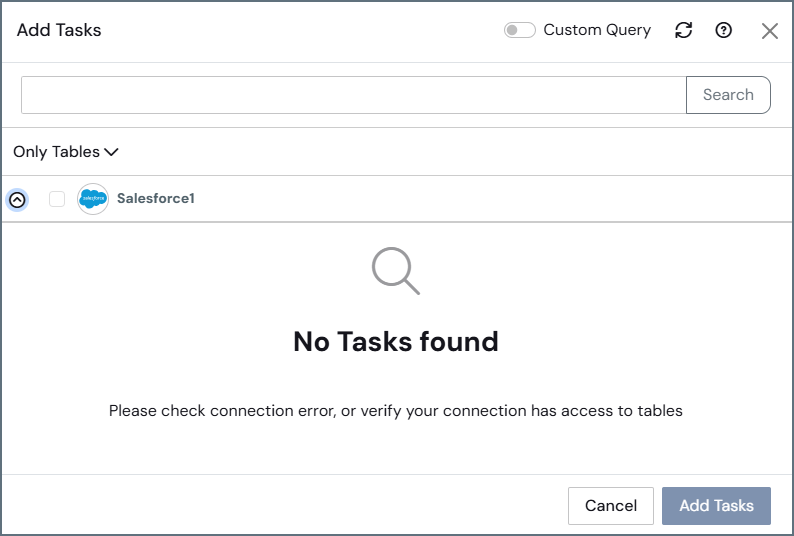
2. **タスクを追加**をクリックして、**タスクを追加**ダイアログボックスを開きます。
3. タスクの一覧から、ジョブに追加するタスクを選択します。**検索**フィールドにタスク名を入力して、特定のタスクを見つけることもできます。
4. ジョブの種類を選択します。デフォルト設定は**標準(個別設定)** です。
* **標準(個別設定):** この種類を選択すると、{siteNameShort} は1つ以上のデータソーステーブルをタスクとしてジョブに追加します。各タスクは、デフォルトまたはカスタマイズされた差分チェックカラムのいずれかを使用して、データソース内の新規または更新されたレコードを見つけます。
* **変更データキャプチャ:** この種類では、各タスクは、データソースのネイティブな変更データキャプチャ(CDC)メカニズムを使用して変更点を取得します。
このテキストボックスは、変更データキャプチャをサポートする次のコネクタでのみ表示されます:Informix (Native), MariaDB, Microsoft Dynamics 365, MySQL, Oracle, PostgreSQL, SQL Server
* **すべて同期:** このジョブの種類を選択すると、{siteNameShort} はすべてのデータソーステーブルをタスクとしてジョブに自動的に追加します。
* **フォルダをロード:** このジョブの種類では、{siteNameShort} はフォルダやコンテナ内のすべてのファイルを、実行中に単一の同期先テーブルに読み込みます。
このテキストボックスは、**フォルダをロード**処理をサポートする次のコネクタでのみ表示されます:Amazon S3, Azure Blob Storage, Azure Data Lake Storage, Google Cloud Storage, Local File Storage, Microsoft Onelake
5. **ジョブを追加**をクリックして、新しいジョブを作成します。
特定のジョブページから(**ジョブ > *YourJobName***)、ジョブを[スケジュールに従って実行](../jobs/scheduling-jobs)、[差分レプリケーションを設定](./configuring-jobs#最初のレプリケーションジョブの設定を定義)、および[E メールアラートの作成](../jobs/notifications)ができます。加えて、[ログとジョブ履歴](../jobs/logging-history)を表示して、詳細情報を取得したりエラーをトラブルシューティングしたりできます。
## ジョブにタスクを追加
ジョブを追加したら、ジョブに1つ以上のタスクを追加できます。
タスクを追加するには:
1. ジョブを選択して**タスク**タブをクリックします。
2. **タスクを追加**をクリックして、**タスクを追加**ダイアログボックスを開きます。
3. タスクの一覧から、ジョブに追加するタスクを選択します。**検索**フィールドにタスク名を入力して、特定のタスクを見つけることもできます。
 すべてのタスクを含めるには、テーブルの上部にあるジョブ名の横にあるチェックボックスを選択します。
デフォルトでは、{siteNameShort} は**タスクを追加**ダイアログボックスにすべてのテーブルとビューを表示します。ただし、タスクリストの上にあるドロップダウンメニューから表示するタイプを選択することで、テーブルのみ、またはビューのみのリストを表示することもできます。
すべてのタスクを含めるには、テーブルの上部にあるジョブ名の横にあるチェックボックスを選択します。
デフォルトでは、{siteNameShort} は**タスクを追加**ダイアログボックスにすべてのテーブルとビューを表示します。ただし、タスクリストの上にあるドロップダウンメニューから表示するタイプを選択することで、テーブルのみ、またはビューのみのリストを表示することもできます。
 **テーブルのみ**または**ビューのみ**を選択して、選択したエンティティのリストが表示されない場合は、次のメッセージが表示されます:
 4. **タスクを追加**をクリックしてジョブにタスクを追加します。
5. ジョブで実行する個々のタスクの横にあるチェックボックスを選択します(**タスク**タブ)。すべてのタスクを含めるには、テーブルの上部にあるジョブのデータソースおよび同期先の横にあるチェックボックスを選択します。
6. タスクの左側にあるチェックボックスを選択して、必要なタスクを実行します。表示された黒いタスクバーにある**実行**をクリックします。タスク行の最後にある**実行**矢印をクリックして、特定のタスクを実行することもできます。
タスクが正常に実行されると、{siteNameShort} の**最後の実行**カラムに`成功` というメッセージが表示されます。
**Notes:**
* ジョブの[レプリケーションの種類で**すべて同期**オプション](#新しいジョブを追加)を選択した場合、利用可能なすべてのテーブルとビューが自動でレプリケーションタスクとしてジョブに追加されます。ジョブが実行されるたびに、{siteNameShort} はまずデータソースの新しいテーブルやビューを検索し、ジョブに追加のレプリケーションタスクを追加して、それらが実行に含まれるようにします。
* 特定のタスクをジョブから除外したい場合は、**タスク**タブからタスクを選択し**除外**をクリックします。この場合、今後のジョブ実行ではこれらのテーブルを無視します。
## 最初のレプリケーションジョブの設定を定義
ジョブを開いたときに表示される**概要**タブで利用可能な特定の設定を使用して、{siteNameShort} が最初のレプリケーションジョブを処理する方法を制御できます。
These settings are available by clicking **Configure** in the **Snapshot Settings** category. Clicking **Configure** opens the **Edit Snapshot Settings** dialog box. The available settings depend on the type of job that you are configuring:
* **Standard** and **Sync All** jobs
* **Change Data Capture** jobs
### Snapshot Settings for **Standard** and **Sync All** Jobs
For **Standard** and **Sync All** jobs, the **Edit Snapshot Settings** dialog box contains the following settings that define how the initial snapshot and subsequent incremental updates are processed.
The main setting for these job types is **Start Value Type**. Depending on your selection for this setting, {siteNameShort} begins replicating data from a defined starting boundary that is based on either a datetime value or a numeric value. Available options for this setting include the following:
* (Default) **Date-based:** When you set **Start Value Type** to **Date-based**, you can select a date from the **Start Date** field. You must specify a date to create a job.
* **Number-based:** When you set **Start Value Type** to **Number-based**, you can specify a numeric value in the **Start Number** field.
When you select **Date-based** as the start-value type, the following settings are displayed:
* **Start Date:** This setting is available when you select **Date-based** as the start-value type. The **Start Date** setting specifies the minimum date from which to begin replication. You must specify a date in order to exit the dialog box.
4. **タスクを追加**をクリックしてジョブにタスクを追加します。
5. ジョブで実行する個々のタスクの横にあるチェックボックスを選択します(**タスク**タブ)。すべてのタスクを含めるには、テーブルの上部にあるジョブのデータソースおよび同期先の横にあるチェックボックスを選択します。
6. タスクの左側にあるチェックボックスを選択して、必要なタスクを実行します。表示された黒いタスクバーにある**実行**をクリックします。タスク行の最後にある**実行**矢印をクリックして、特定のタスクを実行することもできます。
タスクが正常に実行されると、{siteNameShort} の**最後の実行**カラムに`成功` というメッセージが表示されます。
**Notes:**
* ジョブの[レプリケーションの種類で**すべて同期**オプション](#新しいジョブを追加)を選択した場合、利用可能なすべてのテーブルとビューが自動でレプリケーションタスクとしてジョブに追加されます。ジョブが実行されるたびに、{siteNameShort} はまずデータソースの新しいテーブルやビューを検索し、ジョブに追加のレプリケーションタスクを追加して、それらが実行に含まれるようにします。
* 特定のタスクをジョブから除外したい場合は、**タスク**タブからタスクを選択し**除外**をクリックします。この場合、今後のジョブ実行ではこれらのテーブルを無視します。
## 最初のレプリケーションジョブの設定を定義
ジョブを開いたときに表示される**概要**タブで利用可能な特定の設定を使用して、{siteNameShort} が最初のレプリケーションジョブを処理する方法を制御できます。
These settings are available by clicking **Configure** in the **Snapshot Settings** category. Clicking **Configure** opens the **Edit Snapshot Settings** dialog box. The available settings depend on the type of job that you are configuring:
* **Standard** and **Sync All** jobs
* **Change Data Capture** jobs
### Snapshot Settings for **Standard** and **Sync All** Jobs
For **Standard** and **Sync All** jobs, the **Edit Snapshot Settings** dialog box contains the following settings that define how the initial snapshot and subsequent incremental updates are processed.
The main setting for these job types is **Start Value Type**. Depending on your selection for this setting, {siteNameShort} begins replicating data from a defined starting boundary that is based on either a datetime value or a numeric value. Available options for this setting include the following:
* (Default) **Date-based:** When you set **Start Value Type** to **Date-based**, you can select a date from the **Start Date** field. You must specify a date to create a job.
* **Number-based:** When you set **Start Value Type** to **Number-based**, you can specify a numeric value in the **Start Number** field.
When you select **Date-based** as the start-value type, the following settings are displayed:
* **Start Date:** This setting is available when you select **Date-based** as the start-value type. The **Start Date** setting specifies the minimum date from which to begin replication. You must specify a date in order to exit the dialog box.
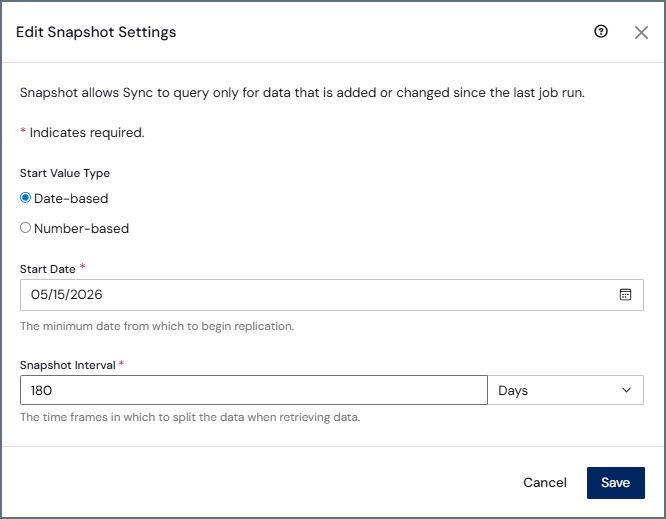 * **Snapshot Interval:** Paired with the interval-unit selection (available from the drop-down list at the right end of this field), this setting defines how frequently {siteNameShort} checks for new or updated data. {siteNameShort} uses this interval to batch updates so that if a failure occurs or if the replication job is interrupted, the next attempt starts where the last run ended.
By default, {siteNameShort} uses an interval of 180 days. However, you can adjust this interval based on how much data you have and how frequently your data changes. You can enter a number manually or use the (▲) and down (▼) arrows for the field.
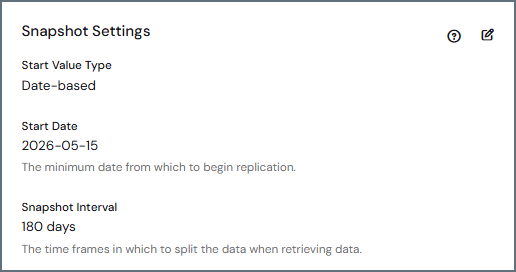
After you click **Save** in the dialog box, your settings are displayed in the **Snapshot Settings** category on the **Overview** tab for your job:
* **Snapshot Interval:** Paired with the interval-unit selection (available from the drop-down list at the right end of this field), this setting defines how frequently {siteNameShort} checks for new or updated data. {siteNameShort} uses this interval to batch updates so that if a failure occurs or if the replication job is interrupted, the next attempt starts where the last run ended.
By default, {siteNameShort} uses an interval of 180 days. However, you can adjust this interval based on how much data you have and how frequently your data changes. You can enter a number manually or use the (▲) and down (▼) arrows for the field.
After you click **Save** in the dialog box, your settings are displayed in the **Snapshot Settings** category on the **Overview** tab for your job:
 When you select **Number-based** as the start-value type, the following settings are displayed:
* **Start Number:** This setting specifies the minimum value of the numeric column that {siteNameShort} uses to track incremental changes. {siteNameShort} begins replicating records whose value in that column is greater than or equal to the specified number.
When you select **Number-based** as the start-value type, the following settings are displayed:
* **Start Number:** This setting specifies the minimum value of the numeric column that {siteNameShort} uses to track incremental changes. {siteNameShort} begins replicating records whose value in that column is greater than or equal to the specified number.
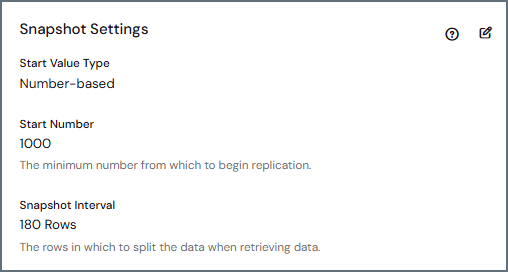
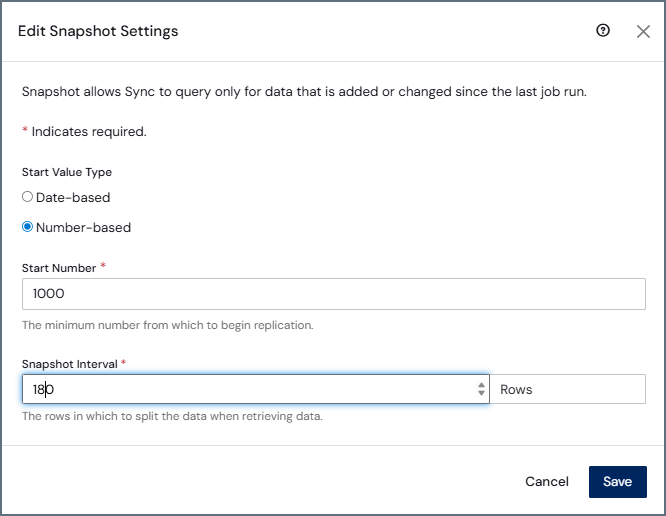 * **Snapshot Interval:** Paired with the **Rows** interval unit (the only selection that is available for this start-value type), this setting defines the number of rows in which {siteNameShort} should split the data when it retrieves data.
By default, {siteNameShort} uses 0 for the number of rows. However, you can adjust this interval by entering a number manually or by using the up (▲) and down (▼) arrows for the field.
After you click **Save** in the dialog box, your settings are displayed in the **Snapshot Settings** category on the **Overview** tab for your job:
* **Snapshot Interval:** Paired with the **Rows** interval unit (the only selection that is available for this start-value type), this setting defines the number of rows in which {siteNameShort} should split the data when it retrieves data.
By default, {siteNameShort} uses 0 for the number of rows. However, you can adjust this interval by entering a number manually or by using the up (▲) and down (▼) arrows for the field.
After you click **Save** in the dialog box, your settings are displayed in the **Snapshot Settings** category on the **Overview** tab for your job:
 ### Snapshot Settings for Change Data Capture (CDC) Jobs
The **Edit Snapshot Settings** dialog box for CDC jobs contains the following settings that control how the snapshot phase is handled before change data capture begins:
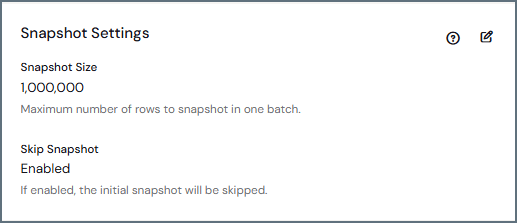
* **Snapshot Size:** This setting specifies the number of rows to snapshot in each batch.
By default, the snapshot size is 1,000,000 rows. Adjusting this value can help manage large initial loads and control transaction size during snapshot processing. You can adjust this interval by entering a number manually or by using the (▲) and down (▼) arrows for the field.
### Snapshot Settings for Change Data Capture (CDC) Jobs
The **Edit Snapshot Settings** dialog box for CDC jobs contains the following settings that control how the snapshot phase is handled before change data capture begins:
* **Snapshot Size:** This setting specifies the number of rows to snapshot in each batch.
By default, the snapshot size is 1,000,000 rows. Adjusting this value can help manage large initial loads and control transaction size during snapshot processing. You can adjust this interval by entering a number manually or by using the (▲) and down (▼) arrows for the field.
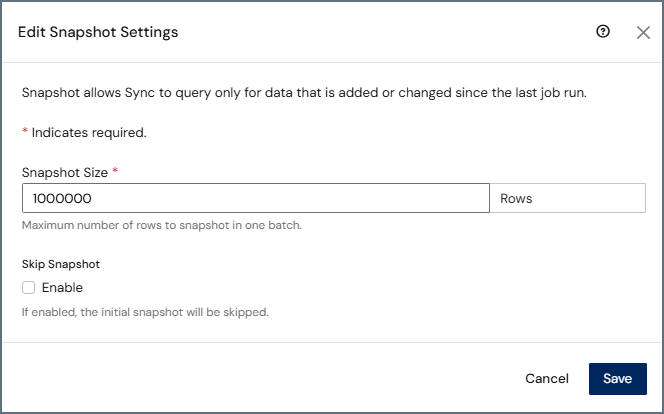 * **Skip Snapshot:** This setting determines whether the initial snapshot of existing data is performed.
* (Default) When **Skip Snapshot** is disabled, {siteNameShort} performs an initial snapshot and then continues processing CDC changes.
* When **Skip Snapshot** is enabled, the initial snapshot is skipped. The first job run transfers zero rows, and only new changes from the CDC stream are processed.
* **Skip Snapshot:** This setting determines whether the initial snapshot of existing data is performed.
* (Default) When **Skip Snapshot** is disabled, {siteNameShort} performs an initial snapshot and then continues processing CDC changes.
* When **Skip Snapshot** is enabled, the initial snapshot is skipped. The first job run transfers zero rows, and only new changes from the CDC stream are processed.
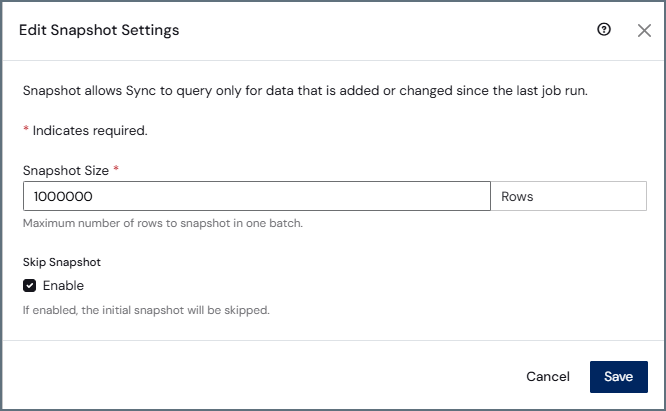 After you click **Save** in the dialog box, your settings are displayed in the **Snapshot Settings** category on the **Overview** tab for your job:
 ### Snapshot Performance with Parallel Partitioned Reads
For large datasets, *parallel partitioned reads* improve snapshot performance by enabling {siteNameShort} to read data from a source table in parallel. The system divides the data into multiple partitions that run concurrently instead of scanning the table sequentially.
Parallel partitioned reads are available for both standard and change data capture (CDC) jobs.
#### Configuration of Parallel Partitioned Reads
You configure parallel partitioned reads for a job on the **Query** tab at the task level. On this tab, enable the feature by adding the appropriate options to the WITH clause of the REPLICATE query. The following options control how partitioning is applied:
* `enableparallelreadpartitioning`: Enables parallel partitioned reads when it is set to `'true'`. The default value is `'false'`.
* `partitionkey`: Specifies the column that {siteNameShort} uses to divide the source data into partitions. This column must be a datetime or integer column.
* `partitionsize`: Defines the size of each partition. For datetime columns, the value represents the number of days. For integer columns, the value is used directly without unit conversion.
* `maxparallelpartitions`: Specifies the maximum number of partitions that can run concurrently. The default value is `2`.
**Example:**
```sql theme={null}
REPLICATE [dest_schema].[DestTable]
WITH maxparallelpartitions = '2',
partitionkey = 'CreatedDateTime',
enableparallelreadpartitioning = 'true',
partitionsize = '180'
SELECT * FROM [src_schema].[SrcTable]
```
#### Behavior of Parallel Partitioned Reads
When you enable parallel partitioned reads, {siteNameShort} divides the source data into partitions based on the partition key that you specify and processes those partitions concurrently. This approach reduces the total time that is required to complete the snapshot phase, especially for large tables.
If a partition fails during execution, {siteNameShort} records the progress in the status table. Then, when you retry a job, {siteNameShort} resumes from the last successful partition instead of restarting the entire snapshot.
#### Requirements and Limitations of Parallel Partitioned Reads
With parallel partitioned reads, the application database must support multiple concurrent connections. Derby and other file-based application databases are not supported. If you use one of these databases, the feature is unavailable.
The following sources support parallel partitioned reads:
* DB2
* DB2 for i
* Informix
* MariaDB
* Microsoft SQL Server
* MySQL
* Oracle
* PostgreSQL
## ジョブを実行
初めてジョブを実行すると、{siteName} はデータソースの履歴データ全体を処理します。このデータには膨大な量の情報が含まれています。そのため、{siteNameShort} は、いくつかの戦略を用いて、効率、パフォーマンス、整合性を最大化します。また{siteNameShort} には、特定のデータセットに対して同期戦略を最適化するために使用できるユーザー制御のオプションも用意されています。これらのオプションについては、[最初のレプリケーションジョブの設定を定義](#最初のレプリケーションジョブの設定を定義)で説明しています。
次のいずれかの方法でジョブを実行できます:
* ジョブ名の左側にあるチェックボックスを選択して、**ジョブ**ページ上部の黒いタスクバーにある**実行**をクリックする。
* 以下に示すように、ジョブ行の最後にカーソルを置いたときに表示される**ジョブを実行** (▷) をクリックする。
### Snapshot Performance with Parallel Partitioned Reads
For large datasets, *parallel partitioned reads* improve snapshot performance by enabling {siteNameShort} to read data from a source table in parallel. The system divides the data into multiple partitions that run concurrently instead of scanning the table sequentially.
Parallel partitioned reads are available for both standard and change data capture (CDC) jobs.
#### Configuration of Parallel Partitioned Reads
You configure parallel partitioned reads for a job on the **Query** tab at the task level. On this tab, enable the feature by adding the appropriate options to the WITH clause of the REPLICATE query. The following options control how partitioning is applied:
* `enableparallelreadpartitioning`: Enables parallel partitioned reads when it is set to `'true'`. The default value is `'false'`.
* `partitionkey`: Specifies the column that {siteNameShort} uses to divide the source data into partitions. This column must be a datetime or integer column.
* `partitionsize`: Defines the size of each partition. For datetime columns, the value represents the number of days. For integer columns, the value is used directly without unit conversion.
* `maxparallelpartitions`: Specifies the maximum number of partitions that can run concurrently. The default value is `2`.
**Example:**
```sql theme={null}
REPLICATE [dest_schema].[DestTable]
WITH maxparallelpartitions = '2',
partitionkey = 'CreatedDateTime',
enableparallelreadpartitioning = 'true',
partitionsize = '180'
SELECT * FROM [src_schema].[SrcTable]
```
#### Behavior of Parallel Partitioned Reads
When you enable parallel partitioned reads, {siteNameShort} divides the source data into partitions based on the partition key that you specify and processes those partitions concurrently. This approach reduces the total time that is required to complete the snapshot phase, especially for large tables.
If a partition fails during execution, {siteNameShort} records the progress in the status table. Then, when you retry a job, {siteNameShort} resumes from the last successful partition instead of restarting the entire snapshot.
#### Requirements and Limitations of Parallel Partitioned Reads
With parallel partitioned reads, the application database must support multiple concurrent connections. Derby and other file-based application databases are not supported. If you use one of these databases, the feature is unavailable.
The following sources support parallel partitioned reads:
* DB2
* DB2 for i
* Informix
* MariaDB
* Microsoft SQL Server
* MySQL
* Oracle
* PostgreSQL
## ジョブを実行
初めてジョブを実行すると、{siteName} はデータソースの履歴データ全体を処理します。このデータには膨大な量の情報が含まれています。そのため、{siteNameShort} は、いくつかの戦略を用いて、効率、パフォーマンス、整合性を最大化します。また{siteNameShort} には、特定のデータセットに対して同期戦略を最適化するために使用できるユーザー制御のオプションも用意されています。これらのオプションについては、[最初のレプリケーションジョブの設定を定義](#最初のレプリケーションジョブの設定を定義)で説明しています。
次のいずれかの方法でジョブを実行できます:
* ジョブ名の左側にあるチェックボックスを選択して、**ジョブ**ページ上部の黒いタスクバーにある**実行**をクリックする。
* 以下に示すように、ジョブ行の最後にカーソルを置いたときに表示される**ジョブを実行** (▷) をクリックする。
 * 実行するジョブを選択する。次に、[ジョブにタスクを追加](#ジョブにタスクを追加)で説明したように**タスク**タブからジョブを実行する。
ジョブが正常に実行されると、{siteNameShort} の**最後の実行**カラムに`成功` というメッセージが表示されます。
* 実行するジョブを選択する。次に、[ジョブにタスクを追加](#ジョブにタスクを追加)で説明したように**タスク**タブからジョブを実行する。
ジョブが正常に実行されると、{siteNameShort} の**最後の実行**カラムに`成功` というメッセージが表示されます。