> ## Documentation Index
> Fetch the complete documentation index at: https://docs.sync.cdata.com/llms.txt
> Use this file to discover all available pages before exploring further.
# Reverse ETL
export const siteNameShort = "Sync";
export const siteName = "CData Sync";
Traditional ETL (extract, transform, load) processes copy data from source systems to a centralized data store for analysis and reporting. *Reverse ETL* does the opposite--it moves data from a central repository back to your operational systems. Reverse ETL enables you to use results from data analytics to improve your operational processes, enhance customer experiences, or facilitate decision making.
The basic process for reverse ETL is as follows:
* Extract data **from a central data warehouse or data lake** where that data has been aggregated and transformed for analytical purposes.
* Transform the extracted data to make it suitable for consumption by your systems. Transformations can include reformatting, filtering, or enhancing your data.
* Load the transformed data back into operational databases, applications, or other systems where you can use it for various purposes (for example, updating records or triggering workflows).
In {siteName}, reverse ETL capability is supported for the following sources:
* [Amazon Redshift](../connections/sources/amazon-redshift-source)
* [Google BigQuery](../connections/sources/google-bigquery-source)
* [Microsoft SQL Server](../connections/sources/sql-source)
* [MySQL](../connections/sources/mysql-source)
* [Oracle](../connections/sources/oracle-source)
* [PostgreSQL](../connections/sources/postgresql-source)
* [Snowflake](../connections/sources/snowflake-source)
Source databases that you can use for reverse ETL capability are restricted to those for which the **Delta Snapshot** replication type is implemented (that is, source databases that accept the SQL EXCEPT statement).
In {siteNameShort}, this capability is supported for the following destinations only. (**Reverse ETL** is the only replication type available for these destinations).
* [HubSpot](../connections/destinations/hubspot-destination)
* [Kintone](../connections/destinations/kintone-destination)
* [Microsoft Dynamics 365](../connections/destinations/microsoft-dynamics-365-destination)
* [Sage Intacct](../connections/destinations/sage-intacct-destination)
* [Salesforce](../connections/destinations/salesforce-destination)
* [Veeva Vault](../connections/destinations/veeva-vault-destination)
* [Zoho CRM](../connections/destinations/zoho-crm-destination)
## Understanding the Reverse ETL Process
Reverse ETL works by querying your data warehouse for changes and writing the results of that query to your destination. When you run the reverse ETL job for the first time, the application creates an initial snapshot of the source table in your data warehouse and the loads the results into your destination. During subsequent runs, {siteName} creates a new snapshot and compares it against the previous snapshot to capture the changes. Then, those changes are loaded into the destination.
Using the **Delta Snapshot** feature, {siteNameShort} maintains an error table for logging rows that do not insert or update correctly, and it enables you to see individual errors at the row level. This feature also cleans up any failed rows from the previous snapshot.
With reverse ETL, you can choose from four modes to transfer your data:
* **Insert:** Select this mode to insert new records into your source. For **Insert** mode, your source table must have a unique primary key. Each time you take a new snapshot, that key enables {siteName} to ensure that you are inserting new identifiers (Ids).
* **Upsert:** Select this mode both to update **existing** records and to insert new records into your source. For **Upsert**, you must define a key that matches a record from your source table to your destination table.
When you run a job in **Upsert** mode, you can also configure **Deletion Behavior** settings by navigating to **Jobs > *JobName* > Advanced > Edit Replicate Options > Deletion Behavior**. These settings control how {siteNameShort} handles records that existed in the previous snapshot but are missing from the latest snapshot.
* **Skip Deleted (default):** No changes are made to the destination.
* **Soft Delete:** {siteNameShort} updates the destination record by setting to NULL all fields that are not primary keys.
* **Hard Delete:** {siteNameShort} permanently removes the record from the destination.
{siteNameShort} retries failed delete operations on subsequent runs so that your destination remains consistent with the source snapshot.
* **Update:** Select this mode to update **existing** records in your source. **Update** mode uses the Salesforce Id or a Microsoft Dynamics 365 alternate key to match records in your source and destination tables. You must select a source column to map to the Salesforce Id or the Dynamics 365 alternate key.
* **Delete:** Select this mode to remove records from your destination. When you run a reverse ETL job using **Delete** mode, {siteNameShort} compares the latest snapshot with the previous snapshot and deletes any destination records that appear in the snapshot results.
## Creating a Reverse ETL Job
To create a reverse ETL job, you need to define job parameters and then map required and optional columns as well as any keys that are necessary, as follows:
1. Select **Jobs > Add Job > Add New Job**. This step opens the **Add Job** dialog box.
2. Enter a job name.
3. Select your destination (**Salesforce** or **Microsoft Dynamics 365**) first. Then select your source, as shown in this example:
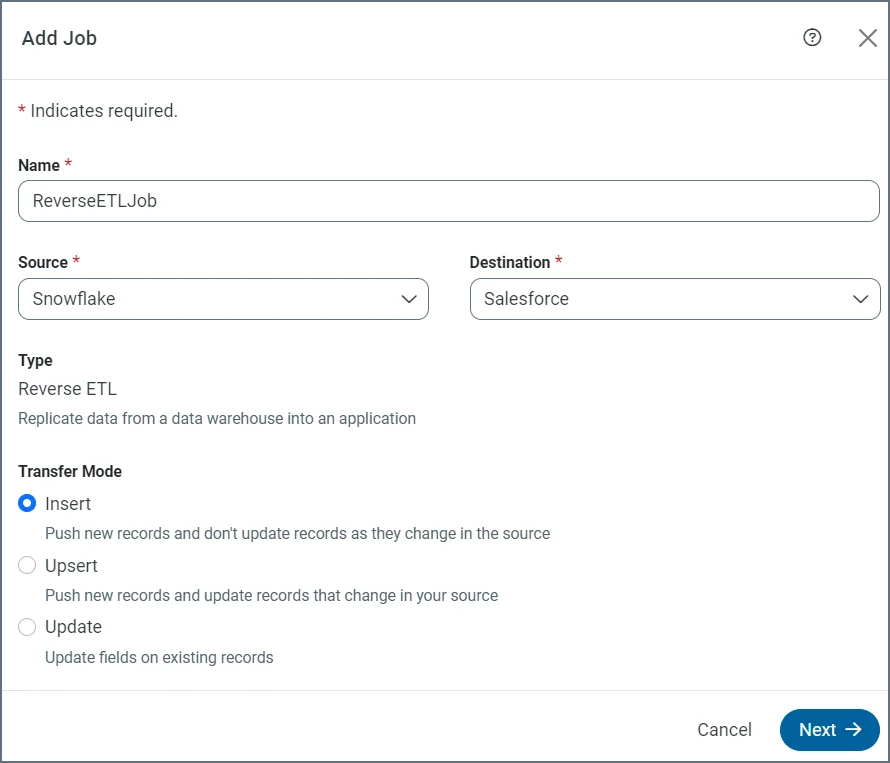 After you enter a source and a destination, the **Add Job** dialog box expands to include a **Type** and a **Transfer Mode** section, as shown above. The **Type** section indicates that your job is a reverse ETL job, and the **Transfer Mode** section enables you to select the type of data transfer that you want to perform. For details about the transfer modes, see [Understanding the Reverse ETL Process](#understanding-the-reverse-etl-process).
4. Click **Next**.
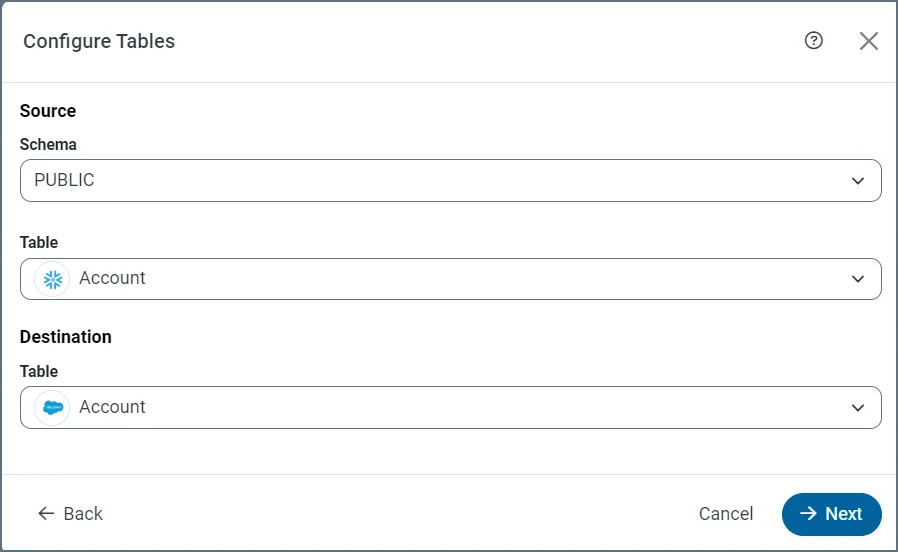
5. Select your schema, a source table, and a destination table in the **Configure Tables** dialog box.
After you enter a source and a destination, the **Add Job** dialog box expands to include a **Type** and a **Transfer Mode** section, as shown above. The **Type** section indicates that your job is a reverse ETL job, and the **Transfer Mode** section enables you to select the type of data transfer that you want to perform. For details about the transfer modes, see [Understanding the Reverse ETL Process](#understanding-the-reverse-etl-process).
4. Click **Next**.
5. Select your schema, a source table, and a destination table in the **Configure Tables** dialog box.
 6. Click **Next**.
7. Configure your columns and keys in the **Configure Mapping** dialog box, as follows:
1. Choose your key (for **Upsert** and **Update** modes only).
2. Map any required columns.
3. Add any additional columns that you want by clicking **Add Column** at the bottom of the dialog box.
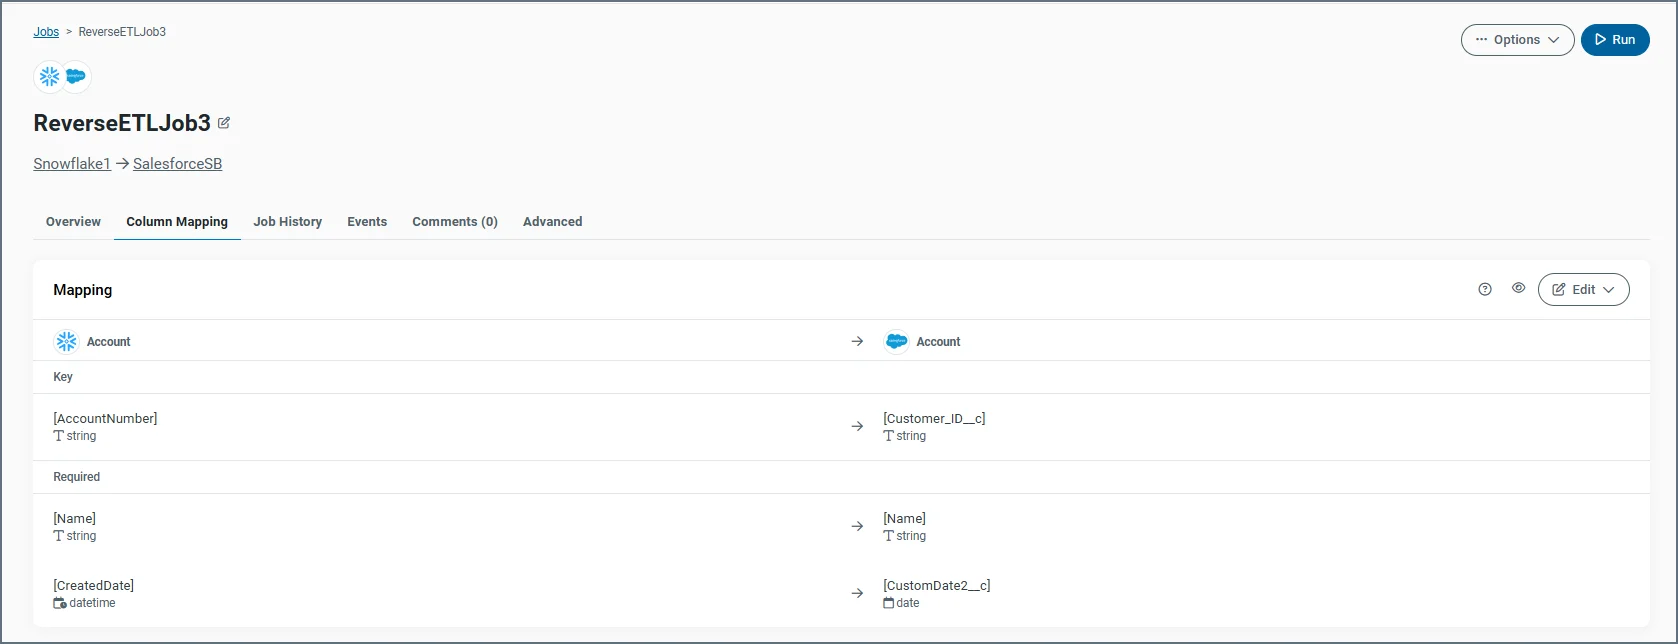
8. Click **Add Job** to create your new job. After the job is created, {siteNameShort} displays your table mappings on the **Column Mapping** tab, as shown below:
6. Click **Next**.
7. Configure your columns and keys in the **Configure Mapping** dialog box, as follows:
1. Choose your key (for **Upsert** and **Update** modes only).
2. Map any required columns.
3. Add any additional columns that you want by clicking **Add Column** at the bottom of the dialog box.
8. Click **Add Job** to create your new job. After the job is created, {siteNameShort} displays your table mappings on the **Column Mapping** tab, as shown below:
 After you add your job, you can manage it as described in the next section.
## Managing Your Job
Once you add your reverse ETL job, you can run and manage it like any other job it in {siteNameShort} from the **Jobs** page. When you click your job in the application, {siteNameShort} opens your job page with the standard tabs (**Overview**, **Column Mapping**, **Job History**, **Events**, and **Advanced**). The following sections explain how to manage settings and mappings for your reverse ETL job on the **Overview**, **Column Mapping**, and **Advanced** tabs.
### Job Overview
The **Overview** tab for a job displays a summary of your settings, including the job type and transfer mode. In the example below, the job type is **Reverse ETL** and the transfer mode is **InsertMode**.
After you add your job, you can manage it as described in the next section.
## Managing Your Job
Once you add your reverse ETL job, you can run and manage it like any other job it in {siteNameShort} from the **Jobs** page. When you click your job in the application, {siteNameShort} opens your job page with the standard tabs (**Overview**, **Column Mapping**, **Job History**, **Events**, and **Advanced**). The following sections explain how to manage settings and mappings for your reverse ETL job on the **Overview**, **Column Mapping**, and **Advanced** tabs.
### Job Overview
The **Overview** tab for a job displays a summary of your settings, including the job type and transfer mode. In the example below, the job type is **Reverse ETL** and the transfer mode is **InsertMode**.
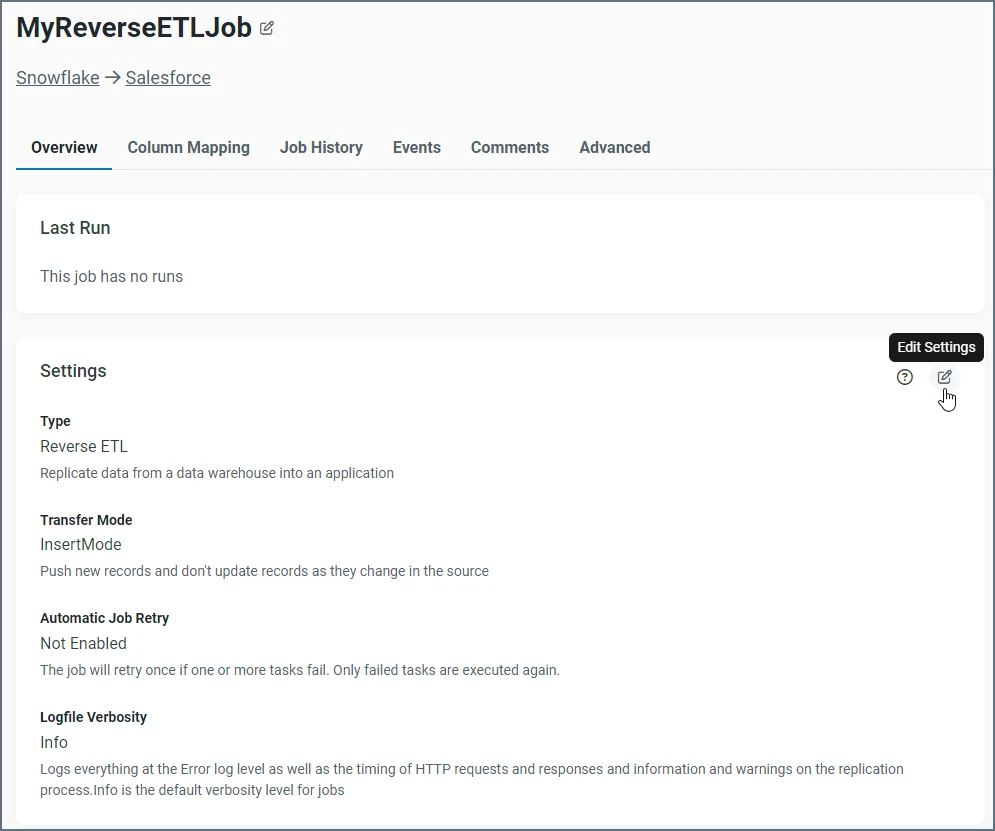 To edit your settings, click the **Edit** button. The only change that you can make in the **Edit Settings** dialog box is to select a different verbosity level for you log file.
### Mapping Columns
As explained earlier, {siteNameShort} automatically opens the **Column Mapping** tab when you add a new job. This page shows you the mappings between your source and the Salesforce destination for both the required and optional columns. In addition, the page shows the mapping for keys for **Insert** mode.
To edit your settings, click the **Edit** button. The only change that you can make in the **Edit Settings** dialog box is to select a different verbosity level for you log file.
### Mapping Columns
As explained earlier, {siteNameShort} automatically opens the **Column Mapping** tab when you add a new job. This page shows you the mappings between your source and the Salesforce destination for both the required and optional columns. In addition, the page shows the mapping for keys for **Insert** mode.
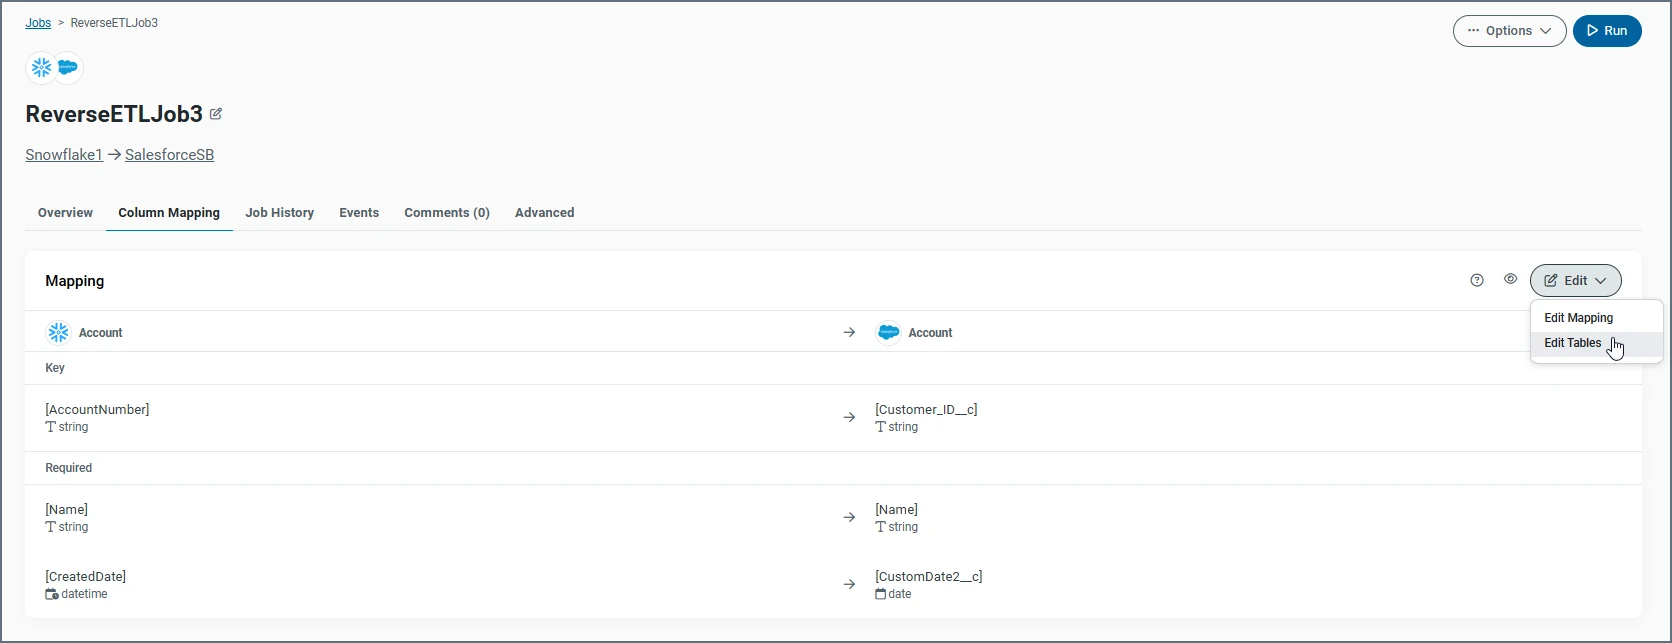 You can map your columns manually, as explained earlier in step 7 of "Creating a Reverse ETL Job." You can also use the {siteNameShort} application's auto-mapping feature, which is especially useful when you have a large number of column fields.
After you create a job, you can edit both the column mappings and your source and destination tables. The following sections explain how to automap columns and how to edit column mappings and the tables.
#### Auto-Mapping Columns
When you create a job and map columns in the **Configure Mapping** dialog box, you can see that the **Auto Map** button is disabled. That button is enabled after you select the key columns that you want to use for both the source and destination, as shown below:
You can map your columns manually, as explained earlier in step 7 of "Creating a Reverse ETL Job." You can also use the {siteNameShort} application's auto-mapping feature, which is especially useful when you have a large number of column fields.
After you create a job, you can edit both the column mappings and your source and destination tables. The following sections explain how to automap columns and how to edit column mappings and the tables.
#### Auto-Mapping Columns
When you create a job and map columns in the **Configure Mapping** dialog box, you can see that the **Auto Map** button is disabled. That button is enabled after you select the key columns that you want to use for both the source and destination, as shown below:
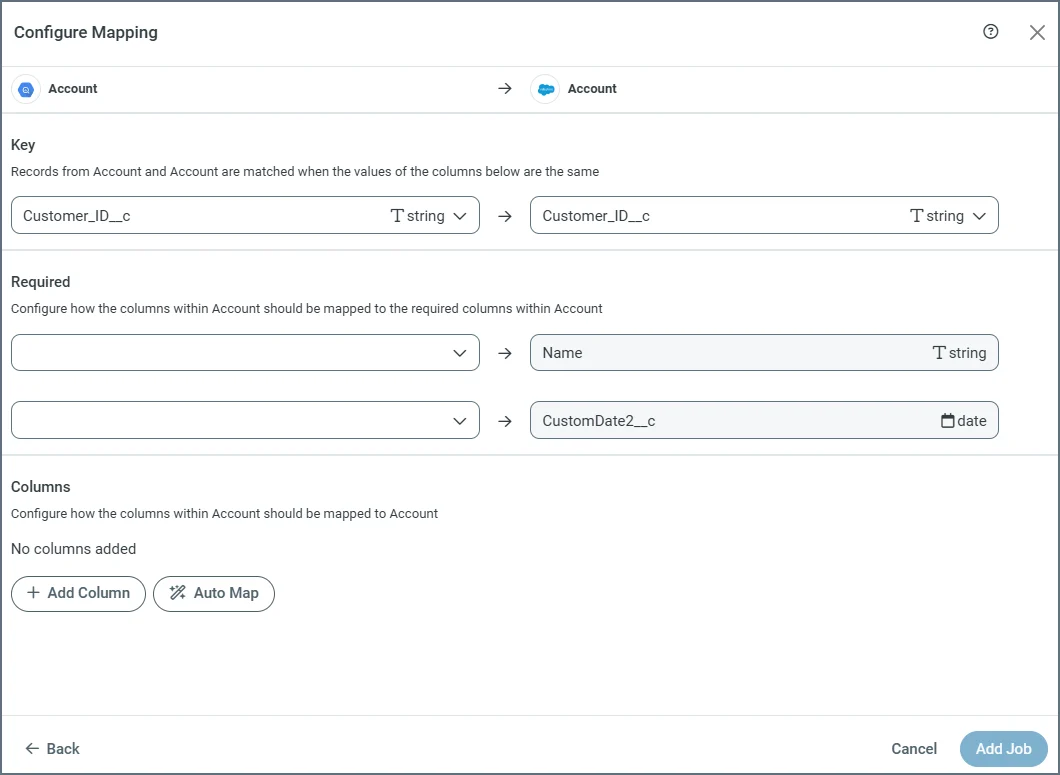 In the example above, the dialog box shows only two mappings in the **Required** section, which are easy enough to map manually. However, manual column mapping can be time-consuming when you have large numbers of columns. In such cases, using the **Auto Map** feature speeds up the process by quickly mapping the source and destination columns for you. Auto mapping can also reduce human errors that might occur from mismatching any columns.
For tables that do not have a key or required column, the **Auto Map** button is disabled. You must add a column manually to enable the button.
To use the auto-map feature:
1. Click the **Auto Map** button (after you select the key columns). When you click the button, {siteNameShort} scans all unmapped source columns (both required and optional) and matches them automatically to destination columns with the same name, regardless of letter casing.
In the example above, the dialog box shows only two mappings in the **Required** section, which are easy enough to map manually. However, manual column mapping can be time-consuming when you have large numbers of columns. In such cases, using the **Auto Map** feature speeds up the process by quickly mapping the source and destination columns for you. Auto mapping can also reduce human errors that might occur from mismatching any columns.
For tables that do not have a key or required column, the **Auto Map** button is disabled. You must add a column manually to enable the button.
To use the auto-map feature:
1. Click the **Auto Map** button (after you select the key columns). When you click the button, {siteNameShort} scans all unmapped source columns (both required and optional) and matches them automatically to destination columns with the same name, regardless of letter casing.
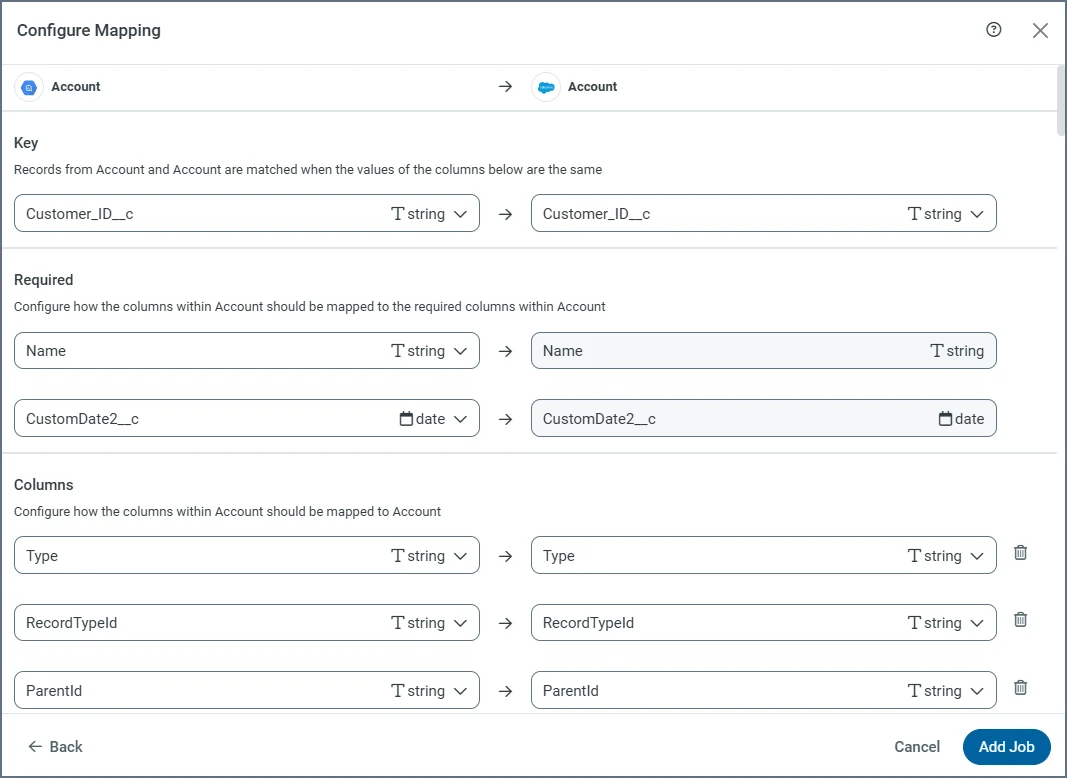 2. Click **Add Job** to create your new job. After the job is created, {siteNameShort} displays your table mappings on the **Column Mapping** tab.
#### Editing Column Mappings and Tables
To edit your mappings:
1. Select **Edit > Edit Mapping**.
2. Click **Add Job** to create your new job. After the job is created, {siteNameShort} displays your table mappings on the **Column Mapping** tab.
#### Editing Column Mappings and Tables
To edit your mappings:
1. Select **Edit > Edit Mapping**.
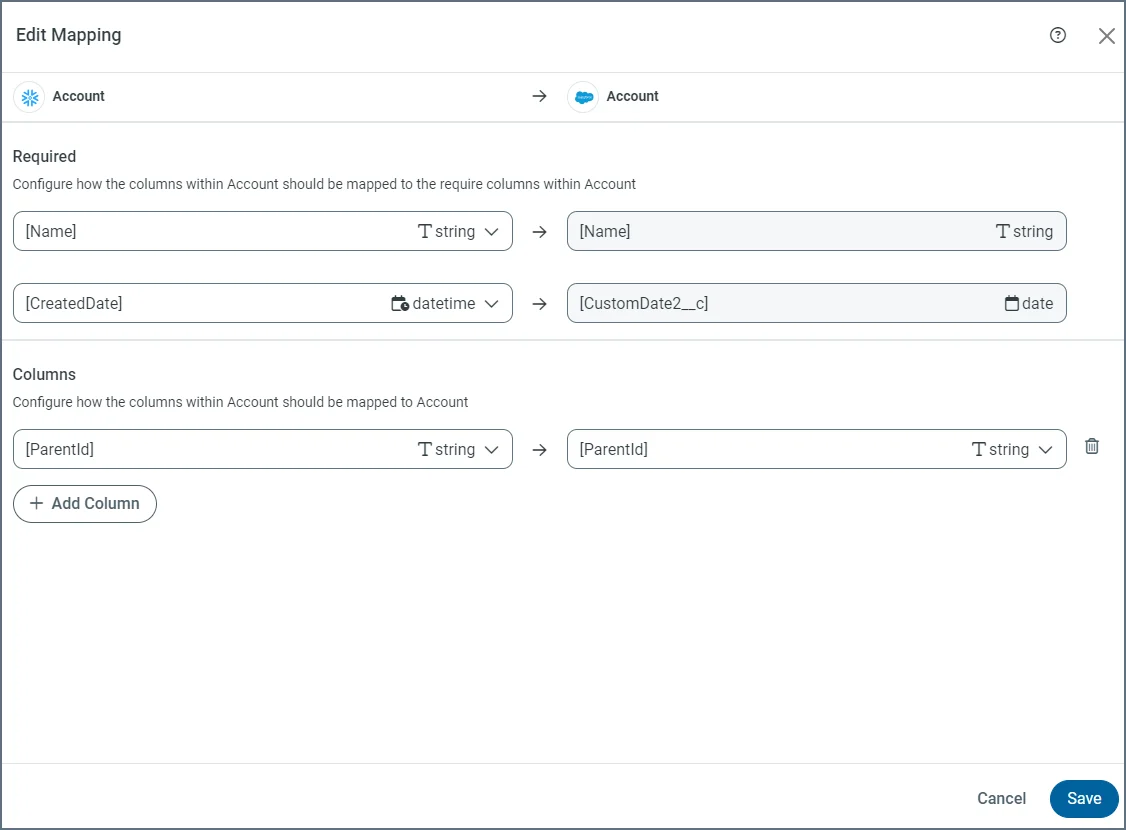 2. Add new columns or change any columns and keys that you want.
3. Click **Save** to save your changes and return to the **Column Mapping** page.
To edit your source or destination table:
1. Select **Edit > Edit Tables**. This selection takes you back to the **Edit Tables** dialog box.
2. Add new columns or change any columns and keys that you want.
3. Click **Save** to save your changes and return to the **Column Mapping** page.
To edit your source or destination table:
1. Select **Edit > Edit Tables**. This selection takes you back to the **Edit Tables** dialog box.
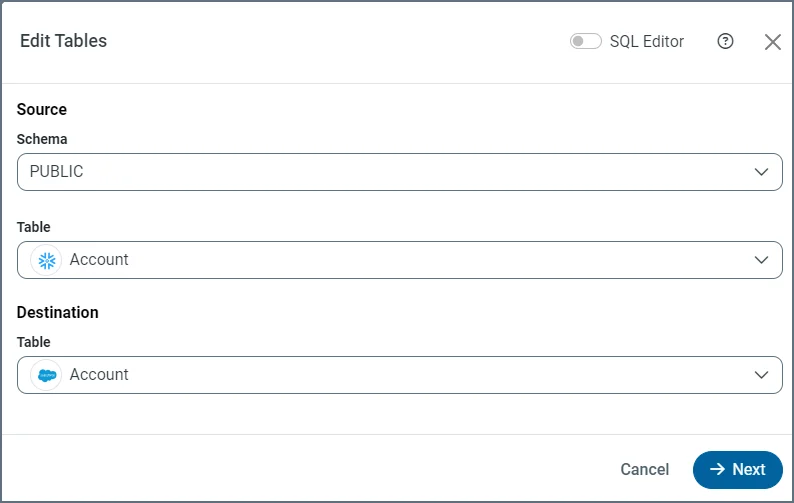 2. Update the source or destination table. For example, select **User** for both the destination and source. Click **Next**.
3. Rebuild the column mapping for your job in the **Edit Mapping** dialog box.
4. Click **Save** to save your changes and return to the **Column Mapping** page.
### Advanced Options
The **Advanced** tab contains advanced replication options for your job. Currently, for reverse ETL jobs, the tab contains one option, **Reset Strategy**. {siteNameShort} uses primary keys to identify when rows in a table are added, modified, or deleted. For reverse ETL jobs, the **Reset Strategy** replication option defines how you should manage situations where the key is changed in the query.
2. Update the source or destination table. For example, select **User** for both the destination and source. Click **Next**.
3. Rebuild the column mapping for your job in the **Edit Mapping** dialog box.
4. Click **Save** to save your changes and return to the **Column Mapping** page.
### Advanced Options
The **Advanced** tab contains advanced replication options for your job. Currently, for reverse ETL jobs, the tab contains one option, **Reset Strategy**. {siteNameShort} uses primary keys to identify when rows in a table are added, modified, or deleted. For reverse ETL jobs, the **Reset Strategy** replication option defines how you should manage situations where the key is changed in the query.
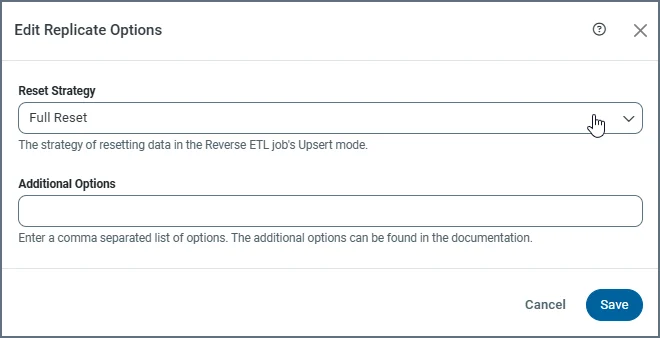 This option provides two settings:
* **Full Reset:** When you use this setting, {siteNameShort} replaces the snapshot table with a full replication of the source table, including previously replicated rows. Avoid using this option with **Insert** mode because it might create duplicate entries.
* **Sparse Reset:** With this setting, {siteNameShort} updates the snapshot table to match schema changes without altering existing rows or duplicating entries. As such, **Sparse Reset** is the preferred option for use with **Insert** mode.
You can also enter a comma-separated list of replication options in the **Additional Options** text box below the **Reset Strategy** drop-down list.
This option provides two settings:
* **Full Reset:** When you use this setting, {siteNameShort} replaces the snapshot table with a full replication of the source table, including previously replicated rows. Avoid using this option with **Insert** mode because it might create duplicate entries.
* **Sparse Reset:** With this setting, {siteNameShort} updates the snapshot table to match schema changes without altering existing rows or duplicating entries. As such, **Sparse Reset** is the preferred option for use with **Insert** mode.
You can also enter a comma-separated list of replication options in the **Additional Options** text box below the **Reset Strategy** drop-down list.