> ## Documentation Index
> Fetch the complete documentation index at: https://docs.sync.cdata.com/llms.txt
> Use this file to discover all available pages before exploring further.
# Pipelines Page
export const siteNameShortLower = "sync";
export const siteNameShort = "Sync";
export const siteName = "CData Sync";
A *{siteName} pipeline* is a sequence of jobs, transformations, scripts, and other actions that run together as a single workflow. By default, steps run sequentially in the order they appear. A pipeline can also include parallel branches, which allow multiple sequences of steps to run concurrently. Each branch runs independently, and the pipeline does not complete until all branches finish.
Within a pipeline, a *step* represents an individual unit of work. Each pipeline contains one or more steps, and {siteNameShort} executes these steps in the order that they appear, unless the steps are in parallel branches, which run concurrently.
{siteNameShort} supports the following step types:
* **Replication step:** Uses an existing {siteNameShort} job to replicate data from a source connection to a destination connection. Replication steps can use **Standard**, **SyncAll**, **Change Data Capture**, or **Load Folder** job types.
* **Reverse ETL step:** Uses an existing reverse ETL job to move data from a destination back into a source system.
* **Transformation step:** Uses an existing transformation to modify or process data as part of the pipeline.
* **Event step:** Executes an API script or Python script to integrate external processes or extend pipeline behavior.
Pipelines enable you to coordinate multi-step workflows by combining replication jobs, reverse ETL jobs, transformations, and event-based scripts into a single, automated execution flow.
The following sections explain the features of the **Pipelines** summary page as well as the following tasks:
* [adding a pipeline](#adding-a-new-pipeline)
* [editing a pipeline](#editing-a-pipeline)
* [editing steps within a pipeline](#editing-steps-in-a-pipeline)
* [adding steps to a pipeline (multiple steps and parallel branches)](#adding-steps-to-a-pipeline)
* [removing steps in a pipeline](#removing-steps-in-a-pipeline)
* [managing pipelines](#managing-pipelines)
* [using pipeline variables](#using-pipeline-variables)
* [configuring a pipeline run schedule](#configuring-a-run-schedule-for-a-pipeline)
* [enabling email notifications](#enabling-email-notifications)
* [exporting pipelines](#exporting-a-pipeline)
* [importing pipelines](#importing-a-pipeline)
* [removing a pipeline](#removing-a-pipeline)
## Viewing Your Pipelines
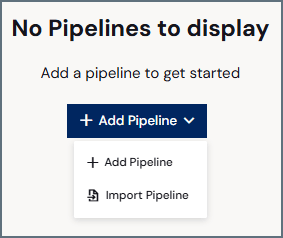
To access the **Pipelines** page, click **Pipelines** in the left navigation bar of the {siteNameShort} interface. When you open the **Pipelines** page for the first time, it displays a message indicating that no pipelines are available, along with an **Add Pipeline** button.
To create your first pipeline, click **Add Pipeline** and select **Add Pipeline** from the drop-down menu, as shown below. For detailed instructions about creating a pipeline, see [Adding a New Pipeline](#adding-a-new-pipeline).
After you create one or more pipelines, clicking **Pipelines** in the navigation bar opens a summary page that displays all pipelines in the current workspace. This page includes two tabs (**Overview** and **History**) that provide details about your pipelines and their execution activity.
The following sections explain the information that is available on each of these tabs.
### Overview Tab
The **Overview** tab displays a table that summarizes your pipelines and enables you to manage them from a single location.
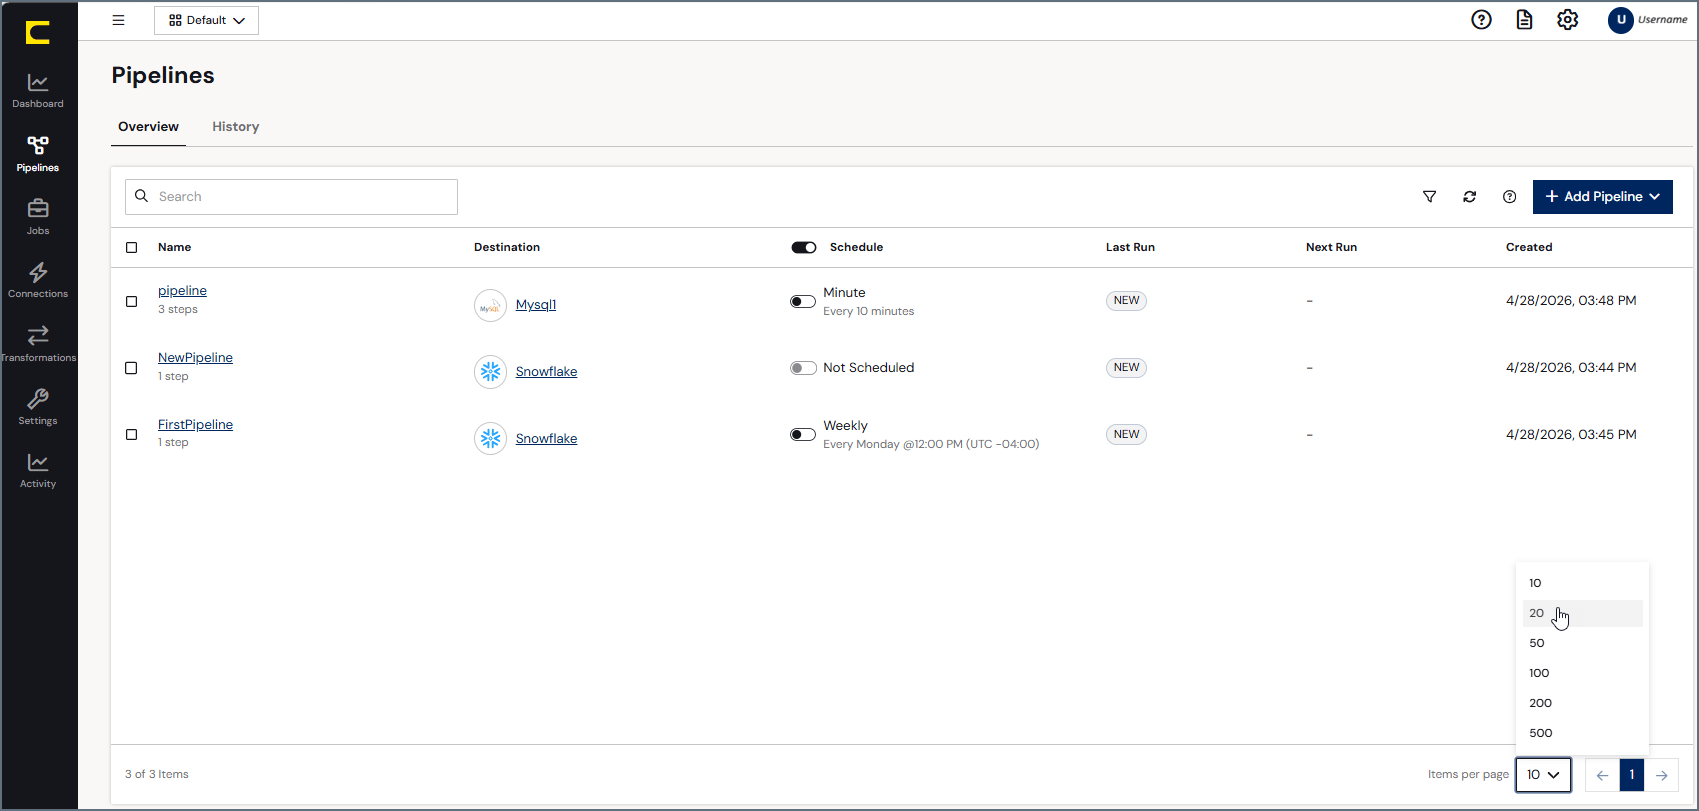
Each pipeline is shown in a separate row, with columns that provide information about each pipeline. You can control how many pipeline records are displayed on the page by selecting a value from the **Items per page** list at the bottom of the page, as shown below.
{siteNameShort} provides details about your pipelines in six columns:
* **NAME:** Lists the name of the pipeline and the number of steps in the pipeline flow.
* **DESTINATION:** Lists the destination connector and provides a link to the settings for that connector
* **SCHEDULE:** Shows the run schedule for your job. For more details, see [Configuring a Run Schedule for a Pipeline](#configuring-a-run-schedule-for-a-pipeline).
* **LAST RUN:** Shows the status (**NEW**, **In Progress**, **Successful**, or **Failed**) of the pipeline's last run.
For pipelines that contain parallel branches, a failed branch does not always cause the pipeline status to change immediately. If the **Stop flow if error** option is enabled for a pipeline step, {siteNameShort} cancels the remaining branches but keeps the pipeline status as **In Progress** until all running branches are finished or stopped. If **Stop flow if error** is disabled, the remaining branches continue to run, and the pipeline does not complete until all branches have finished.
* **NEXT RUN:** Shows the next date and time that the pipeline will run.
* **CREATED:** Shows the date and time that a pipeline was created.
On this tab, you can also manage your pipeline in the following ways:
* View a pipeline in the editor by clicking the pipeline name in the **NAME** column.
* Sort the pipeline list in ascending or descending order by all of the columns except **SCHEDULE**. To change the sort order, click the up (↑) or down (↓) arrow next to the column header.
* Filter the **Pipeline** table by destination. After you apply a filter, you can clear all filter options by clicking the **Reset** link to the right of the filter menu.
* Edit settings for a pipeline, export a pipeline, and remove a pipeline by clicking the options menu (**...**) at the end of the pipeline row and select the action that you want.
### History Tab
The **History** tab displays historical information about pipelines that you have run. The table on this page contains five columns with details about your pipeline:
* **RUN DATE:** Specifies the date and time that your pipeline ran, how long it took to run, and the number of rows that were affected. If an error occurs, the error message is displayed in this column.
* **PIPELINE:** Lists the name of the pipeline and how many steps are in the pipeline.
* **DESTINATION:** Lists the destination connector and provides a link to the settings for that connector.
* **STATUS:** Specifies a pipeline's run status (**Successful**, **Failed**, or **ERROR**).
* **RUN TIME:** Specifies the duration of the run in hours, minutes, and seconds (in the form *HH:MM:SS*).
On this tab, you can also manage your pipeline histories in the following ways:
* Organize your pipeline history list in ascending or descending order via the **RUN DATE** or **PIPELINE** columns. To order the columns, simply click the up (↑) and down (↓) arrows next to the column by which you want to sort.
* Filter the history table by pipeline, destination, and status. Unlike other tabs, the **History** tab does not allow you to save filter options. After you set a filter, you can clear filter options in one of two ways:
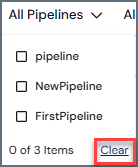
* Clear items in each individual filter by opening the filter and clicking **Clear** at the bottom of the filter list. Once you click **Clear**, selected items are deselected.
* Clear all filters by clicking the **Reset** link to the right of the filter menu.
* Export pipeline logs to your local machine by clicking the **Export Logs** button (upper right of the window).
## Adding a New Pipeline
Adding a pipeline requires preconfigured source and destination connections. After you [define a source connection to your data source and a destination connection to your database](../../connections/connections), follow these steps to create a new pipeline:
1. Click **Pipelines** in the navigation bar to open the **Pipelines** page.
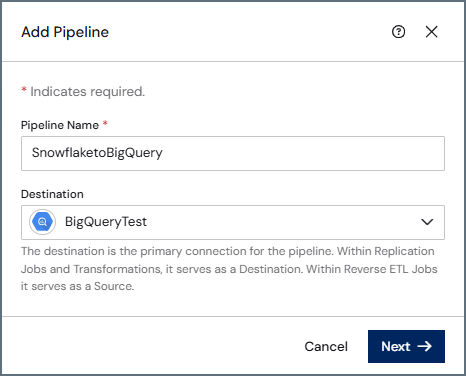
2. Select **Add Pipeline > Add Pipeline**. This action opens the **Add Pipeline** dialog where you can enter pipeline information.
3. Enter a pipeline name and select a destination.
4. Select a step type. For details about step types, see the step descriptions earlier on this page.
**Notes:**
* The example below uses the replicate step. Under **REPLICATE STEP**, select either **Add New Replication Job** or **Convert Existing Replication Job**.
Selecting a step opens a new dialog. Because this example uses the **Add New Replication Job** step, the **Add New Replication Job** dialog opens.
* The **Convert Existing Replication Job** step pulls an existing job directly into pipeline steps. When the existing job contains customized events, {siteNameShort} also adds those events as pipeline steps. To avoid runtime conflicts in a pipeline environment, you must manually update any pre-job event scripts from the existing job after they are added to the pipeline.
Specifically, the `` variables must be removed from the `` block because these values only apply to standalone jobs and are not used in a pipeline flow. If these variable are left in the block, {siteNameShort} returns an error when it attempts to run the pipeline, as shown below:
To edit a pipeline event script, see [Editing Steps in a Pipeline](#editing-steps-in-a-pipeline).
5. Specify the following information on the tabs in the dialog:
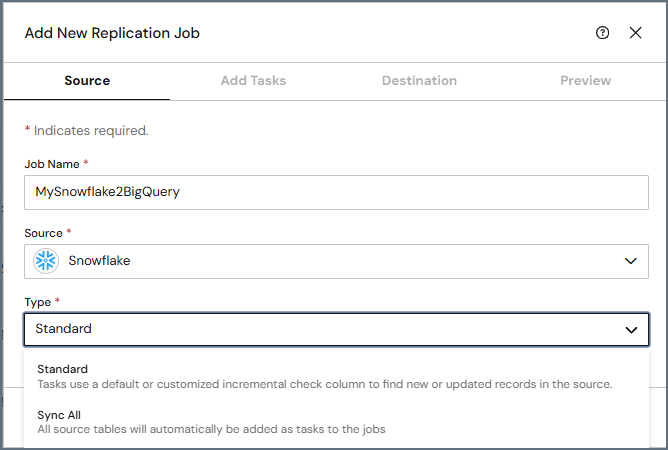
* **Source tab:** Enter a job name, select a source connection, and select a replication type. Then, click **Next**.
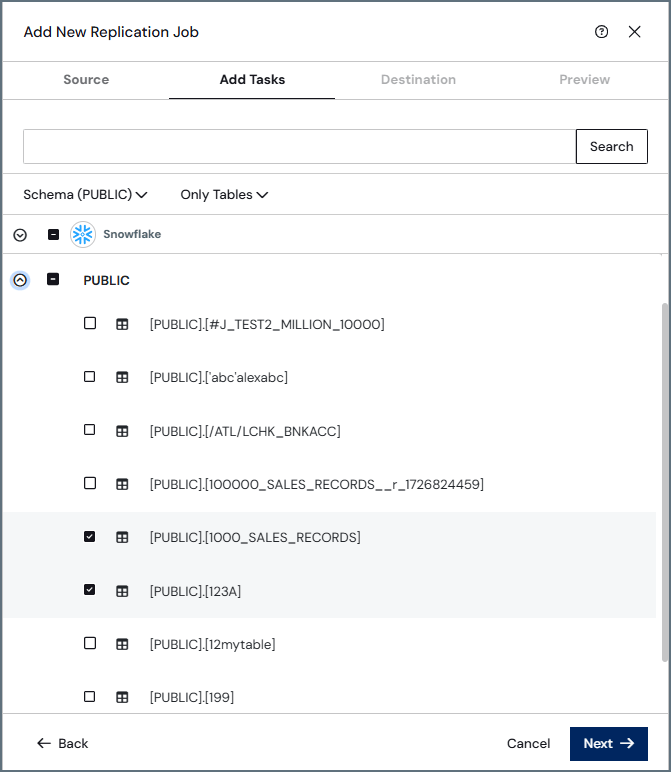
* **Add Tasks tab:** Select one or more tables or views to replicate. Then, click **Next**.
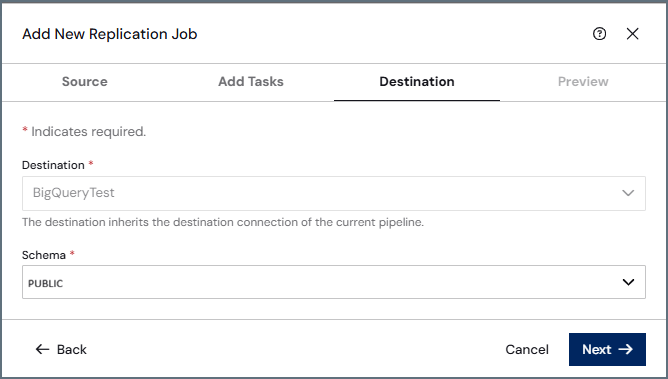
* **Destination tab:** Confirm the destination and select a schema if one is required. Then, click **Next**.
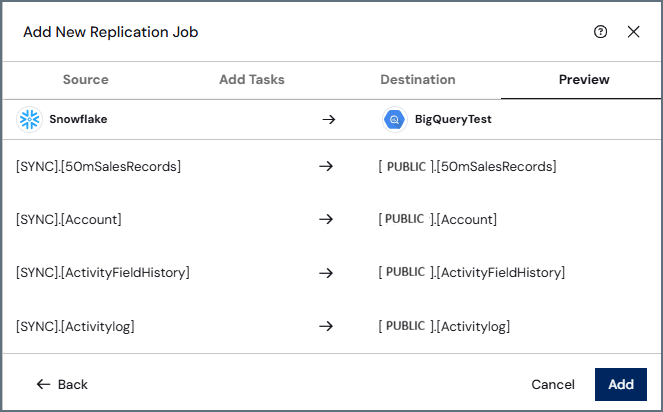
* **Preview tab:** Review the configuration. When you are satisfied with the configuration, click **Add** to create the replication job.
You can cancel pipeline creation at any time by clicking **Cancel** on any step in the **Add New Replication Job** dialog.
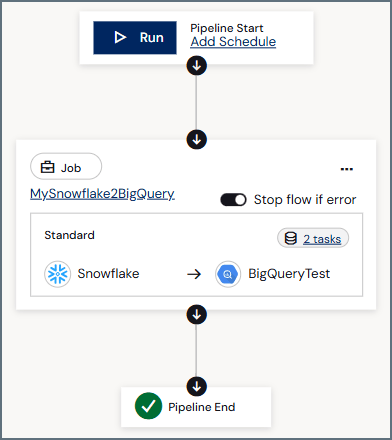
When you complete these steps, {siteNameShort} adds the step to the pipeline and displays the visual workflow, as shown below:
From the **Pipeline** editor (**Pipelines > *YourPipelineName***), you can [edit a pipeline](#editing-a-pipeline), [configure scheduling](#configuring-a-run-schedule-for-a-pipeline), [edit associated jobs](#editing-steps-in-a-pipeline), and [enable email notifications](#enabling-email-notifications).
## Editing a Pipeline
After you create a pipeline, you can modify its name.
To edit a pipeline:
1. Open the **Pipelines** page and locate the pipeline that you want to edit.
2. Click the options menu (**...**) at the end of the pipeline row and select **Edit**. (Alternatively, you can click the link in the pipeline name to navigate to the pipeline page.) This action opens the **Pipeline** editor so that you can modify pipeline structure or configuration.
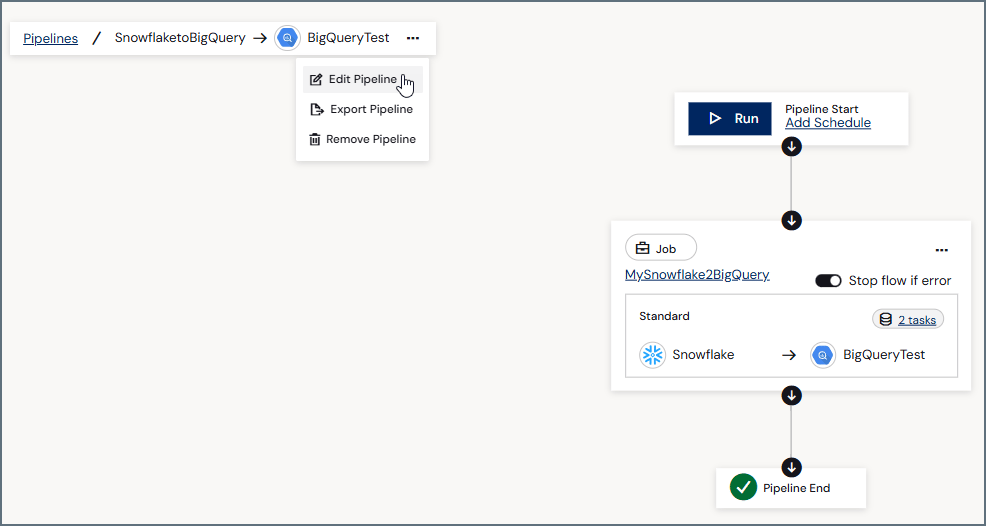
3. In the **Pipeline** editor, click the options menu (**...**) in the selection path at the upper-left corner of the editor page:
This action opens the **Edit Pipeline** dialog, where you can modify the pipeline name.
4. Click **Save**.
## Running a Pipeline
To run a pipeline:
1. Open your pipeline.
2. In the **Start** step for your pipeline, click **Run**.
Once the pipeline is running, {siteNameShort} opens the **Run History** pane on the right side of the editor window. This pane displays the run date and time, the total execution duration, and the current status of the run (**In Progress**, **Successful**, or **Failed**).
{siteNameShort} does not allow pipeline structure modifications while the pipeline is running or canceling.
## Editing Steps in a Pipeline
To edit a pipeline step:
1. Open your pipeline.
2. Locate the step that you want to modify and click the options menu (**...**) for that step.
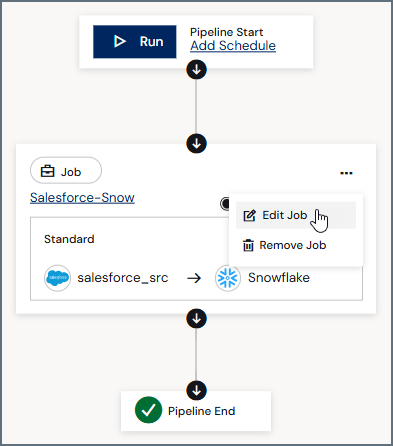
3. Select the action that you want to perform for the step. In the following example, which shows a replication job step, you can select **Edit Job** or **Remove Job**.
When you select **Edit Job**, {siteNameShort} opens the job settings page where you can modify the job, as necessary.
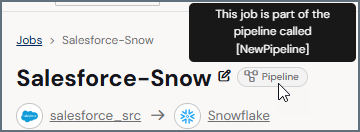
A **Pipeline** icon appears to the right of the job name. When you hover over that icon, {siteNameShort} displays the name of the pipeline to which the job belongs.
4. Save the changes to your job settings. To return to the **Pipeline** editor, click the back arrow in your browser. {siteNameShort} updates the pipeline to reflect your changes.
## Adding Steps to a Pipeline
You can add sequential steps and parallel branches to build out your pipeline workflow.
### Adding Sequential Steps
You can add multiple sequential steps in a pipeline, but you must add each step individually.
To add a step:
1. Open the pipeline.
2. Select where to insert the new step by placing your cursor over one of the connecting lines in the flow.
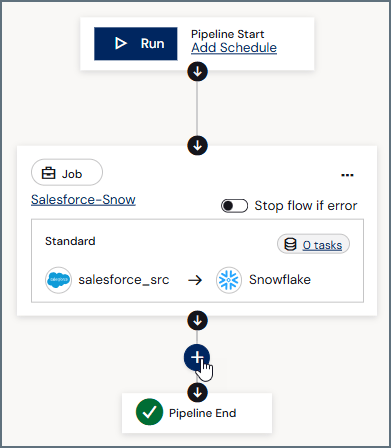
3. Click the **Add Step** icon (a blue circle with a plus sign) that appears.
This action opens the **Select Step Type** dialog.
4. Select the type of step that you want to add.
5. Continue through the dialogs to configure and add the new step. For detailed configuration instructions, see step 5 in [Adding a New Pipeline](#adding-a-new-pipeline).
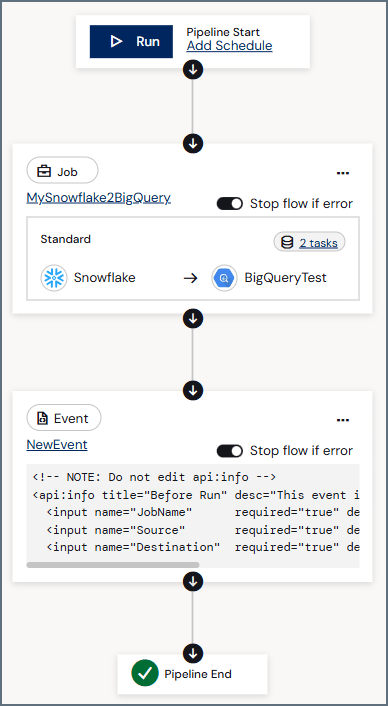
In the following example, a transformation step (**MyTransformation**) is added after the original step.
Repeat the steps above as necessary to include additional steps.
### Adding a Parallel Branch
You can add a parallel branch to run two or more steps concurrently within a single pipeline. Parallel steps have no guaranteed execution order, and the pipeline completes only after all parallel branches finish.
To add a parallel branch:
1. Open the pipeline.
2. Hover over the line between two steps until the **Add Step** icon appears. Do not click the icon. Instead, move the pointer to the right or left of the existing step to position the new branch in the flow diagram. Then, click the **Add Step** icon on the connecting line for that branch.
3. In the **Select Step Type** dialog, select the step type that you want to add and complete the configuration steps. For detailed instructions on the remaining configuration steps, see step 5 in [Adding a New Pipeline](#adding-a-new-pipeline).
After you complete the steps, {siteNameShort} adds the new branch alongside the existing flow, as shown below. You can continue adding parallel branches wherever you need them.
To reorder steps in a branch, drag a step to a different position within the same branch. To move a step to another branch, drag it to the target branch. If the operation is not valid, {siteNameShort} automatically returns the step to its original position.
Each step node includes a **Stop flow if error** toggle. If this toggle is enabled, a failing branch causes {siteNameShort} to cancel the remaining branches. If it is disabled, all branches continue running regardless of errors, and the pipeline completes only after all branches finish.
## Removing Steps in a Pipeline
To remove a pipeline step:
1. Open your pipeline and locate the step that you want to remove.
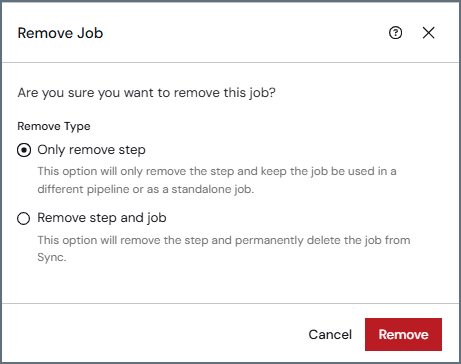
2. Click the options menu (**...**) for that step and select **Remove *StepType***, where *StepType* is the name of the step type (for example, **Remove Job** or **Remove Transformation**). This action opens the **Remove *StepType*** dialog.
In the dialog, you can choose one of the following options:
* **Only remove step:** This option removes the step from the pipeline but keeps the underlying component (job, transformation, or event) for use in another pipeline or as a standalone component.
* **Remove step and *component*:** This option removes the step and permanently removes the underlying component from {siteNameShort}.
3. Select the option that you want, as shown in the following example:
4. Click **Remove**.
## Managing Pipelines
After you add or import a pipeline, {siteNameShort} displays it as a visual workflow diagram. You can manage pipeline configuration, execution, and monitoring from the pipeline editor.
* At the upper-left corner of the editor page, {siteNameShort} displays the pipeline name and an options menu (**...**). From this menu, you can edit, export, or remove the pipeline.
* The upper-right corner of the page provides additional controls, including a notifications toggle, an **Edit Notifications** () icon, and a **Run History** button. Clicking **Run History** displays the pipeline's run history in a side pane.
* The pipeline workflows appears in the center of the editor page and consists of the following nodes and functionality.
* **Pipeline Start node:** This node provides controls for executing and scheduling the pipeline.
* A **Run** button enables you to execute the pipeline manually.
* An **Add Schedule** link is displayed if no schedule is configured. Clicking the link opens the **Add Schedule** dialog, where you can define a run interval. After you configure a schedule, that information appears in the **Pipeline Start** node. You can edit or remove the schedule by clicking the options menu (**...**) and selecting the appropriate option.
* **Step nodes:** Each step, which appears as a node in the pipeline, includes the following information and actions:
* the step type (job , reverse ETL, transformation, or event)
* the job, transformation, or event type
* the number of tasks that are configured for the step
* an options menu (**...**) that enables you to edit or remove the step
* the **Stop flow if error** toggle
* the source and destination connectors that are associated with the step
* **Pipeline End node:** This node indicates the completion of the pipeline workflow and marks the point at which execution stops after the final step runs.
### Configuring a Run Schedule for a Pipeline
You can configure a pipeline to run automatically on a defined schedule.
To schedule a pipeline run:
1. Click the **Add Schedule** link in the **Pipeline Start** node.
When you click the link, {siteNameShort} opens the **Add Schedule** dialog.
2. Select the run interval that you want for your pipeline. Then, click **Add Schedule**.
After you add a schedule, the configured run interval appears in the **Pipeline Start** node, as shown below.
### Enabling Email Notifications
You can configure email notifications to be sent after a pipeline runs.
To enable email notifications for a pipeline:
1. In the upper right of the **Pipelines** editor, slide the notifications toggle to the right.
2. (Optional) To override any global notification settings, click the **Edit Notifications** () icon to the right of the toggle. This action opens the **Notifications** dialog.
3. Select **Override Global Settings** and modify the notification settings, as necessary.
4. Click **Save** to apply your changes.
### Exporting a Pipeline
You can export a pipeline from {siteNameShort} to a file on your local machine.
To export a pipeline:
1. Open the **Pipelines** summary page.
2. Locate the pipeline that you want to export.
3. Click the options menu (**...**) at the end of the pipeline row and select **Export**. Alternatively, you can open the pipeline and click the options menu in the upper-left corner of the **Pipeline** editor, and then select **Export Pipeline**.
When you are prompted, choose a location on your machine to save the exported pipeline file.
{siteNameShort} downloads the pipeline file (with a {siteNameShortLower}pipeline extension) to your machine. You can store this file for backup purposes or import it into another workspace or environment at a later time.
### Importing a Pipeline
You can import a .{siteNameShortLower}pipeline file into {siteNameShort} from a location on your local machine.
To import a pipeline:
1. Open the **Pipelines** summary page.
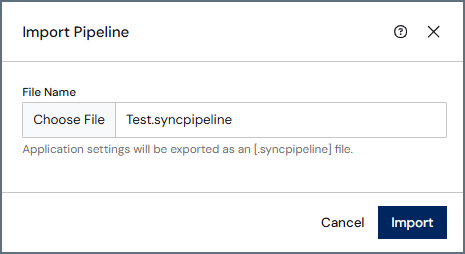
2. Select **Add Pipeline > Import Pipeline**. This action opens the **Import Pipeline** dialog.
3. Click **Choose File** to open a file explorer. Select the pipeline file that you want to import, and then click **Open**. (The file should have a .{siteNameShortLower}pipeline extension.)
4. Click **Import** in the **Import Pipeline** dialog to import your pipeline to {siteNameShort}.
You can import this file at a later time to any workspace in {siteNameShort}.
### Removing a Pipeline
You can remove a pipeline in either of the following ways:
* On the **Pipelines** summary page, click the options menu (**...**) at the end of the pipeline row and select **Remove**.
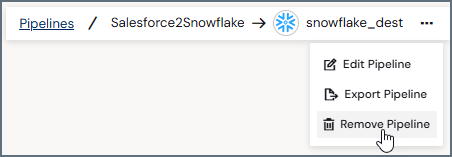
* From the **Pipeline** editor, click the options menu (**...**) in the upper left corner of the page and select **Remove Pipeline**.
## Using Pipeline Variables
Pipeline variables let you define values once at the start of a pipeline run and reference them in any task query or transformation throughout the pipeline. This approach makes it easy to reuse dynamic values (for example, a custom filter value) across multiple steps without hardcoding them.
### Understanding Built-In Attributes
When a pipeline starts, {siteNameShort} automatically creates the following read-only pipeline attributes:
* `id`: The unique identifier of the pipeline.
* `name`: The name of the pipeline.
* `runstartdate`: The date and time the pipeline run started.
These attributes are available to every step in the pipeline and cannot be modified.
### Defining Custom Variables
You can define custom pipeline variables in a variable event (that is, in an event step that runs before any other pipeline steps execute). Variables that are defined in the variable event are available throughout the entire pipeline run.
To define a custom variable, use the following syntax in the event-step script, replacing `myvar` with your variable name:
```xml theme={null}
```
For example, to define a cutoff date, submit the following script, where the custom variable is `cutoffdate`:
```xml theme={null}
```
### Referencing Pipeline Variables
You can reference pipeline variables in replication queries and transformations. To reference a pipeline variable, use this syntax: `{pipeline:variablename}`
This syntax works for both built-in attributes and custom variables.
For example, to reference a custom variable in a REPLICATE query, submit the following statement:
```sql theme={null}
REPLICATE [Orders] SELECT * FROM [Orders] WHERE [OrderDate] > '{pipeline:cutoffdate}'
```
To reference a built-in attribute, submit a query like the following:
```sql theme={null}
REPLICATE [AuditLog] SELECT '{pipeline:runstartdate}' AS [RunDate], * FROM [AuditLog]
```
### Understanding Variable Precedence
Pipeline variables serve as global defaults for the entire pipeline run. However, if a pipeline step produces output that contains a key with the same name as a custom pipeline variable, downstream steps use the step output value instead.
By contrast, the built-in, read-only attributes (`id`, `name`, and `runstartdate`) cannot be overridden under any circumstances.
### Running Pipeline-Associated Jobs Outside of a Pipeline
If a task query references pipeline variables and the associated job is run outside of a pipeline (for example, manually, via re-syncing, or as a standalone job), the pipeline variables are not available. The job runs, but it returns errors in the task results.
 After you create one or more pipelines, clicking **Pipelines** in the navigation bar opens a summary page that displays all pipelines in the current workspace. This page includes two tabs (**Overview** and **History**) that provide details about your pipelines and their execution activity.
The following sections explain the information that is available on each of these tabs.
### Overview Tab
The **Overview** tab displays a table that summarizes your pipelines and enables you to manage them from a single location.
Each pipeline is shown in a separate row, with columns that provide information about each pipeline. You can control how many pipeline records are displayed on the page by selecting a value from the **Items per page** list at the bottom of the page, as shown below.
After you create one or more pipelines, clicking **Pipelines** in the navigation bar opens a summary page that displays all pipelines in the current workspace. This page includes two tabs (**Overview** and **History**) that provide details about your pipelines and their execution activity.
The following sections explain the information that is available on each of these tabs.
### Overview Tab
The **Overview** tab displays a table that summarizes your pipelines and enables you to manage them from a single location.
Each pipeline is shown in a separate row, with columns that provide information about each pipeline. You can control how many pipeline records are displayed on the page by selecting a value from the **Items per page** list at the bottom of the page, as shown below.
 {siteNameShort} provides details about your pipelines in six columns:
* **NAME:** Lists the name of the pipeline and the number of steps in the pipeline flow.
* **DESTINATION:** Lists the destination connector and provides a link to the settings for that connector
* **SCHEDULE:** Shows the run schedule for your job. For more details, see [Configuring a Run Schedule for a Pipeline](#configuring-a-run-schedule-for-a-pipeline).
* **LAST RUN:** Shows the status (**NEW**, **In Progress**, **Successful**, or **Failed**) of the pipeline's last run.
{siteNameShort} provides details about your pipelines in six columns:
* **NAME:** Lists the name of the pipeline and the number of steps in the pipeline flow.
* **DESTINATION:** Lists the destination connector and provides a link to the settings for that connector
* **SCHEDULE:** Shows the run schedule for your job. For more details, see [Configuring a Run Schedule for a Pipeline](#configuring-a-run-schedule-for-a-pipeline).
* **LAST RUN:** Shows the status (**NEW**, **In Progress**, **Successful**, or **Failed**) of the pipeline's last run.
 On this tab, you can also manage your pipeline histories in the following ways:
* Organize your pipeline history list in ascending or descending order via the **RUN DATE** or **PIPELINE** columns. To order the columns, simply click the up (↑) and down (↓) arrows next to the column by which you want to sort.
* Filter the history table by pipeline, destination, and status. Unlike other tabs, the **History** tab does not allow you to save filter options. After you set a filter, you can clear filter options in one of two ways:
* Clear items in each individual filter by opening the filter and clicking **Clear** at the bottom of the filter list. Once you click **Clear**, selected items are deselected.
On this tab, you can also manage your pipeline histories in the following ways:
* Organize your pipeline history list in ascending or descending order via the **RUN DATE** or **PIPELINE** columns. To order the columns, simply click the up (↑) and down (↓) arrows next to the column by which you want to sort.
* Filter the history table by pipeline, destination, and status. Unlike other tabs, the **History** tab does not allow you to save filter options. After you set a filter, you can clear filter options in one of two ways:
* Clear items in each individual filter by opening the filter and clicking **Clear** at the bottom of the filter list. Once you click **Clear**, selected items are deselected.
 * Clear all filters by clicking the **Reset** link to the right of the filter menu.
* Export pipeline logs to your local machine by clicking the **Export Logs** button (upper right of the window).
## Adding a New Pipeline
Adding a pipeline requires preconfigured source and destination connections. After you [define a source connection to your data source and a destination connection to your database](../../connections/connections), follow these steps to create a new pipeline:
1. Click **Pipelines** in the navigation bar to open the **Pipelines** page.
2. Select **Add Pipeline > Add Pipeline**. This action opens the **Add Pipeline** dialog where you can enter pipeline information.
3. Enter a pipeline name and select a destination.
* Clear all filters by clicking the **Reset** link to the right of the filter menu.
* Export pipeline logs to your local machine by clicking the **Export Logs** button (upper right of the window).
## Adding a New Pipeline
Adding a pipeline requires preconfigured source and destination connections. After you [define a source connection to your data source and a destination connection to your database](../../connections/connections), follow these steps to create a new pipeline:
1. Click **Pipelines** in the navigation bar to open the **Pipelines** page.
2. Select **Add Pipeline > Add Pipeline**. This action opens the **Add Pipeline** dialog where you can enter pipeline information.
3. Enter a pipeline name and select a destination.
 4. Select a step type. For details about step types, see the step descriptions earlier on this page.
**Notes:**
* The example below uses the replicate step. Under **REPLICATE STEP**, select either **Add New Replication Job** or **Convert Existing Replication Job**.
4. Select a step type. For details about step types, see the step descriptions earlier on this page.
**Notes:**
* The example below uses the replicate step. Under **REPLICATE STEP**, select either **Add New Replication Job** or **Convert Existing Replication Job**.
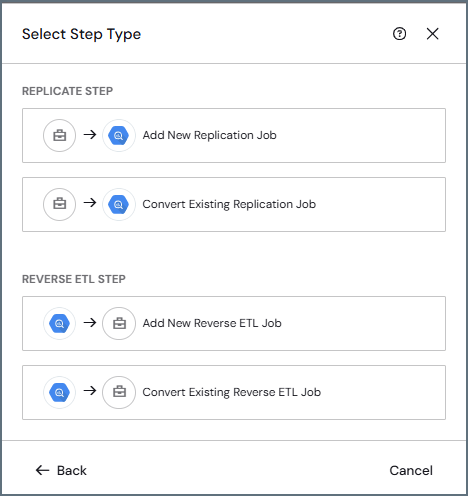 Selecting a step opens a new dialog. Because this example uses the **Add New Replication Job** step, the **Add New Replication Job** dialog opens.
* The **Convert Existing Replication Job** step pulls an existing job directly into pipeline steps. When the existing job contains customized events, {siteNameShort} also adds those events as pipeline steps. To avoid runtime conflicts in a pipeline environment, you must manually update any pre-job event scripts from the existing job after they are added to the pipeline.
Specifically, the `` variables must be removed from the `
Selecting a step opens a new dialog. Because this example uses the **Add New Replication Job** step, the **Add New Replication Job** dialog opens.
* The **Convert Existing Replication Job** step pulls an existing job directly into pipeline steps. When the existing job contains customized events, {siteNameShort} also adds those events as pipeline steps. To avoid runtime conflicts in a pipeline environment, you must manually update any pre-job event scripts from the existing job after they are added to the pipeline.
Specifically, the `` variables must be removed from the `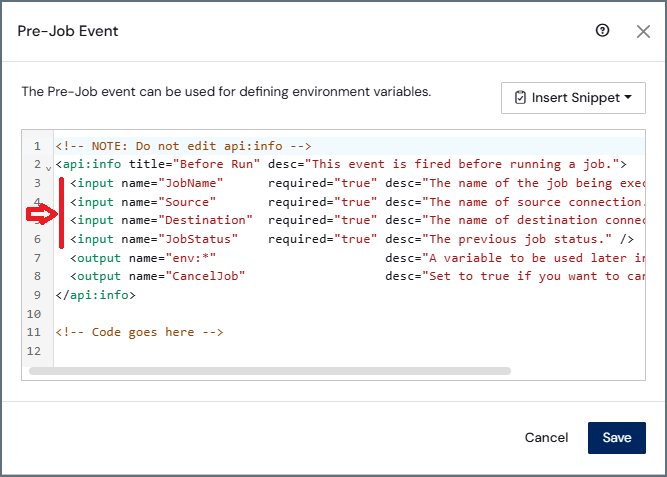 To edit a pipeline event script, see [Editing Steps in a Pipeline](#editing-steps-in-a-pipeline).
5. Specify the following information on the tabs in the dialog:
* **Source tab:** Enter a job name, select a source connection, and select a replication type. Then, click **Next**.
To edit a pipeline event script, see [Editing Steps in a Pipeline](#editing-steps-in-a-pipeline).
5. Specify the following information on the tabs in the dialog:
* **Source tab:** Enter a job name, select a source connection, and select a replication type. Then, click **Next**.
 * **Add Tasks tab:** Select one or more tables or views to replicate. Then, click **Next**.
 * **Destination tab:** Confirm the destination and select a schema if one is required. Then, click **Next**.
 * **Preview tab:** Review the configuration. When you are satisfied with the configuration, click **Add** to create the replication job.
 From the **Pipeline** editor (**Pipelines > *YourPipelineName***), you can [edit a pipeline](#editing-a-pipeline), [configure scheduling](#configuring-a-run-schedule-for-a-pipeline), [edit associated jobs](#editing-steps-in-a-pipeline), and [enable email notifications](#enabling-email-notifications).
## Editing a Pipeline
After you create a pipeline, you can modify its name.
To edit a pipeline:
1. Open the **Pipelines** page and locate the pipeline that you want to edit.
2. Click the options menu (**...**) at the end of the pipeline row and select **Edit**. (Alternatively, you can click the link in the pipeline name to navigate to the pipeline page.) This action opens the **Pipeline** editor so that you can modify pipeline structure or configuration.
3. In the **Pipeline** editor, click the options menu (**...**) in the selection path at the upper-left corner of the editor page:
From the **Pipeline** editor (**Pipelines > *YourPipelineName***), you can [edit a pipeline](#editing-a-pipeline), [configure scheduling](#configuring-a-run-schedule-for-a-pipeline), [edit associated jobs](#editing-steps-in-a-pipeline), and [enable email notifications](#enabling-email-notifications).
## Editing a Pipeline
After you create a pipeline, you can modify its name.
To edit a pipeline:
1. Open the **Pipelines** page and locate the pipeline that you want to edit.
2. Click the options menu (**...**) at the end of the pipeline row and select **Edit**. (Alternatively, you can click the link in the pipeline name to navigate to the pipeline page.) This action opens the **Pipeline** editor so that you can modify pipeline structure or configuration.
3. In the **Pipeline** editor, click the options menu (**...**) in the selection path at the upper-left corner of the editor page:
 This action opens the **Edit Pipeline** dialog, where you can modify the pipeline name.
4. Click **Save**.
## Running a Pipeline
To run a pipeline:
1. Open your pipeline.
2. In the **Start** step for your pipeline, click **Run**.
Once the pipeline is running, {siteNameShort} opens the **Run History** pane on the right side of the editor window. This pane displays the run date and time, the total execution duration, and the current status of the run (**In Progress**, **Successful**, or **Failed**).
This action opens the **Edit Pipeline** dialog, where you can modify the pipeline name.
4. Click **Save**.
## Running a Pipeline
To run a pipeline:
1. Open your pipeline.
2. In the **Start** step for your pipeline, click **Run**.
Once the pipeline is running, {siteNameShort} opens the **Run History** pane on the right side of the editor window. This pane displays the run date and time, the total execution duration, and the current status of the run (**In Progress**, **Successful**, or **Failed**).
 When you select **Edit Job**, {siteNameShort} opens the job settings page where you can modify the job, as necessary.
A **Pipeline** icon appears to the right of the job name. When you hover over that icon, {siteNameShort} displays the name of the pipeline to which the job belongs.
When you select **Edit Job**, {siteNameShort} opens the job settings page where you can modify the job, as necessary.
A **Pipeline** icon appears to the right of the job name. When you hover over that icon, {siteNameShort} displays the name of the pipeline to which the job belongs.
 4. Save the changes to your job settings. To return to the **Pipeline** editor, click the back arrow in your browser. {siteNameShort} updates the pipeline to reflect your changes.
## Adding Steps to a Pipeline
You can add sequential steps and parallel branches to build out your pipeline workflow.
### Adding Sequential Steps
You can add multiple sequential steps in a pipeline, but you must add each step individually.
To add a step:
1. Open the pipeline.
2. Select where to insert the new step by placing your cursor over one of the connecting lines in the flow.
3. Click the **Add Step** icon (a blue circle with a plus sign) that appears.
4. Save the changes to your job settings. To return to the **Pipeline** editor, click the back arrow in your browser. {siteNameShort} updates the pipeline to reflect your changes.
## Adding Steps to a Pipeline
You can add sequential steps and parallel branches to build out your pipeline workflow.
### Adding Sequential Steps
You can add multiple sequential steps in a pipeline, but you must add each step individually.
To add a step:
1. Open the pipeline.
2. Select where to insert the new step by placing your cursor over one of the connecting lines in the flow.
3. Click the **Add Step** icon (a blue circle with a plus sign) that appears.
 This action opens the **Select Step Type** dialog.
4. Select the type of step that you want to add.
5. Continue through the dialogs to configure and add the new step. For detailed configuration instructions, see step 5 in [Adding a New Pipeline](#adding-a-new-pipeline).
In the following example, a transformation step (**MyTransformation**) is added after the original step.
This action opens the **Select Step Type** dialog.
4. Select the type of step that you want to add.
5. Continue through the dialogs to configure and add the new step. For detailed configuration instructions, see step 5 in [Adding a New Pipeline](#adding-a-new-pipeline).
In the following example, a transformation step (**MyTransformation**) is added after the original step.
 Repeat the steps above as necessary to include additional steps.
### Adding a Parallel Branch
You can add a parallel branch to run two or more steps concurrently within a single pipeline. Parallel steps have no guaranteed execution order, and the pipeline completes only after all parallel branches finish.
To add a parallel branch:
1. Open the pipeline.
2. Hover over the line between two steps until the **Add Step** icon appears. Do not click the icon. Instead, move the pointer to the right or left of the existing step to position the new branch in the flow diagram. Then, click the **Add Step** icon on the connecting line for that branch.
Repeat the steps above as necessary to include additional steps.
### Adding a Parallel Branch
You can add a parallel branch to run two or more steps concurrently within a single pipeline. Parallel steps have no guaranteed execution order, and the pipeline completes only after all parallel branches finish.
To add a parallel branch:
1. Open the pipeline.
2. Hover over the line between two steps until the **Add Step** icon appears. Do not click the icon. Instead, move the pointer to the right or left of the existing step to position the new branch in the flow diagram. Then, click the **Add Step** icon on the connecting line for that branch.
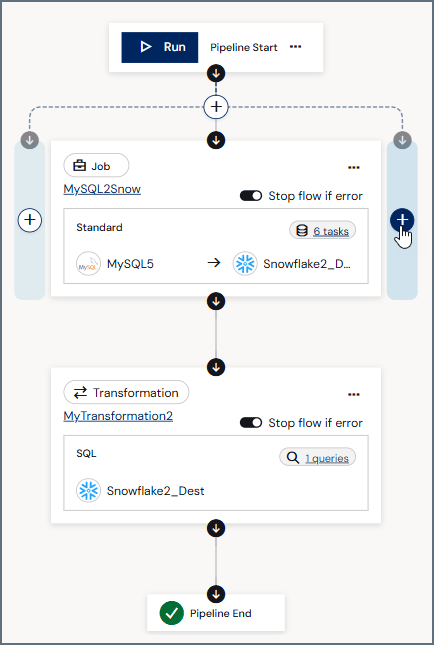 3. In the **Select Step Type** dialog, select the step type that you want to add and complete the configuration steps. For detailed instructions on the remaining configuration steps, see step 5 in [Adding a New Pipeline](#adding-a-new-pipeline).
After you complete the steps, {siteNameShort} adds the new branch alongside the existing flow, as shown below. You can continue adding parallel branches wherever you need them.
3. In the **Select Step Type** dialog, select the step type that you want to add and complete the configuration steps. For detailed instructions on the remaining configuration steps, see step 5 in [Adding a New Pipeline](#adding-a-new-pipeline).
After you complete the steps, {siteNameShort} adds the new branch alongside the existing flow, as shown below. You can continue adding parallel branches wherever you need them.
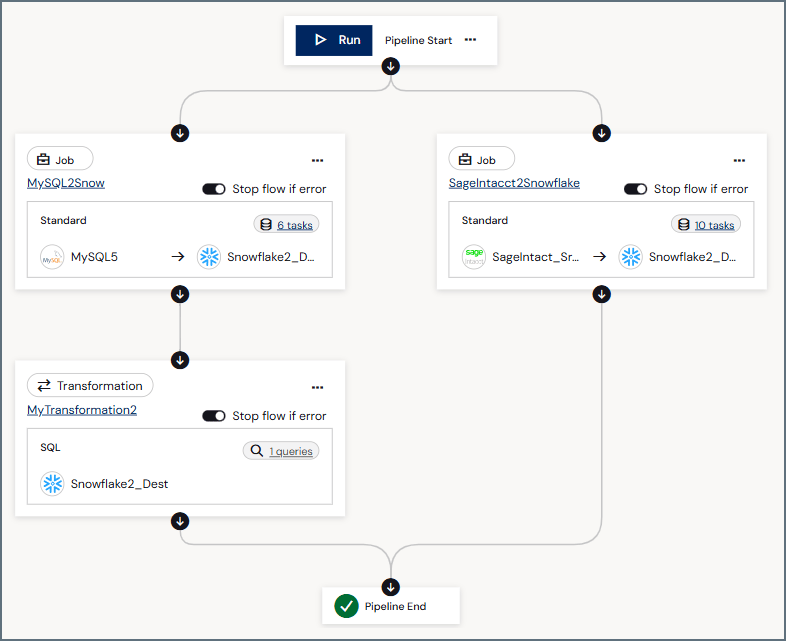 To reorder steps in a branch, drag a step to a different position within the same branch. To move a step to another branch, drag it to the target branch. If the operation is not valid, {siteNameShort} automatically returns the step to its original position.
 4. Click **Remove**.
## Managing Pipelines
After you add or import a pipeline, {siteNameShort} displays it as a visual workflow diagram. You can manage pipeline configuration, execution, and monitoring from the pipeline editor.
* At the upper-left corner of the editor page, {siteNameShort} displays the pipeline name and an options menu (**...**). From this menu, you can edit, export, or remove the pipeline.
* The upper-right corner of the page provides additional controls, including a notifications toggle, an **Edit Notifications** (
4. Click **Remove**.
## Managing Pipelines
After you add or import a pipeline, {siteNameShort} displays it as a visual workflow diagram. You can manage pipeline configuration, execution, and monitoring from the pipeline editor.
* At the upper-left corner of the editor page, {siteNameShort} displays the pipeline name and an options menu (**...**). From this menu, you can edit, export, or remove the pipeline.
* The upper-right corner of the page provides additional controls, including a notifications toggle, an **Edit Notifications** ( ) icon, and a **Run History** button. Clicking **Run History** displays the pipeline's run history in a side pane.
* The pipeline workflows appears in the center of the editor page and consists of the following nodes and functionality.
* **Pipeline Start node:** This node provides controls for executing and scheduling the pipeline.
* A **Run** button enables you to execute the pipeline manually.
* An **Add Schedule** link is displayed if no schedule is configured. Clicking the link opens the **Add Schedule** dialog, where you can define a run interval. After you configure a schedule, that information appears in the **Pipeline Start** node. You can edit or remove the schedule by clicking the options menu (**...**) and selecting the appropriate option.
* **Step nodes:** Each step, which appears as a node in the pipeline, includes the following information and actions:
* the step type (job , reverse ETL, transformation, or event)
* the job, transformation, or event type
* the number of tasks that are configured for the step
* an options menu (**...**) that enables you to edit or remove the step
* the **Stop flow if error** toggle
* the source and destination connectors that are associated with the step
* **Pipeline End node:** This node indicates the completion of the pipeline workflow and marks the point at which execution stops after the final step runs.
### Configuring a Run Schedule for a Pipeline
You can configure a pipeline to run automatically on a defined schedule.
To schedule a pipeline run:
1. Click the **Add Schedule** link in the **Pipeline Start** node.
) icon, and a **Run History** button. Clicking **Run History** displays the pipeline's run history in a side pane.
* The pipeline workflows appears in the center of the editor page and consists of the following nodes and functionality.
* **Pipeline Start node:** This node provides controls for executing and scheduling the pipeline.
* A **Run** button enables you to execute the pipeline manually.
* An **Add Schedule** link is displayed if no schedule is configured. Clicking the link opens the **Add Schedule** dialog, where you can define a run interval. After you configure a schedule, that information appears in the **Pipeline Start** node. You can edit or remove the schedule by clicking the options menu (**...**) and selecting the appropriate option.
* **Step nodes:** Each step, which appears as a node in the pipeline, includes the following information and actions:
* the step type (job , reverse ETL, transformation, or event)
* the job, transformation, or event type
* the number of tasks that are configured for the step
* an options menu (**...**) that enables you to edit or remove the step
* the **Stop flow if error** toggle
* the source and destination connectors that are associated with the step
* **Pipeline End node:** This node indicates the completion of the pipeline workflow and marks the point at which execution stops after the final step runs.
### Configuring a Run Schedule for a Pipeline
You can configure a pipeline to run automatically on a defined schedule.
To schedule a pipeline run:
1. Click the **Add Schedule** link in the **Pipeline Start** node.
 When you click the link, {siteNameShort} opens the **Add Schedule** dialog.
2. Select the run interval that you want for your pipeline. Then, click **Add Schedule**.
When you click the link, {siteNameShort} opens the **Add Schedule** dialog.
2. Select the run interval that you want for your pipeline. Then, click **Add Schedule**.
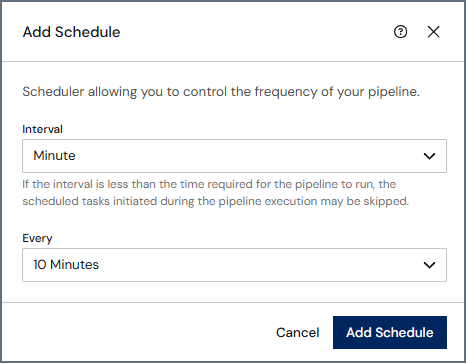 After you add a schedule, the configured run interval appears in the **Pipeline Start** node, as shown below.
 ### Enabling Email Notifications
You can configure email notifications to be sent after a pipeline runs.
To enable email notifications for a pipeline:
1. In the upper right of the **Pipelines** editor, slide the notifications toggle to the right.
2. (Optional) To override any global notification settings, click the **Edit Notifications** (
### Enabling Email Notifications
You can configure email notifications to be sent after a pipeline runs.
To enable email notifications for a pipeline:
1. In the upper right of the **Pipelines** editor, slide the notifications toggle to the right.
2. (Optional) To override any global notification settings, click the **Edit Notifications** (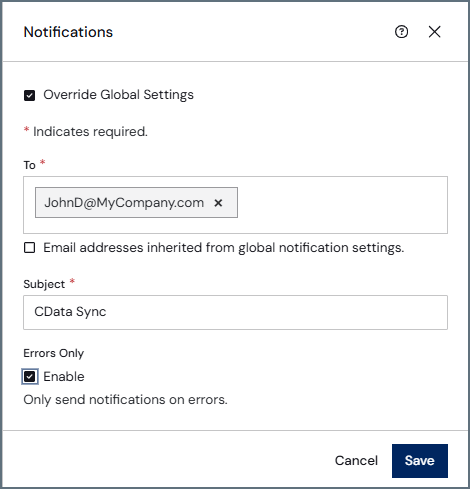 4. Click **Save** to apply your changes.
### Exporting a Pipeline
You can export a pipeline from {siteNameShort} to a file on your local machine.
To export a pipeline:
1. Open the **Pipelines** summary page.
2. Locate the pipeline that you want to export.
3. Click the options menu (**...**) at the end of the pipeline row and select **Export**. Alternatively, you can open the pipeline and click the options menu in the upper-left corner of the **Pipeline** editor, and then select **Export Pipeline**.
When you are prompted, choose a location on your machine to save the exported pipeline file.
{siteNameShort} downloads the pipeline file (with a {siteNameShortLower}pipeline extension) to your machine. You can store this file for backup purposes or import it into another workspace or environment at a later time.
### Importing a Pipeline
You can import a .{siteNameShortLower}pipeline file into {siteNameShort} from a location on your local machine.
To import a pipeline:
1. Open the **Pipelines** summary page.
2. Select **Add Pipeline > Import Pipeline**. This action opens the **Import Pipeline** dialog.
3. Click **Choose File** to open a file explorer. Select the pipeline file that you want to import, and then click **Open**. (The file should have a .{siteNameShortLower}pipeline extension.)
4. Click **Import** in the **Import Pipeline** dialog to import your pipeline to {siteNameShort}.
4. Click **Save** to apply your changes.
### Exporting a Pipeline
You can export a pipeline from {siteNameShort} to a file on your local machine.
To export a pipeline:
1. Open the **Pipelines** summary page.
2. Locate the pipeline that you want to export.
3. Click the options menu (**...**) at the end of the pipeline row and select **Export**. Alternatively, you can open the pipeline and click the options menu in the upper-left corner of the **Pipeline** editor, and then select **Export Pipeline**.
When you are prompted, choose a location on your machine to save the exported pipeline file.
{siteNameShort} downloads the pipeline file (with a {siteNameShortLower}pipeline extension) to your machine. You can store this file for backup purposes or import it into another workspace or environment at a later time.
### Importing a Pipeline
You can import a .{siteNameShortLower}pipeline file into {siteNameShort} from a location on your local machine.
To import a pipeline:
1. Open the **Pipelines** summary page.
2. Select **Add Pipeline > Import Pipeline**. This action opens the **Import Pipeline** dialog.
3. Click **Choose File** to open a file explorer. Select the pipeline file that you want to import, and then click **Open**. (The file should have a .{siteNameShortLower}pipeline extension.)
4. Click **Import** in the **Import Pipeline** dialog to import your pipeline to {siteNameShort}.
 You can import this file at a later time to any workspace in {siteNameShort}.
### Removing a Pipeline
You can remove a pipeline in either of the following ways:
* On the **Pipelines** summary page, click the options menu (**...**) at the end of the pipeline row and select **Remove**.
* From the **Pipeline** editor, click the options menu (**...**) in the upper left corner of the page and select **Remove Pipeline**.
You can import this file at a later time to any workspace in {siteNameShort}.
### Removing a Pipeline
You can remove a pipeline in either of the following ways:
* On the **Pipelines** summary page, click the options menu (**...**) at the end of the pipeline row and select **Remove**.
* From the **Pipeline** editor, click the options menu (**...**) in the upper left corner of the page and select **Remove Pipeline**.
 ## Using Pipeline Variables
Pipeline variables let you define values once at the start of a pipeline run and reference them in any task query or transformation throughout the pipeline. This approach makes it easy to reuse dynamic values (for example, a custom filter value) across multiple steps without hardcoding them.
### Understanding Built-In Attributes
When a pipeline starts, {siteNameShort} automatically creates the following read-only pipeline attributes:
* `id`: The unique identifier of the pipeline.
* `name`: The name of the pipeline.
* `runstartdate`: The date and time the pipeline run started.
These attributes are available to every step in the pipeline and cannot be modified.
### Defining Custom Variables
You can define custom pipeline variables in a variable event (that is, in an event step that runs before any other pipeline steps execute). Variables that are defined in the variable event are available throughout the entire pipeline run.
To define a custom variable, use the following syntax in the event-step script, replacing `myvar` with your variable name:
```xml theme={null}
## Using Pipeline Variables
Pipeline variables let you define values once at the start of a pipeline run and reference them in any task query or transformation throughout the pipeline. This approach makes it easy to reuse dynamic values (for example, a custom filter value) across multiple steps without hardcoding them.
### Understanding Built-In Attributes
When a pipeline starts, {siteNameShort} automatically creates the following read-only pipeline attributes:
* `id`: The unique identifier of the pipeline.
* `name`: The name of the pipeline.
* `runstartdate`: The date and time the pipeline run started.
These attributes are available to every step in the pipeline and cannot be modified.
### Defining Custom Variables
You can define custom pipeline variables in a variable event (that is, in an event step that runs before any other pipeline steps execute). Variables that are defined in the variable event are available throughout the entire pipeline run.
To define a custom variable, use the following syntax in the event-step script, replacing `myvar` with your variable name:
```xml theme={null}