> ## Documentation Index
> Fetch the complete documentation index at: https://docs.sync.cdata.com/llms.txt
> Use this file to discover all available pages before exploring further.
# SAP ERP
export const CommonDatasourceMoreInformation = ({datasource = "the data source", advancedurl = "", siteName = "CData Sync", driverVersion = ""}) => {
return <>
For more information about interactions between {siteName} and {datasource}, see{' '}
{datasource} Connector for {siteName}
.
;
};
export const CommonDatasourceAddConnector = ({datasource = "the data source", title = "the connector", destination = false, siteNameShort = "Sync"}) => {
return <>
To enable {siteNameShort} to use data from {datasource}, you first must add the
connector, as follows:
- Open the Connections page of the {siteNameShort} dashboard.
- Click Add Connection to open the Select Connectors page.
-
Click the {destination ? "Destinations" : "Sources"} tab and locate
the {title} row.
-
Click the Configure Connection icon at the end of that row to open
the New Connection page. This action opens the{' '}
Add Connection dialog box.
Note: If the Configure Connection icon is not
available, click the Download Connector icon to install
the {title} connector.
- Enter a name for your connection in the Add Connection dialog box.
- Click Add to open the Settings tab for your connector.
For more information about installing new connectors, see{' '}
Connections.
;
};
export const CommonDatasourceIntroSource = ({datasource = "the data source", siteName = "CData Sync"}) => {
return
You can use the {datasource} connector from the {siteName} application to capture data
from {datasource} and move it to any supported destination. To do so, you need to add
the connector, authenticate to the connector, and complete your connection.
;
};
export const driverVersion = "M";
export const siteNameShort = "Sync";
export const siteName = "CData Sync";
export const datasource = "SAP ERP";
export const pageTitle = "SAP ERP";
export const advancedurl = "RY";
This connector is available in {siteNameShort} Self-Hosted deployments only.
## Prerequisites
Before you can connect to {datasource}, you must set up the following components:
1. Download the Software Developer Kit (SDK), based on your operating system, from SAP Java Connector.
2. Download the sapjco3.jar and sapjco3.dll files from the SDK, as follows:
1. Open the SAP Java connector and select the Jco version that matches your platform.
2. Click the download link. This action opens the login page.
3. Login to the SAP site with a valid S-user identifier (Id).
4. Download the package.
3. Copy the sapjco3.jar file to the `/libs/ext` folder in your application directory.
4. Copy the sapjco3.dll file (or, use libsapjco3.so if your {siteNameShort} instance is on a Linux machine) to the `/libs/ext` folder in your application directory.
## Add the SAP ERP Connector
## Authenticate to SAP ERP
After you add the connector, you need to set the required properties.
* **User:** Enter the username that you use to authenticate to {datasource}.
* **Password:** Enter the password that you use to authenticate to the {datasource} account.
* **Client:** Enter the name of the client that you want to authenticate to the SAP system.
* **Connection Type:** Select the connection type that you want to use. The default type is **JCo**.
* **Connection Scheme:** Select the connection scheme that you want to use. The default scheme is **ApplicationServer**.
## Complete Your Connection
To complete your connection:
1. Specify the following properties:
* **Host:** Enter the host name of the target system. You can specify a regular host name, an IP address, or a SAP router address.
* **System Number:** Select the number that defines the target system. The default value is **0**.
2. Define advanced connection settings on the **Advanced** tab. (In most cases, though, you should not need these settings.)
3. Click **Connect to {datasource}** to connect to your {pageTitle} account.
4. Click **Create & Test** to create your connection.
## Enabling CDC in {siteName}
To configure your SAP ERP source connection to use CDC, follow these steps:
1. Open the **Advanced** tab of the SAP ERP source page and navigate to the **Miscellaneous** category.
2. Select **ChangeDataCapture** for the **Table Mode** property.
3. Click **Create & Test** to save your connection change.
4. Create a job in {siteNameShort} using {datasource} as your source and select **Change Data Capture** for the **Type** option.
Once you create a CDC job, the **Tasks** list shows only tables that are enabled for CDC. If you have custom tables that you want to appear in the **Tasks** list for the CDC job, you must enable them for tracking first in the SAP GUI. The following section explains how to enable such tables for tracking.
## Enable SAP Custom Tables for CDC
To prepare SAP custom tables for use with CDC in {siteNameShort}, perform the steps in the following sections.
#### Step 1: Create Your Custom Table and Data Elements with the Change Document Flag
In the SAP GUI, create a custom table, as follows:
1. Open {datasource} and navigate to transaction **SE11**.
2. On the **ABAP Dictionary: Initial Screen** page, select the **Database Table** radio button and enter a name for your custom table (for example, **ZMACHINES\_TABLE**) in the associated text box.
The initial Z in the name is required for custom objects in {datasource}.
3. Click **Create**. This action opens the **Create Table** page.
4. On the **Create Table** page, enter a short description of your table (for example, **Machines Table**).
5. Click **Technical Settings** in the menu bar at the top of the window.
6. On the **General Properties** tab of the **Dictionary: Define Technical Settings** page:
1. Select **APPL0** in the **Data Class** list. This is the typical selection for master data and transparent application tables.
2. Select the **Log Data Changes** checkbox and save your changes.
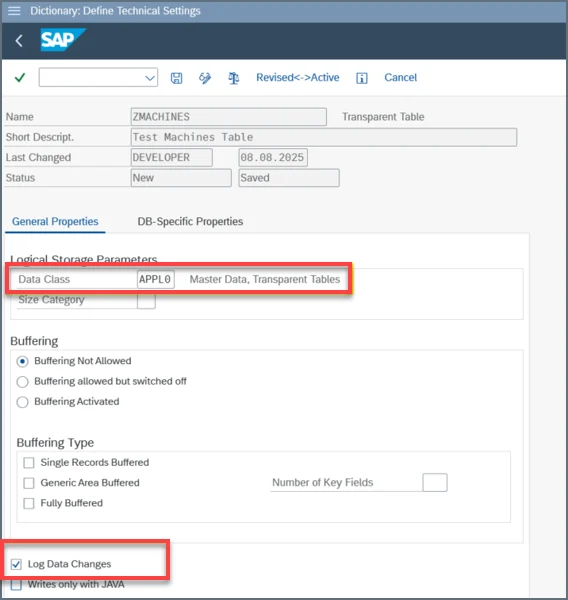 3. Click **Cancel** to return to the previous page.
7. Click the **Fields** tab and follow these steps to create any new fields that you want.
1. Enter a field name in the **Fields** column (for example, **NEW\_FIELD**).
2. Enter a name for the new element in the **Data Element** field. To create a custom data element, enter a name that starts with the letter Z (for example, **ZNEWDATAELEMENT**). SAP prompts you to create a new element if it does not already exist.
3. Click **Cancel** to return to the previous page.
7. Click the **Fields** tab and follow these steps to create any new fields that you want.
1. Enter a field name in the **Fields** column (for example, **NEW\_FIELD**).
2. Enter a name for the new element in the **Data Element** field. To create a custom data element, enter a name that starts with the letter Z (for example, **ZNEWDATAELEMENT**). SAP prompts you to create a new element if it does not already exist.
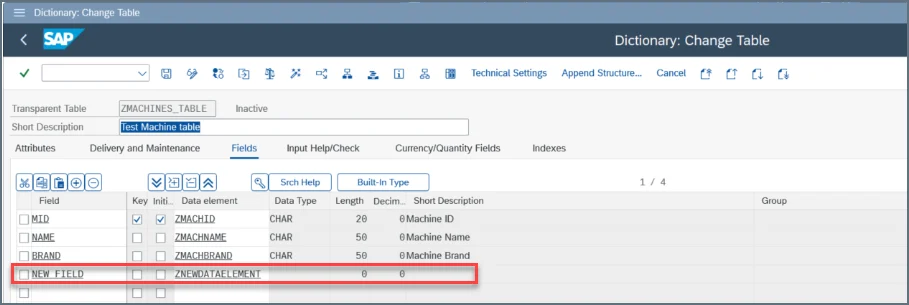 3. Double-click the name that you entered. SAP will prompt you for additional configuration in other columns (**Data Type**, **Length**, and **Description**).
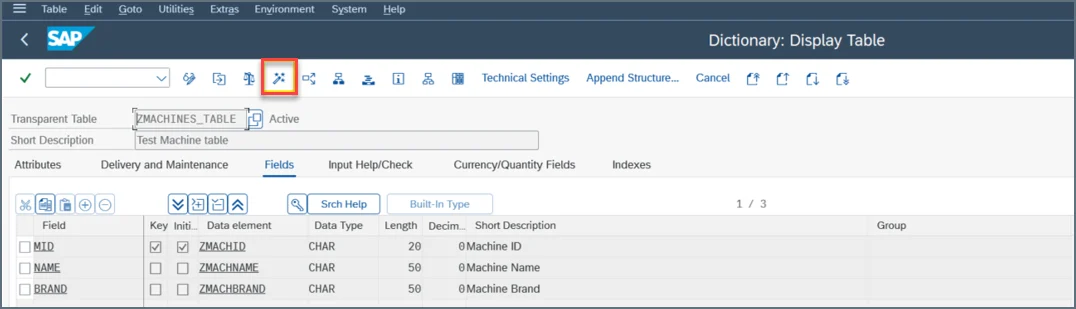
8. Activate the table by clicking the **Activate** icon in the menu bar.
3. Double-click the name that you entered. SAP will prompt you for additional configuration in other columns (**Data Type**, **Length**, and **Description**).
8. Activate the table by clicking the **Activate** icon in the menu bar.
 #### Step 2: Create and Configure the Change Document Object
Follow these steps to create and configure a change document object (SCDO):
1. Open transaction **SCDO**.
2. Enter a name for your object (for example, **ZMACHLOG**) in the **Object** text box.
3. Click **Create** to create a new change document object and open the **Create Object Directory Entry** dialog box.
#### Step 2: Create and Configure the Change Document Object
Follow these steps to create and configure a change document object (SCDO):
1. Open transaction **SCDO**.
2. Enter a name for your object (for example, **ZMACHLOG**) in the **Object** text box.
3. Click **Create** to create a new change document object and open the **Create Object Directory Entry** dialog box.
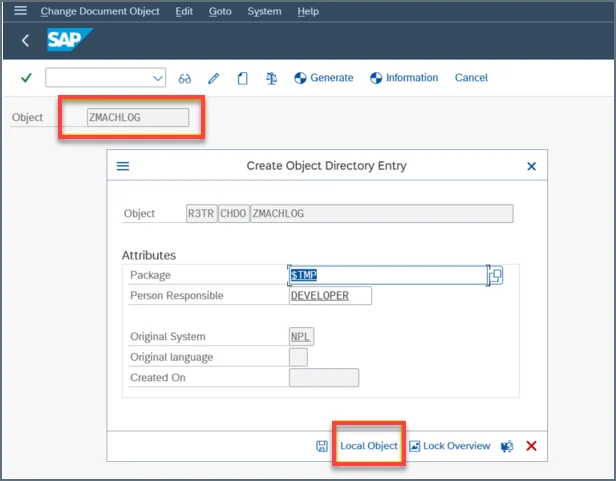 4. Select **Local Object** from the **Package** list. Provide a short description of the object (for example, "Change Document Object for Machines Tab").
5. Click the **Table** tab to assign your custom table to your change document object.
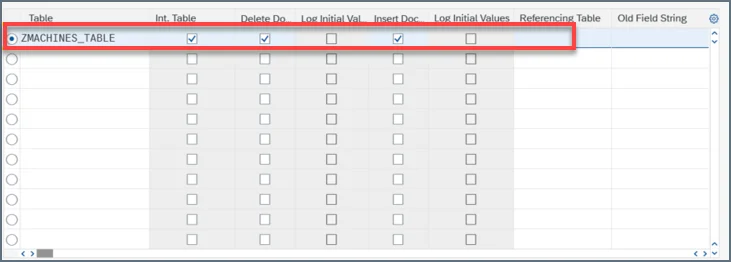
1. Add your table name (for example, **ZMACHINES\_TABLE**).
2. Select the **Delete Documentation** column and the **Insert Documentation** column, as shown below:
4. Select **Local Object** from the **Package** list. Provide a short description of the object (for example, "Change Document Object for Machines Tab").
5. Click the **Table** tab to assign your custom table to your change document object.
1. Add your table name (for example, **ZMACHINES\_TABLE**).
2. Select the **Delete Documentation** column and the **Insert Documentation** column, as shown below:
 3. Click the **Save** icon in the task bar at the top of the window.
6. Click **Generate** in the task bar.
7. In the **Generate Update Pgm.** dialog box, enter a name in the **Function group** text box (for example, **ZMACHLOG\_WRITE\_DOCUMENT**).
8. Click **Generate** at the bottom of the dialog box.
9. On the next page, double-click the name of your function group (**ZMACHLOG\_WRITE\_DOCUMENT**). This action takes you to transaction SE37.
3. Click the **Save** icon in the task bar at the top of the window.
6. Click **Generate** in the task bar.
7. In the **Generate Update Pgm.** dialog box, enter a name in the **Function group** text box (for example, **ZMACHLOG\_WRITE\_DOCUMENT**).
8. Click **Generate** at the bottom of the dialog box.
9. On the next page, double-click the name of your function group (**ZMACHLOG\_WRITE\_DOCUMENT**). This action takes you to transaction SE37.
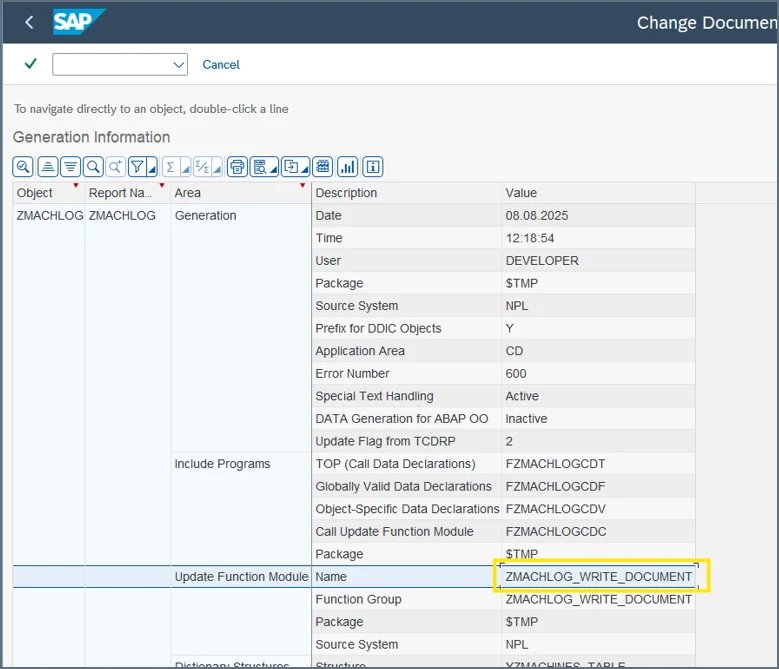 SAP generates a function module that is executed each time this object is involved. You might need to adapt the logic to handle the insertions, updates and deletions based on your scenario. You can modify this module, depending on your scenario.
10. Click the **Validate** icon (
SAP generates a function module that is executed each time this object is involved. You might need to adapt the logic to handle the insertions, updates and deletions based on your scenario. You can modify this module, depending on your scenario.
10. Click the **Validate** icon ( ) to check the module syntax.
11. Click the **Activate** icon (
) to check the module syntax.
11. Click the **Activate** icon ( ) to activate the function module.
At this point, the infrastructure for change documents in SAP is in place. However, no entries are logged until the system-generated function module (ZMACHLOG\_WRITE\_DOCUMENT) is invoked. This invocation must occur within the application logic, update module, or custom program that modifies the table, ensuring that each change is explicitly captured and recorded.
#### Step 3: Verify That Your Table Is Ready for CDC
Now, you should verify that the target table is ready for change-document capture (CDC). This ensures that the system recognizes the SCDO object that you created and that subsequent changes will be logged correctly.
1. Open transaction **SE16**.
2. Enter the table name **TCDOB**.
) to activate the function module.
At this point, the infrastructure for change documents in SAP is in place. However, no entries are logged until the system-generated function module (ZMACHLOG\_WRITE\_DOCUMENT) is invoked. This invocation must occur within the application logic, update module, or custom program that modifies the table, ensuring that each change is explicitly captured and recorded.
#### Step 3: Verify That Your Table Is Ready for CDC
Now, you should verify that the target table is ready for change-document capture (CDC). This ensures that the system recognizes the SCDO object that you created and that subsequent changes will be logged correctly.
1. Open transaction **SE16**.
2. Enter the table name **TCDOB**.
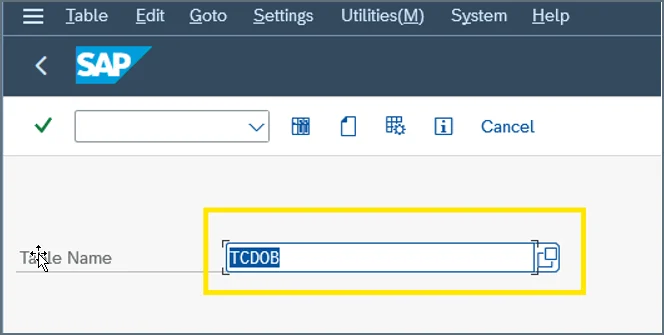 3. On the **Data Browser - Table TCDOB** page, filter by entering **ZMACHINES\_TABLE** in the **TABNAME** text box.
Once you do this, you can see that the SCDO object you created is linked to your table and that it is ready to handle CDC.
3. On the **Data Browser - Table TCDOB** page, filter by entering **ZMACHINES\_TABLE** in the **TABNAME** text box.
Once you do this, you can see that the SCDO object you created is linked to your table and that it is ready to handle CDC.
 ## More Information