> ## Documentation Index
> Fetch the complete documentation index at: https://docs.sync.cdata.com/llms.txt
> Use this file to discover all available pages before exploring further.
# Salesforce
export const CommonAuthSchemeOauthEmbedded = ({siteName = "CData Sync", siteNameShort = "Sync", datasource = "the data source"}) => {
return <>
{siteName} provides an embedded OAuth application with which to connect. To use the application, select OAuth for Auth Scheme. No additional properties are required.
;
};
export const CommonDatasourceMoreInformation = ({datasource = "the data source", advancedurl = "", siteName = "CData Sync", driverVersion = ""}) => {
return <>
For more information about interactions between {siteName} and {datasource}, see{' '}
{datasource} Connector for {siteName}
.
;
};
export const CommonDatasourceAddConnector = ({datasource = "the data source", title = "the connector", destination = false, siteNameShort = "Sync"}) => {
return <>
To enable {siteNameShort} to use data from {datasource}, you first must add the
connector, as follows:
- Open the Connections page of the {siteNameShort} dashboard.
- Click Add Connection to open the Select Connectors page.
-
Click the {destination ? "Destinations" : "Sources"} tab and locate
the {title} row.
-
Click the Configure Connection icon at the end of that row to open
the New Connection page. This action opens the{' '}
Add Connection dialog box.
Note: If the Configure Connection icon is not
available, click the Download Connector icon to install
the {title} connector.
- Enter a name for your connection in the Add Connection dialog box.
- Click Add to open the Settings tab for your connector.
For more information about installing new connectors, see{' '}
Connections.
;
};
export const CommonDatasourceIntroSource = ({datasource = "the data source", siteName = "CData Sync"}) => {
return
You can use the {datasource} connector from the {siteName} application to capture data
from {datasource} and move it to any supported destination. To do so, you need to add
the connector, authenticate to the connector, and complete your connection.
;
};
export const driverVersion = "M";
export const siteNameShort = "Sync";
export const siteName = "CData Sync";
export const datasource = "Salesforce";
export const pageTitle = "Salesforce";
export const advancedurl = "RF";
export const oauthschemes = "OAuth or AzureAD";
## Add the Salesforce Connector
## Authenticate to Salesforce
After you add the connector, you need to set the required properties.
{siteName} supports authenticating to {pageTitle} in several ways. Select your authentication method below to proceed to the relevant section that contains the authentication details.
* [**Basic**](#basic)
* [**OAuth**](#oauth)
* [**OAuth Password**](#oauth-password)
* [**OAuth JWT**](#oauth-jwt)
* [**OneLogin**](#onelogin)
* [**PingFederate**](#pingfederate)
* [**OKTA**](#okta)
* [**ADFS**](#adfs)
* [**Azure Active Directory**](#azure-active-directory)
### Basic
To connect with user credentials and a security token, specify the following settings:
* **Auth Scheme:** Select **Basic**.
* **User:** Enter the username that you use to authenticate to your {datasource} account.
* **Password:** Enter the password that you use to authenticate to your {datasource} account.
* **Security Token:** Enter the security token for your {datasource} account. If you do not know your security token, you can reset it as follows:
1. Open your personal information page on the [https://www.salesforce.com/](https://www.salesforce.com/) website.
2. Click the link to reset your security token. The token will be emailed to you.
### OAuth
### OAuth Password
To connect with OAuth credentials, specify the following settings:
* **Auth Scheme:** Select **OAuthPassword**.
* **User:** Enter the username that you use to authenticate to your {datasource} account.
* **Password:** Enter the password that you use to authenticate to your {datasource} account.
* **Security Token:** Enter the security token for your {datasource} account. If you do not know your security token, you can reset it as follows:
1. Open your personal information page on the [https://www.salesforce.com/](https://www.salesforce.com/) website.
2. Click the link to reset your security token. The token will be emailed to you.
### OAuth JWT
To connect with JWT, specify the following settings:
* **Auth Scheme:** Select **OAuthJWT**.
* **OAuth JWT Cert:** Enter your Java web tokens (JWT) certificate store.
* **OAuth JWT Cert Type:** Enter the type of key store that contains your JWT Certificate. The default type is **PEMKEY\_BLOB**.
* **OAuth JWT Issuer:** Enter the issuer of your Java web token. Typically, the issuer is either the client Id or the email address of the OAuth application.
* **OAuth JWT Cert Password:** Enter the password for your OAuth JWT certificate.
* **OAuth JWT Cert Subject:** Enter the subject of your OAuth JWT certificate.
* **OAuth JWT Subject:** Enter the user subject for which the application is requesting delegated access.
### OneLogin
To connect with single sign-on (SSO) via OneLogin, specify the following settings:
* **Auth Scheme:** Select **OneLogin**.
* **User:** Enter the username for your PingFederate account.
* **Password:** Enter the password for your PingFederate account.
* **SSO Login URL:** Enter the login URL for your single sign-on (SSO) provider.
* **SSO Properties:** Enter the SSO properties that you want to use (for example, *SSOProperty1*=*Value1*;*SSOProperty2*=*Value2*;...).
* **SSO Exchange URL:** Enter the {datasource} OAuth 2.0 token endpoint for the identity provider (for example, https\://*MyOrganization*.*My.{datasource}Acct*.com/services/oauth2/*token*).
### PingFederate
To connect with single sign-on (SSO) via PingFederate, specify the following settings:
* **Auth Scheme:** Select **PingFederate**.
* **User:** Enter the username for your OneLogin account.
* **Password:** Enter the password for your OneLogin account.
* **SSO Properties:** Enter the single sign-on (SSO) properties that you want to use (for example, *SSOProperty1*=*Value1*;*SSOProperty2*=*Value2*;...).
* **SSO Exchange URL:** Enter the {datasource} OAuth 2.0 token endpoint for the identity provider (for example, https\://*MyOrganization*.*My.{datasource}Acct*.com/services/oauth2/*token*).
### OKTA
To connect with single sign-on (SSO) via Okta, specify the following properties:
* **Auth Scheme:** Select **OKTA**.
* **User:** Enter the username for your OKTA account.
* **Password:** Enter the password for your OKTA account.
* **SSO Login URL:** Enter the login URL for your single sign-on (SSO) provider.
* **SSO Properties:** Enter the single sign-on (SSO) properties that you want to use (for example, *SSOProperty1*=*Value1*;*SSOProperty2*=*Value2*;...).
* **SSO Exchange URL:** Enter the {datasource} OAuth 2.0 token endpoint for the identity provider (for example, https\://*MyOrganization*.*My.{datasource}Acct*.com/services/oauth2/*token*).
### ADFS
To connect with single sign-on (SSO) via ADFS, specify the following properties:
* **Auth Scheme:** Select **ADFS**.
* **User:** Enter the username for your ADFS account.
* **Password:** Enter the password for your ADFS account.
* **SSO Login URL:** Enter the login URL for your single sign-on (SSO) provider.
* **SSO Properties:** Enter the single sign-on (SSO) properties that you want to use (for example, *SSOProperty1*=*Value1*;*SSOProperty2*=*Value2*;...).
* **SSO Exchange URL:** Enter the {datasource} OAuth 2.0 token endpoint for the identity provider (for example, https\://*MyOrganization*.*My.{datasource}Acct*.com/services/oauth2/*token*).
### Azure Active Directory
To connect with single sign-on via Azure Active Directory, specify the following settings:
* **Auth Scheme:** Select **AzureAD**.
* **SSO Properties:** Enter the single sign-on (SSO) properties that you want to use (for example, *SSOProperty1*=*Value1*;*SSOProperty2*=*Value2*;...).
* **SSO Exchange URL:** Enter the {datasource} OAuth 2.0 token endpoint for the identity provider (for example, https\://*MyOrganization*.*My.{datasource}Acct*.com/services/oauth2/*token*).
* **OAuth Client Id:** Enter the client Id that you were assigned when you registered your application with an OAuth authorization server.
* **OAuth Client Secret:** Enter the client secret that you were assigned when you registered your application with an OAuth authorization server.
## Replicating {datasource} Formula Fields
The {siteNameShort} application provides a dedicated **{datasource}\_Formulas** schema to help you manage the replication of formula fields separately from standard fields. This schema ensures that formula fields are always refreshed with the latest calculations.
{datasource} formula fields differ from standard fields in their replication behavior. Specifically, when the definition of a formula changes, {datasource} does not update the record's `SystemModStamp` column. This behavior can cause issues with data synchronization that relies solely on incremental replication.
{siteNameShort} addresses this issue by providing two schemas (**{datasource}** and **{datasource}\_Formulas**) that allow you to apply different replication strategies to standard and formula fields.
### Configure Tasks with the {datasource}\_Formulas Schema
When you add or edit a task in a {datasource} job, {siteNameShort} displays the two schema options, **{datasource}** and **{datasource}\_Formulas**, in the **Add Tasks** dialog box.
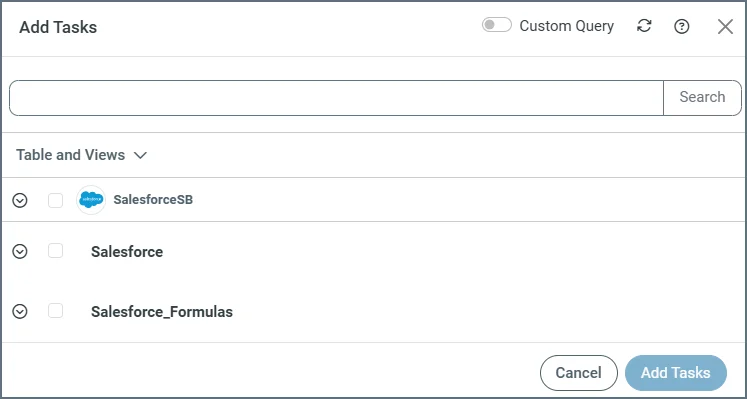 When you select the **{datasource}\_Formulas** schema, only the **Id** and formula fields are available. This is in contrast to the **{datasource}** schema, where all standard fields (and formula fields, depending on the connection setting) are available.
Use the **{datasource}\_Formulas** schema when you want {siteNameShort} to perform the following tasks:
* Truncate and reload formula fields on each run.
* Automatically add new formula fields as they are created in {datasource} **when** you enable the **Alter Schema** property (available when you add or edit tasks from a job's **Task** tab).
### Configure Tasks with the {datasource} Schema
Use the {datasource} schema when you want {siteNameShort} to replicate non-formula fields incrementally. When you use this schema, you can also control whether formula fields are included by using the **Skip Formula Fields** property. This property is available on the on the **Advanced** tab of the {datasource} connection page, under the **Miscellaneous** category.
* If you set **Skip Formula Fields** to **True**, formula fields are excluded from the {datasource} schema.
* If you set **Skip Formula Fields** to **False**, formula fields are included in the {datasource} schema.
Changing the **Skip Formula Fields** property affects only the {datasource} schema. It does not change what the **{datasource}\_Formulas** schema returns.
## Complete Your Connection
To complete your connection:
1. Specify the following properties:
* (Optional) **API Version:** Enter your API version. The default version is **56.0**.
* (Optional) **Login URL:** Enter your login URL for {pageTitle}.
* **Use Sandbox:** Select whether you want to enable the sandbox. By default, the **Enable** checkbox is not selected.
2. Define advanced connection settings on the **Advanced** tab. (In most cases, though, you should not need these settings.)
3. {oauthschemes ? `If you authenticate with ${oauthschemes}, click` : "Click"} **Connect to {datasource}** to connect to your {pageTitle} account.
4. Click **Create & Test** to create your connection.
## More Information
When you select the **{datasource}\_Formulas** schema, only the **Id** and formula fields are available. This is in contrast to the **{datasource}** schema, where all standard fields (and formula fields, depending on the connection setting) are available.
Use the **{datasource}\_Formulas** schema when you want {siteNameShort} to perform the following tasks:
* Truncate and reload formula fields on each run.
* Automatically add new formula fields as they are created in {datasource} **when** you enable the **Alter Schema** property (available when you add or edit tasks from a job's **Task** tab).
### Configure Tasks with the {datasource} Schema
Use the {datasource} schema when you want {siteNameShort} to replicate non-formula fields incrementally. When you use this schema, you can also control whether formula fields are included by using the **Skip Formula Fields** property. This property is available on the on the **Advanced** tab of the {datasource} connection page, under the **Miscellaneous** category.
* If you set **Skip Formula Fields** to **True**, formula fields are excluded from the {datasource} schema.
* If you set **Skip Formula Fields** to **False**, formula fields are included in the {datasource} schema.
Changing the **Skip Formula Fields** property affects only the {datasource} schema. It does not change what the **{datasource}\_Formulas** schema returns.
## Complete Your Connection
To complete your connection:
1. Specify the following properties:
* (Optional) **API Version:** Enter your API version. The default version is **56.0**.
* (Optional) **Login URL:** Enter your login URL for {pageTitle}.
* **Use Sandbox:** Select whether you want to enable the sandbox. By default, the **Enable** checkbox is not selected.
2. Define advanced connection settings on the **Advanced** tab. (In most cases, though, you should not need these settings.)
3. {oauthschemes ? `If you authenticate with ${oauthschemes}, click` : "Click"} **Connect to {datasource}** to connect to your {pageTitle} account.
4. Click **Create & Test** to create your connection.
## More Information