> ## Documentation Index
> Fetch the complete documentation index at: https://docs.sync.cdata.com/llms.txt
> Use this file to discover all available pages before exploring further.
# Apache Kafka
export const CommonDatasourceMoreInformation = ({datasource = "the data source", advancedurl = "", siteName = "CData Sync", driverVersion = ""}) => {
return <>
For more information about interactions between {siteName} and {datasource}, see{' '}
{datasource} Connector for {siteName}
.
;
};
export const CommonDatasourceCompleteConnectionOauth = ({datasource = "the data source", title = "the connector", oauthschemes = "", start = 2}) => {
return
- Define advanced connection settings on the Advanced tab. (In most cases, though, you should not need these settings.)
- {oauthschemes ? <>If you authenticate with {oauthschemes}, click : <>Click} Connect to {datasource} to connect to your {title} account.
- Click Create & Test to create your connection.
;
};
export const CommonAuthSchemeAwsWorkloadIdentity = () => {
return <>
To connect with AWS Workload Identity federation credentials, specify the following properties:
;
};
export const CommonAuthSchemeGcpinstanceaccount = ({siteName = "CData Sync", siteNameShort = "Sync", datasource = "the data source"}) => {
return <>
When you run {siteName} on a GCP virtual machine, {siteNameShort} can authenticate by using the service account that is tied to the virtual machine. Select GCPInstanceAccount for Auth Scheme to use that account. No additional properties are required.
;
};
export const CommonAuthSchemeAzureserviceprincipalcert = () => {
return <>
To connect with an Azure service principal and client certificate, set the following properties:
- Auth Scheme: Select AzureServicePrincipalCert.
- Azure Tenant: Enter the Microsoft Online tenant to which you want to connect.
- OAuth Client Id: Enter the client Id that you were assigned when you registered your application with an OAuth authorization server.
- OAuth JWT Cert: Enter your Java web tokens (JWT) certificate store.
- OAuth JWT Cert Type: Enter the type of key store that contains your JWT Certificate. The default type is PEMKEY_BLOB.
- (Optional) OAuth JWT Cert Password: Enter the password for your OAuth JWT certificate.
- (Optional) OAuth JWT Cert Subject: Enter the subject of your OAuth JWT certificate.
To obtain the OAuth certificate for your application:
- Log in to the Azure portal.
- In the left navigation pane, select All services. Then, search for and select App registrations.
- Click New registrations.
- Enter an application name and select Any Azure AD Directory - Multi Tenant.
- After you create the application, copy the application (client) Id value that is displayed in the Overview section. Use this value as the OAuth client Id.
- Navigate to the Certificates & Secrets section and select Upload certificate. Then, select the certificate to upload from your local machine.
- Specify the duration and save the client secret. After you save it, the key value is displayed.
- Copy this value because it is displayed only once. You will use this value as the OAuth client secret.
- On the Authentication tab, make sure to select Access tokens (used for implicit flows).
;
};
export const CommonAuthSchemeAzureserviceprincipal = () => {
return <>
To connect with an Azure service principal and client secret, set the following properties:
- Auth Scheme: Select AzureServicePrincipal.
- Azure Tenant: Enter the Microsoft Online tenant to which you want to connect.
- OAuth Client Id: Enter the client Id that you were assigned when you registered your application with an OAuth authorization server.
- OAuth Client Secret: Enter the client secret that you were assigned when you registered your application with an OAuth authorization server.
To obtain the OAuth client Id and client secret for your application:
- Log in to the Azure portal.
- In the left navigation pane, select All services. Then, search for and select App registrations.
- Click New registrations.
- Enter an application name and select Any Azure AD Directory - Multi Tenant.
- After you create the application, copy the application (client) Id value that is displayed in the Overview section. Use this value as the OAuth client Id.
- Navigate to the Certificates & Secrets section and select New Client Secret for the application.
- Specify the duration and save the client secret. After you save it, the key value is displayed.
- Copy this value because it is displayed only once. You will use this value as the OAuth client secret.
- On the Authentication tab, make sure to select Access tokens (used for implicit flows).
;
};
export const CommonAuthSchemeAzuremsi = ({siteName = "CData Sync"}) => {
return <>
To leverage Azure Managed Service Identity (MSI) when {siteName} is running on an Azure
virtual machine, select Azure MSI for Auth Scheme. No
additional properties are required.
;
};
export const CommonAuthSchemePlain = ({siteName = "CData Sync", siteNameShort = "Sync", datasource = "the data source"}) => {
return <>
To connect with a plain-text login, specify these properties:
- Auth Scheme: Select Plain.
- User: Enter the username that you use to authenticate to your {datasource} account.
- Password: Enter the password that you use to authenticate to your {datasource} account.
;
};
export const CommonAuthSchemeNone = ({siteName = "CData Sync", siteNameShort = "Sync", datasource = "the data source"}) => {
return <>
To connect without authentication, select None for Auth Scheme. No additional properties are required.
;
};
export const CommonDatasourceAddConnector = ({datasource = "the data source", title = "the connector", destination = false, siteNameShort = "Sync"}) => {
return <>
To enable {siteNameShort} to use data from {datasource}, you first must add the
connector, as follows:
- Open the Connections page of the {siteNameShort} dashboard.
- Click Add Connection to open the Select Connectors page.
-
Click the {destination ? "Destinations" : "Sources"} tab and locate
the {title} row.
-
Click the Configure Connection icon at the end of that row to open
the New Connection page. This action opens the{' '}
Add Connection dialog box.
Note: If the Configure Connection icon is not
available, click the Download Connector icon to install
the {title} connector.
- Enter a name for your connection in the Add Connection dialog box.
- Click Add to open the Settings tab for your connector.
For more information about installing new connectors, see{' '}
Connections.
;
};
export const CommonDatasourceIntroDestination = ({datasource = "the data source", siteName = "CData Sync"}) => {
return
You can use the {datasource} connector from the {siteName} application to move data
from any supported source to the {datasource} destination. To do so, you need to add
the connector, authenticate to the connector, and complete your connection.
;
};
export const driverVersion = "M";
export const siteNameShort = "Sync";
export const siteName = "CData Sync";
export const datasource = "Apache Kafka";
export const pageTitle = "Apache Kafka";
export const advancedurl = "SK";
export const oauthschemes = "AzureAD";
**Note:** With this connector, you can authenticate either to {datasource} or to Azure Event Hubs.
## Add the Apache Kafka Connector
## Authenticate to Apache Kafka
After you add the connector, you need to set the required properties.
**Bootstrap Servers:** Enter the address of the {datasource} Bootstrap servers to which you want to connect.
{siteName} supports authenticating to {datasource} in several ways. Select your authentication method below to proceed to the relevant section that contains the authentication details.
* [**None**](#none) (default)
* [**Plain**](#plain)
* [**SCRAM**](#scram)
* [**SCRAM-SHA-512**](#scram-sha-512)
* [**Kerberos**](#kerberos)
### None
### Plain
### SCRAM
To connect with SCRAM (SHA-256) credentials, specify these properties:
* **Auth Scheme:** Select **SCRAM**.
* **User:** Enter the username that you use to authenticate to your {datasource} account.
* **Password:** Enter the password that you use to authenticate to your {datasource} account.
### SCRAM-SHA-512
To connect with the SCRAM (SHA-512) credentials, specify these properties:
* **Auth Scheme:** Select SCRAM-SHA-512.
* **User:** Enter the username that you use to authenticate to your {datasource} account.
* **Password:** Enter the password that you use to authenticate to your {datasource} account.
### Kerberos
To connect with Kerberos, specify these properties:
* **Auth Scheme:** Select **Kerberos**.
* **Kerberos SPN:** Enter the service principal name (SPN) for the Kerberos domain controller.
* **Kerberos Service Name:** Enter the name of the Kerberos service with which you want to authenticate.
* (Optional) **Kerberos Keytab File:** Enter the keytab file that contains your pairs of the Kerberos principals and encrypted keys.
* (Optional) **Use Kerberos Ticket Cache:** Select **True** to use a ticket cache with the logged-in user instead of a keytab file. The default value is **False**.
## Authenticate to Azure Event Hubs
After you add the connector, you need to set the following required properties to connect to Azure Event Hubs:
For **Bootstrap Servers,** enter the address of the {datasource} bootstrap servers to which you want to connect.
{siteName} supports authenticating to Apache Event Hubs in several ways. Select your authentication method below to proceed to the relevant section that contains the authentication details.
* [**SSL Certificate**](#ssl-certificate)
* [**Azure Active Directory**](#azure-active-directory)
* [**Azure Managed Service Identity**](#azure-managed-service-identity)
* [**Azure Service Principal**](#azure-service-principal)
* [**Azure Service Principal Certificate**](#azure-service-principal-certificate)
### SSL Certificate
To connect with a Secure Sockets Layer (SSL) client certificate, specify these properties:
* **Auth Scheme:** Select **SSLCertificate**.
* **SSL Client Cert:** Enter the SSL client certificate that is used to validate to the {datasource} broker.
* **SSL Client Cert Type:** Select the format of the SSL client certificate that is used to connect to the {datasource} broker:
* **JKSFILE**
* **PFXFILE**
* **PEMKEY\_FILE** (default)
* **PEMKEY\_BLOB**
* (Optional) **SSL Client Cert Password:** Enter the password that is used to decrypt the SSL client certificate.
### Azure Active Directory
To connect with Azure Active Directory (AD) credentials, specify the following properties:
* **Azure Tenant:** Enter the Microsoft Online tenant that is used to access data. If you do not specify a tenant, {siteNameShort} uses the default tenant.
* **OAuth Client Id:** Enter the client Id that you were assigned when you registered your application with an OAuth authorization server.
* **OAuth Client Secret:** Enter the client secret that you were assigned when you registered your application with an OAuth authorization server.
### Azure Managed Service Identity
### Azure Service Principal
### Azure Service Principal Certificate
## Authenticate to GCP Kafka
After you add the connector, you need to set the following required properties to connect to GCP Kafka:
For **Bootstrap Servers,** enter the address of the {datasource} bootstrap servers to which you want to connect.
{siteName} supports authenticating to GCP Kafka in several ways. Select your authentication method below to proceed to the relevant section that contains the authentication details.
* [**OAuth JWT**](#oauth-jwt)
* [**GCP Instance Account**](#gcp-instance-account)
* [**AWS Workload Identity**](#aws-workload-identity)
### OAuth JWT
To connect with a {datasource} account using OAuth JWT, specify the following properties:
* **Auth Scheme:** Select OAuthJWT.
* **OAuth Client Id:** Enter the client Id that you were assigned when you registered your application with an OAuth authorization server.
* **OAuth Client Secret:** Enter the client secret that you were assigned when you registered your application with an OAuth authorization server.
* **OAuth JWT Cert:** Enter your JSON web tokens (JWT) certificate store.
* **OAuth JWT Cert Type:** Enter the type of key store that contains your JWT certificate. The default type is PEMKEY\_BLOB.
* **OAuth JWT Cert Password:** Enter the password for the OAuth JWT certificate that is used to access a password-protected certificate store. If the certificate store does not require a password, leave this property blank.
* (Optional) **OAuth JWT Cert Subject:** Enter the subject of your OAuth JWT certificate.
### GCP Instance Account
### AWS Workload Identity
## Extracting Metadata from Topics
{siteNameShort} models {datasource} topics as tables and messages as rows.
The **Type Detection Scheme** property controls how {siteNameShort} reads schema information from each topic. Details about **Type Detection Scheme** are provided in [Complete Your Connection](#complete-your-connection).
### Schema Registry
The schema registry contains a list of topics that have registered schemas. The list of tables and columns are simply read directly from the schema registry.
To connect to a service with a schema registry, specify the following properties:
* **Bootstrap Servers:** Enter the server (host name or IP address) and port (in the format *Server:Port*) of the {datasource} bootstrap servers.
* **Type Detection Scheme:** Select the detection scheme that you want to use. For complete details about using this scheme, see [Complete Your Connection](#complete-your-connection).
* (Optional) **Schema Merge Mode:** Select the mode by which you want to merge multiple schemas.
* **None** (default)
* **Simple**
#### Confluent Schema Registry
When you connect to Confluent Cloud, the registry URL corresponds to the Schema Registry endpoint value that is located in **Schemas > Schema Registry > Instructions**.
The Confluent schema registry supports several authentication options. Typically, Confluent Cloud deployments require that you set the **Registry Auth Scheme** property to **Basic**, along with a registry user and registry password. To find your user and password, navigate to **Schemas > Schema Registry > API Access** and locate the access-key and secret-key values.
On-premises deployments might not require authentication. In these configurations, you should set **Registry Auth Scheme** to **None**. These deployments might require SSL client certificates also. For that, you need to set the **SSL Certificate** registry auth scheme as well as the **Registry Client Cert** and **Registry Client Cert Type** options.
#### Amazon Web Services (AWS) Glue Schema Registry
When you connect to AWS Glue, the registry URL corresponds to the Amazon Resources Name (ARN) value of the registry.
The AWS Glue schema registry only supports the **Basic** registry auth scheme. You should set **Registry User** and **Registry Password**, respectively, to the access key and secret key of a user that has access to the registry.
## Topic Routing
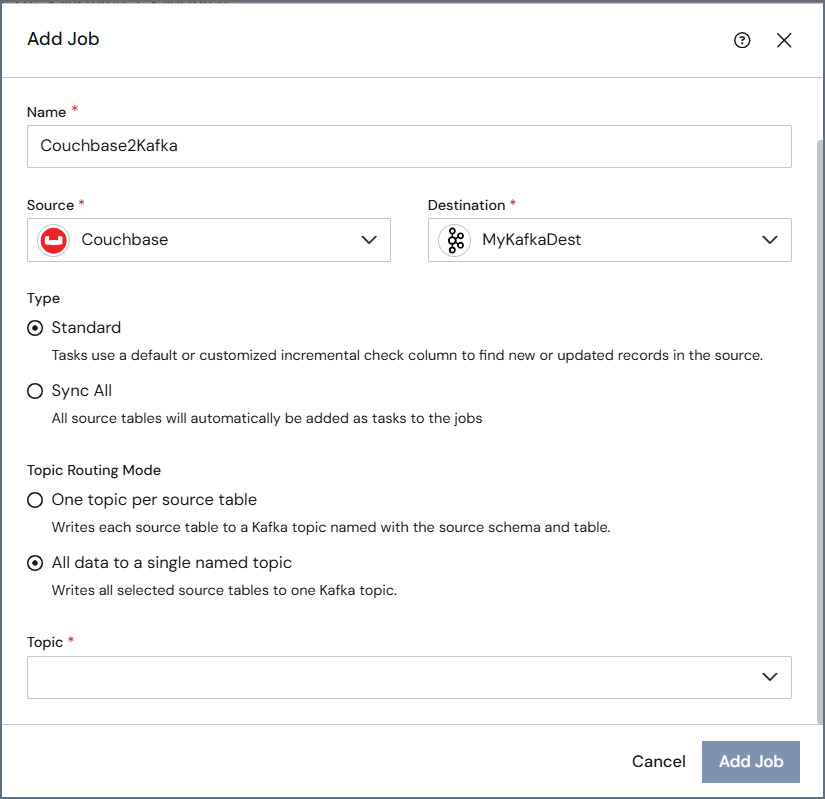
You can control how source tables map to {datasource} topics when you create a job that uses the {datasource} destination. To do so, select one of the following options in the **Add Job** dialog when you create a job:
* **One topic per source table:** Each source table is written to its own topic. {siteNameShort} automatically names the topic using the format *SchemaName*\_*TableName*. If the source does not have a schema, the topic name is simply the table name.
* **All data to a single named topic:** All source data for a table is written to one topic. When you select this option, a **Topic** field is displayed, as shown below. You can either enter a topic name in the field or search and select a topic, if a topic list is available.
 If a target topic does not exist when the job runs, {siteNameShort} either creates it automatically or returns an error, depending on your broker configuration.
## Message Partitioning
In {siteNameShort}, new {datasource} destination jobs automatically partition messages by the source table's primary key. This behavior controls how messages are distributed across partitions in the target topic.
* **Single primary key:** {siteNameShort} uses the primary key value as the {datasource} message key. All messages with the same key value are written to the same partition, so downstream consumers see changes for a given key in the order they were written.
* **No primary key:** {siteNameShort} distributes messages across partitions in a round-robin pattern (each message goes to the next partition in sequence). No {datasource} message key is assigned.
- Automatic key-based partitioning does not support tables with composite (multiple-column) primary keys. To partition by a single key, update your query to include only one primary key column.
- Existing {datasource} destination jobs (prior to release 26.3) are not affected by this change.
## Complete Your Connection
To complete your connection:
1. Specify the following properties:
* **Type Detection Scheme:** Select the detection scheme that you want to use.
* (Default) **RowScan**—Scans messages from the topic to infer column names and data types. No additional configuration is required.
* **SchemaRegistry**—Reads schema definitions from a Confluent-compatible schema registry. When you select this option, additional schema registry properties appear. For this scheme, specify the following properties:
* **Registry Url:** Enter the URL to the server for the schema registry. When you specify this property, {siteNameShort} reads the {datasource} schema from the server.
* **Registry Service:** Select the Schema Registry service that you want to use for working with topic schemas.
* **Confluent** (default)
* **AWSGlue**
* **Registry Auth Scheme:** Select the scheme that you want to use to authenticate to the schema registry.
* (Default) **None:** This scheme specifies that no authentication is used.
* **Basic:** For this scheme, specify the following properties:
* **Registry User:** Enter the username that you use to authenticate with the server that you specified earlier for **Registry Url**.
* **Registry Password:** Enter the password that you use to authenticate with the server that you specified earlier for **Registry Url**.
* **SSLCertificate:** This scheme specifies that SSL client-certificate authentication should be used. For this setting, you must specify the following:
* **Registry Client Cert:** Enter the TLS/SSL client certificate store for SSL client authentication (two-way SSL) with the schema registry.
* (Optional) **Registry Client Cert Password:** Enter the password for your TLS/SSL client certificate.
* (Optional) **Registry Client Cert Subject** Enter the subject of your TLS/SSL client certificate.
* **Use SSL:** Select whether you want to enable Secure Sockets Layer (SSL). By default, the **Enable** checkbox is not selected.
If a target topic does not exist when the job runs, {siteNameShort} either creates it automatically or returns an error, depending on your broker configuration.
## Message Partitioning
In {siteNameShort}, new {datasource} destination jobs automatically partition messages by the source table's primary key. This behavior controls how messages are distributed across partitions in the target topic.
* **Single primary key:** {siteNameShort} uses the primary key value as the {datasource} message key. All messages with the same key value are written to the same partition, so downstream consumers see changes for a given key in the order they were written.
* **No primary key:** {siteNameShort} distributes messages across partitions in a round-robin pattern (each message goes to the next partition in sequence). No {datasource} message key is assigned.
- Automatic key-based partitioning does not support tables with composite (multiple-column) primary keys. To partition by a single key, update your query to include only one primary key column.
- Existing {datasource} destination jobs (prior to release 26.3) are not affected by this change.
## Complete Your Connection
To complete your connection:
1. Specify the following properties:
* **Type Detection Scheme:** Select the detection scheme that you want to use.
* (Default) **RowScan**—Scans messages from the topic to infer column names and data types. No additional configuration is required.
* **SchemaRegistry**—Reads schema definitions from a Confluent-compatible schema registry. When you select this option, additional schema registry properties appear. For this scheme, specify the following properties:
* **Registry Url:** Enter the URL to the server for the schema registry. When you specify this property, {siteNameShort} reads the {datasource} schema from the server.
* **Registry Service:** Select the Schema Registry service that you want to use for working with topic schemas.
* **Confluent** (default)
* **AWSGlue**
* **Registry Auth Scheme:** Select the scheme that you want to use to authenticate to the schema registry.
* (Default) **None:** This scheme specifies that no authentication is used.
* **Basic:** For this scheme, specify the following properties:
* **Registry User:** Enter the username that you use to authenticate with the server that you specified earlier for **Registry Url**.
* **Registry Password:** Enter the password that you use to authenticate with the server that you specified earlier for **Registry Url**.
* **SSLCertificate:** This scheme specifies that SSL client-certificate authentication should be used. For this setting, you must specify the following:
* **Registry Client Cert:** Enter the TLS/SSL client certificate store for SSL client authentication (two-way SSL) with the schema registry.
* (Optional) **Registry Client Cert Password:** Enter the password for your TLS/SSL client certificate.
* (Optional) **Registry Client Cert Subject** Enter the subject of your TLS/SSL client certificate.
* **Use SSL:** Select whether you want to enable Secure Sockets Layer (SSL). By default, the **Enable** checkbox is not selected.
## More Information