> ## Documentation Index
> Fetch the complete documentation index at: https://docs.sync.cdata.com/llms.txt
> Use this file to discover all available pages before exploring further.
# API Connector
export const CommonAuthSchemeNone = ({siteName = "CData Sync", siteNameShort = "Sync", datasource = "the data source"}) => {
return <>
To connect without authentication, select None for Auth Scheme. No additional properties are required.
;
};
export const cloudEnv = false;
export const siteNameShort = "Sync";
export const siteName = "CData Sync";
export const datasource = "API";
export const pageTitle = "API";
export const oauthschemes = "OAuth";
The {siteName} API connector provides an easy and fully customizable way to connect directly to an API. After you establish a connection, use the built-in wizard to configure your API response data in the form of tables that you can use later in a job.
## Add the API Connector
To enable {siteName} to use data from {datasource}, you first must add the connector, as follows:
1. Open the **Connections** page of the {siteNameShort} dashboard.
2. Click **Add Connection** to open the **Select Connectors** page.
3. Click the **Sources** tab and locate the **API** row.
4. Click the **Configure Connection** icon at the end of that row.
5. Enter a name for your connection in the **Add Connection** dialog box.
6. Click **Add** to open the **Settings** tab for your connector.
## Authenticate to API
After you add the connector, you need to set the required properties.
{siteName} supports authenticating to {pageTitle} in several ways. Select your authentication method below to proceed to the relevant section that contains the authentication details.
* [**None**](#none)
* [**Basic**](#basic)
* [**Digest**](#digest)
* [**Bearer Token**](#bearer-token)
* [**OAuth**](#oauth)
* [**OAuth Password**](#oauth-password)
* [**OAuth Client**](#oauth-client)
### None
### Basic
To connect with your user credentials, specify the following properties:
* **Auth Scheme:** Select **Basic**.
* **User:** Enter the username that you use to authenticate to your API account.
* **Password:** Enter the password that you use to authenticate to your API account.
### Digest
To connect with your user credentials, specify these settings:
* **Auth Scheme:** Select **Digest**.
* **User:** Enter the username that you use to authenticate to your API account.
* **Password:** Enter the password that you use to authenticate to your API account.
### Bearer Token
To connect with an OAuth access token, specify these settings:
* **Auth Scheme:** Select **Bearer Token**.
* **OAuth Access Token:** Enter the access token that you use for connecting when you use OAuth.
### OAuth
To connect with OAuth custom credentials, specify the following properties:
* **Auth Scheme:** Select **OAuth**.
* **OAuth Client Id:** Enter the client Id that you were assigned when you registered your application with an OAuth authorization server.
* **OAuth Client Secret:** Enter the client secret that you were assigned when you registered your application with an OAuth authorization server.
* **OAuth Authorization URL:** Enter the OAuth authorization URL that you need to authorize request tokens when you sign in.
* **OAuth Access Token URL:** Enter the URL where the request for the access token is made.
In OAuth 1.0, the authorized request token is exchanged for the access token.
* **OAuth Refresh Token URL:** Enter the URL where the refresh token is exchanged for a new access token when the old one expires.
For your data source, this URL might be the same as the access-token URL.
* (Optional) **Scope:** Enter the scope that is required in order to obtain the initial access token and the refresh token.
### OAuth Password
To connect with OAuth custom credentials, specify the following properties:
* **Auth Scheme:** Select **OAuthPassword**.
* **User:** Enter the username that you use to authenticate to your API account.
* **Password:** Enter the password that you use to authenticate to your API account.
* **OAuth Client Id:** Enter the client Id that you were assigned when you registered your application with an OAuth authorization server.
* **OAuth Client Secret:** Enter the client secret that you were assigned when you registered your application with an OAuth authorization server.
* **OAuth Access Token URL:** Enter the URL where the request for the access token is made.
In OAuth 1.0, the authorized request token is exchanged for the access token.
* (Optional) **OAuth Refresh Token URL:** Enter the URL where the refresh token is exchanged for a new access token when the old one expires.
For your data source, this URL might be the same as the access-token URL.
* (Optional) **Scope:** Enter the scope that is required in order to obtain the initial access token and the refresh token.
### OAuth Client
To connect with OAuth custom credentials, specify the following properties:
* **Auth Scheme:** Select **OAuthClient**.
* **OAuth Client Id:** Enter the client Id that you were assigned when you registered your application with an OAuth authorization server.
* **OAuth Client Secret:** Enter the client secret that you were assigned when you registered your application with an OAuth authorization server.
* **OAuth Access Token URL:** Enter the URL where the request for the access token is made.
In OAuth 1.0, the authorized request token is exchanged for the access token.
* (Optional) **OAuth Refresh Token URL:** Enter the URL where the refresh token is exchanged for a new access token when the old one expires.
For your data source, this URL might be the same as the access-token URL.
* (Optional) **Scope:** Enter the scope that is required in order to obtain the initial access token and the refresh token.
## Complete Your Connection
To complete your connection:
1. For **Test URL**, enter a URL in order to verify the authentication scheme.
2. Define global headers that apply both to your connection and to any tables that you create. For detailed steps, see [Add Headers](#add-headers).
3. Specify, if necessary, any additional settings for the **Other** property (under the **Miscellaneous** section). This property is not required in normal use. However, if it is required, enter a semicolon-separated list of additional settings.
4. Define advanced connection settings on the **Advanced** tab. (In most cases, though, you should not need these settings.)
5. If you authenticate with {oauthschemes}, click **Connect to {datasource}** to connect to your {pageTitle} account.
6. Click **Create & Test** to create your connection.
After you successfully create your connection, you can add tables, pseudocolumns, filters, and pagination, as described in these sections:
* [Add Tables](#add-tables)
* [Add Pseudocolumns](#add-pseudocolumns)
* [Add Filters](#add-filters)
* [Add Pagination](#add-pagination)
## Add Headers
The **Add Headers** section on the connection page enables you to define global headers that apply both to your connection and to any tables that you create.
To add HTTP headers that are sent with all API calls, specify the following properties:
* **Name:** Enter the header name in the **Name** field (for example, **Token**).
* **Value:** Enter a value for the header (for example, a token).
If you want to add additional headers, click **Add Header** and specify the header name and value.
## Add Tables
After you connect to your API, you can create, view, and configure the API data in the form of tables.
To create a table:
1. Open your API connection and click the **Tables** tab to open the **New Table** page.
2. Click **Add Table** to begin creating a new table.
3. In the **Request URL** section:
1. Select the request method (**GET** or **POST**) from the **Request URL** list.
2. Enter the URL of your API endpoint in the blank field to the right of the method that you selected, as shown in this example:
 If you select **POST** as your method, you **must** supply both the body and the content type.
4. Select an option for **Format** (either **JSON** or **XML**).
5. Add URL parameters that will be sent with all API requests for this table.
To add parameters:
1. Click **Add Parameter** on the **Parameters** tab.
2. Enter a parameter name (for example, **Country**) in the **Name** field.
3. Enter a parameter value (for example, **United States**) in the **Value** field.
To add additional parameters, repeat the steps above.
6. Add HTTP headers that are sent with all API requests for your table. These headers are in addition to those that you add when you configure the API connector itself.
To add headers:
1. Click **Add Header** on the **Headers** tab.
2. Enter a name (for example, **Year**) in the **Name** field.
3. Enter a value (for example, **2020**) in the **Value** field.
To add additional headers, repeat the steps above.
7. In the **Table Details** category, click the **Configure Table** button. This action opens the **Configure Table** dialog box where you can preview the API response, as shown in this example:
If you select **POST** as your method, you **must** supply both the body and the content type.
4. Select an option for **Format** (either **JSON** or **XML**).
5. Add URL parameters that will be sent with all API requests for this table.
To add parameters:
1. Click **Add Parameter** on the **Parameters** tab.
2. Enter a parameter name (for example, **Country**) in the **Name** field.
3. Enter a parameter value (for example, **United States**) in the **Value** field.
To add additional parameters, repeat the steps above.
6. Add HTTP headers that are sent with all API requests for your table. These headers are in addition to those that you add when you configure the API connector itself.
To add headers:
1. Click **Add Header** on the **Headers** tab.
2. Enter a name (for example, **Year**) in the **Name** field.
3. Enter a value (for example, **2020**) in the **Value** field.
To add additional headers, repeat the steps above.
7. In the **Table Details** category, click the **Configure Table** button. This action opens the **Configure Table** dialog box where you can preview the API response, as shown in this example:
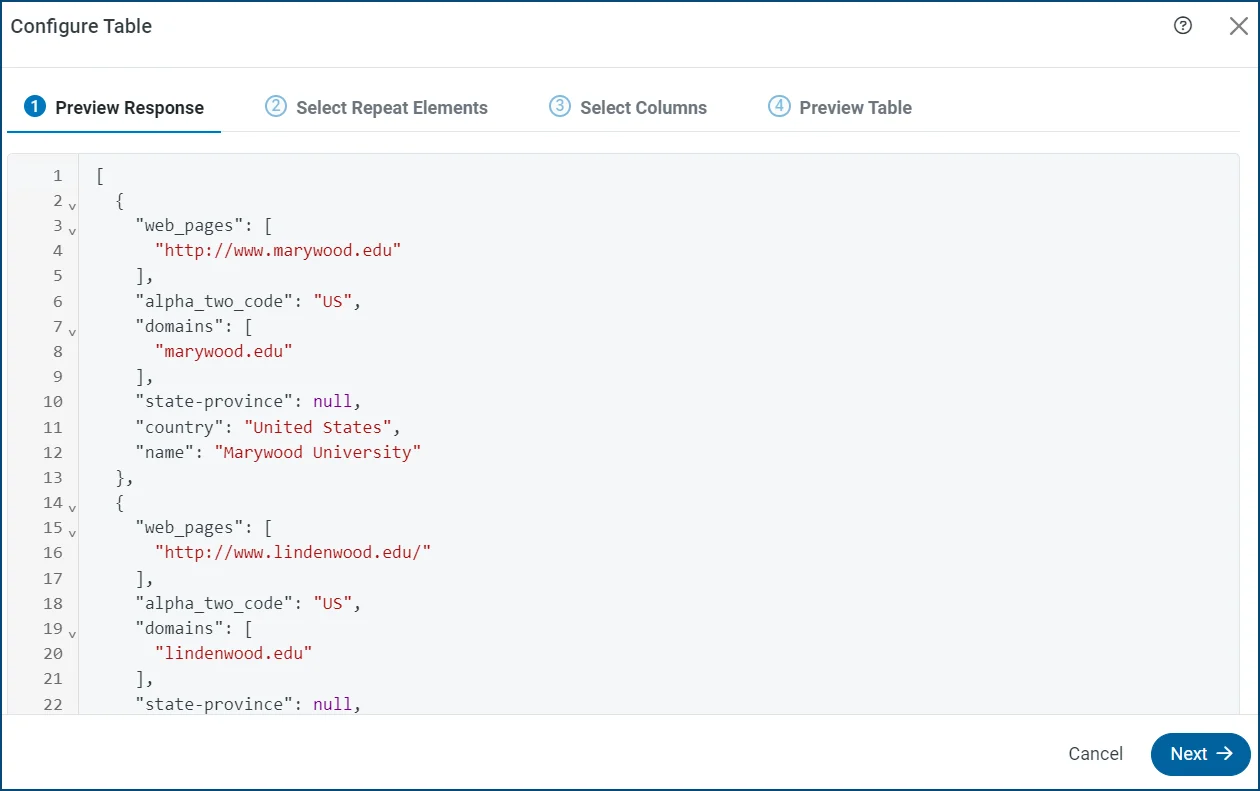 8. Click **Next**.
9. Select at least one repeat element for your table. A *repeat element* is the path of the element in the API response that contains repeating items that are to be used as rows. {siteNameShort} returns each detected array in the response data, which allows you to choose multiple paths. In this example, **source** is the repeat element.
8. Click **Next**.
9. Select at least one repeat element for your table. A *repeat element* is the path of the element in the API response that contains repeating items that are to be used as rows. {siteNameShort} returns each detected array in the response data, which allows you to choose multiple paths. In this example, **source** is the repeat element.
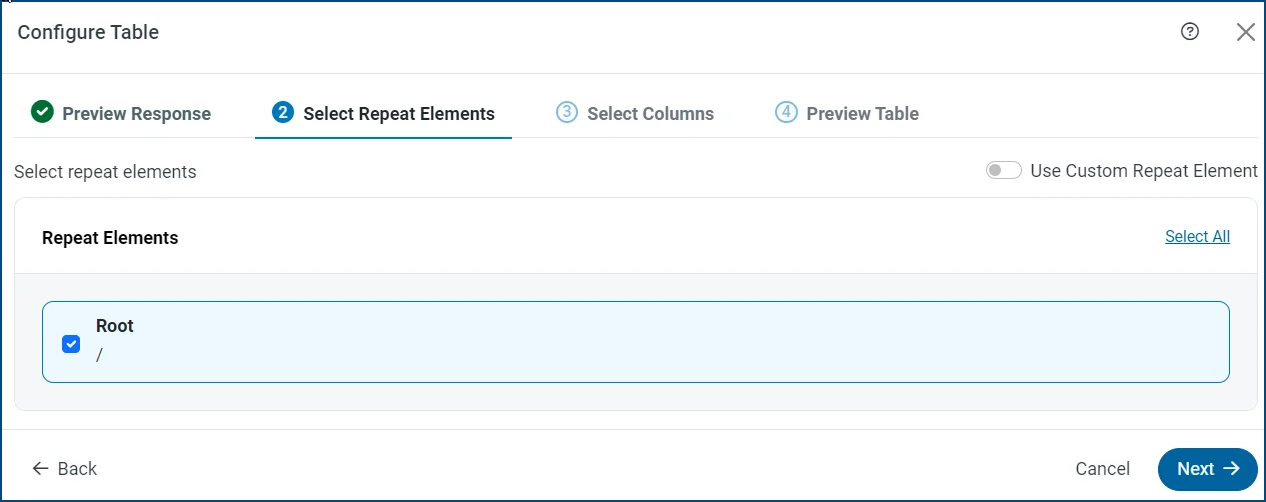 While {siteNameShort} tries to intelligently determine the possible repeat elements, it cannot detect them in certain scenarios. Such cases require that you set a custom **Repeat Element** path, as follows:
1. Click **Use Custom Repeat Element** (upper right of the dialog box).
2. Click **Add Repeat Element**.
3. Enter the path of the element that you want to repeat.
10. Click **Next**.
11. Select the specific columns that you want to include.
While {siteNameShort} tries to intelligently determine the possible repeat elements, it cannot detect them in certain scenarios. Such cases require that you set a custom **Repeat Element** path, as follows:
1. Click **Use Custom Repeat Element** (upper right of the dialog box).
2. Click **Add Repeat Element**.
3. Enter the path of the element that you want to repeat.
10. Click **Next**.
11. Select the specific columns that you want to include.
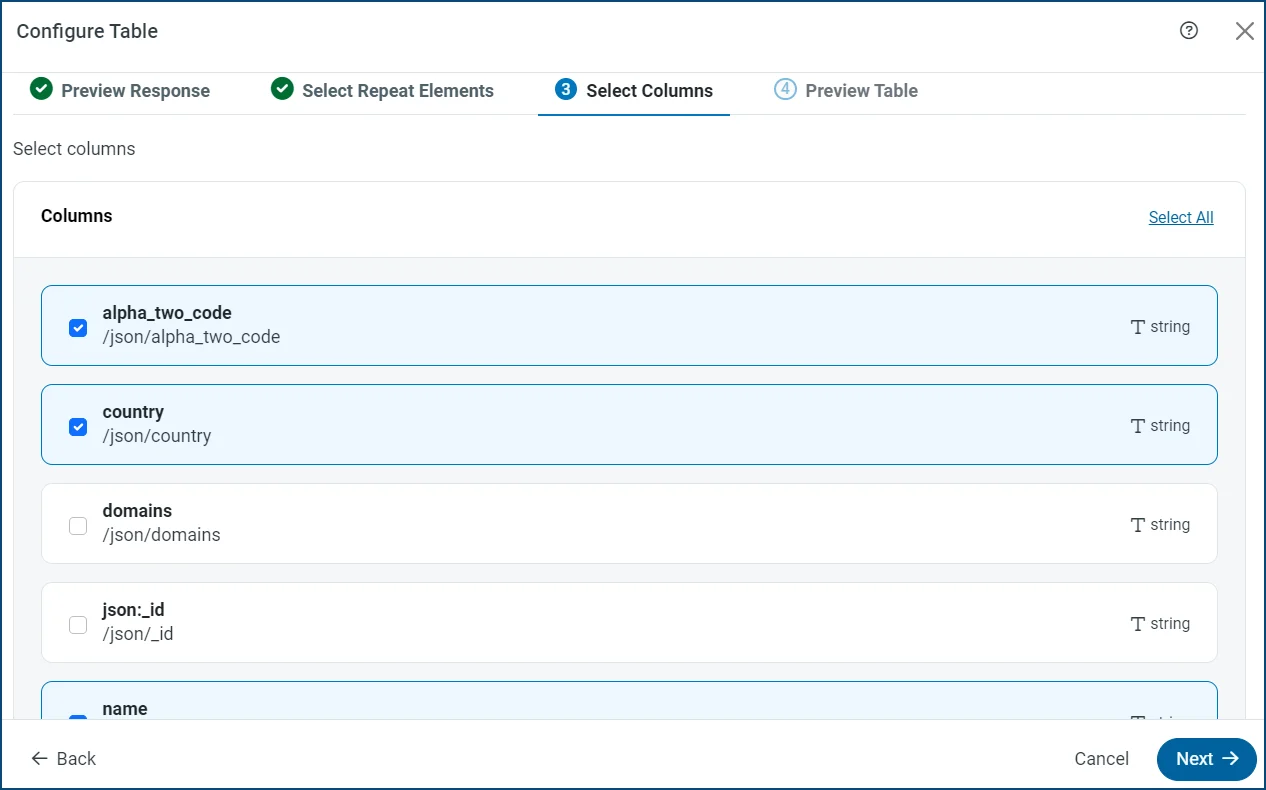 To include all columns, click **Select All** at the upper right of the columns list.
12. Click **Next**. This opens a **Preview Table** tab in the dialog box where you can see the table with the columns that you selected.
13. Enter a name for your table in the **Table Name** field.
To include all columns, click **Select All** at the upper right of the columns list.
12. Click **Next**. This opens a **Preview Table** tab in the dialog box where you can see the table with the columns that you selected.
13. Enter a name for your table in the **Table Name** field.
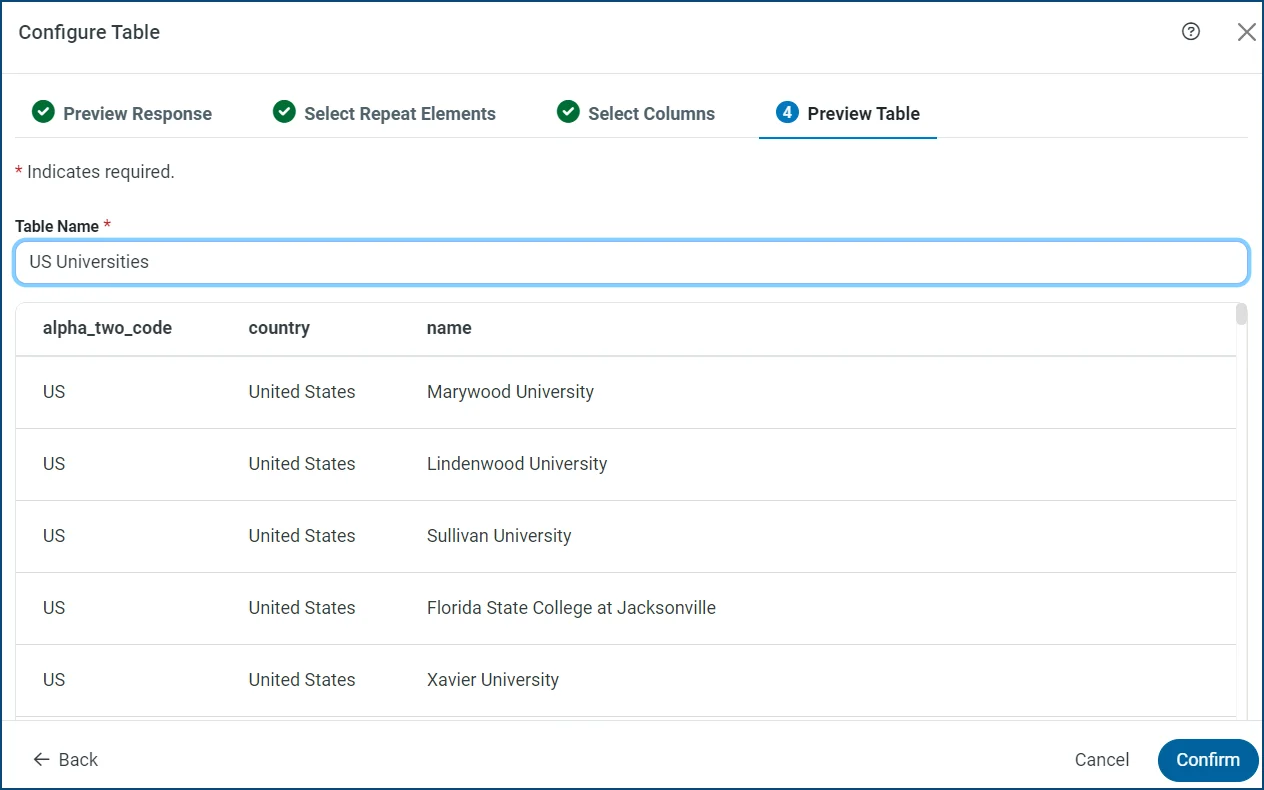 14. Click **Confirm** to save the selections for your table.
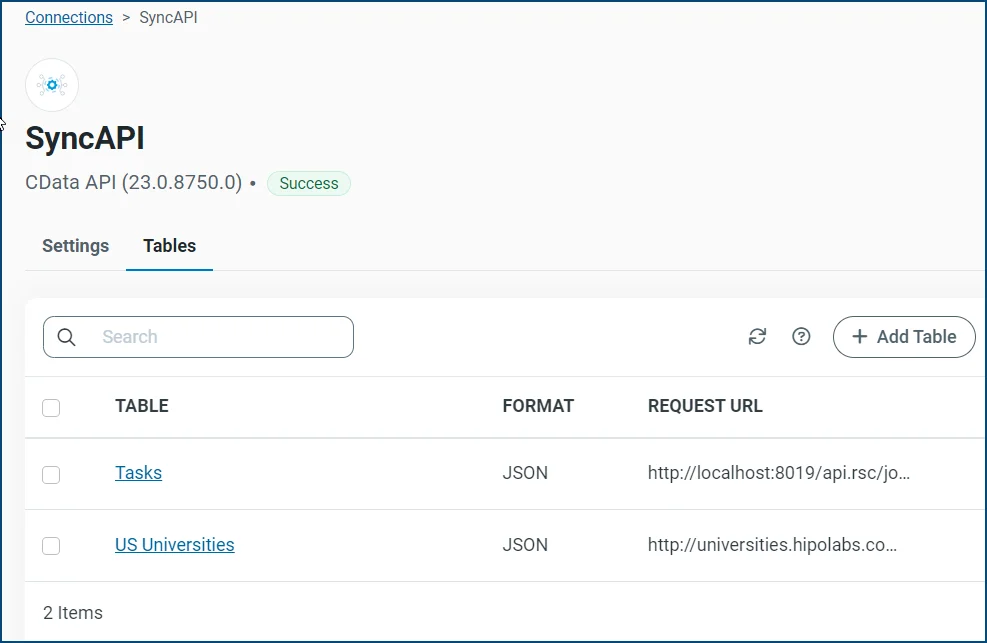
15. Click **Save** (upper right corner of the **New Table** page) to save a link to your table on the API connector page.
14. Click **Confirm** to save the selections for your table.
15. Click **Save** (upper right corner of the **New Table** page) to save a link to your table on the API connector page.
 ## Add Pseudocolumns
A *pseudocolumn* imitates the behavior of a table column, but the pseudocolumn is not stored physically in your source table or API. These columns enable you to modify the requests that are sent to your API (via an SQL WHERE clause), but the values will not be replicated to your destination table.
To create a pseudocolumn in {siteNameShort}:
1. From your API connector, select **Tables > Tasks**.
2. Navigate to the **Table Details** section at the bottom of the **Tasks** page and click the **Pseudocolumns** tab.
3. Click **Add Pseudocolumn**.
## Add Pseudocolumns
A *pseudocolumn* imitates the behavior of a table column, but the pseudocolumn is not stored physically in your source table or API. These columns enable you to modify the requests that are sent to your API (via an SQL WHERE clause), but the values will not be replicated to your destination table.
To create a pseudocolumn in {siteNameShort}:
1. From your API connector, select **Tables > Tasks**.
2. Navigate to the **Table Details** section at the bottom of the **Tasks** page and click the **Pseudocolumns** tab.
3. Click **Add Pseudocolumn**.
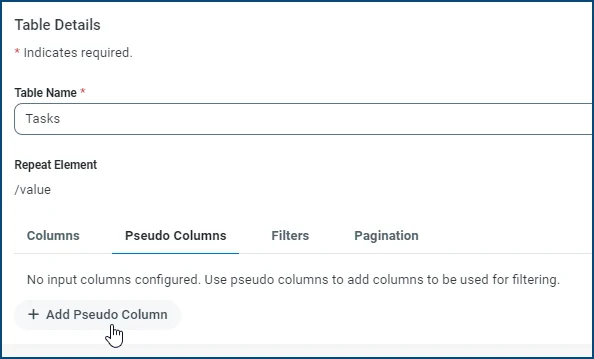 4. Enter a name for your pseudocolumn in the **COLUMN NAME** text box. Then, select an appropriate data type from the **DATA TYPE** list.
 You can choose to output a pseudocolumn within the result of your API table by selecting the **Output** check box, as shown in the image above. In addition, you can select the **Required** check box if you want to mandate the inclusion of your pseudocolumn in the WHERE clause of your task. Then, if the task does not include the pseudocolumn in the WHERE clause, {siteNameShort} generates an error message similar to this example:
 To delete a pseudocolumn, click the **Delete** icon at the end of the pseudocolumn row.
5. Click **Save**.
## Modify Column Attributes in API Connector Tables
In the {siteNameShort} application, you can edit certain column attributes (column size, precision, and scale) for API connector tables from the **Table Details** section of your table page. These settings are saved in the connection configuration and are preserved during backup/restore and job import/export processes.
* **Column Size:** Available for the String and Binary types (the default size is 2000).
* **Precision:** Available for the Time, DateTime, Decimal, Float, and Double types.
* **Scale:** Available only for the Decimal type.
Replication works correctly with the updated definitions, and upgrading to later builds does not affect existing functionality.
To modify the column attributes, open your API connection and follow these steps:
1. Click the **Tables** tab. You can either edit an existing table or create a new table.
2. Click the name of the table that you want to edit (or click **Configure Table** to create a new table).
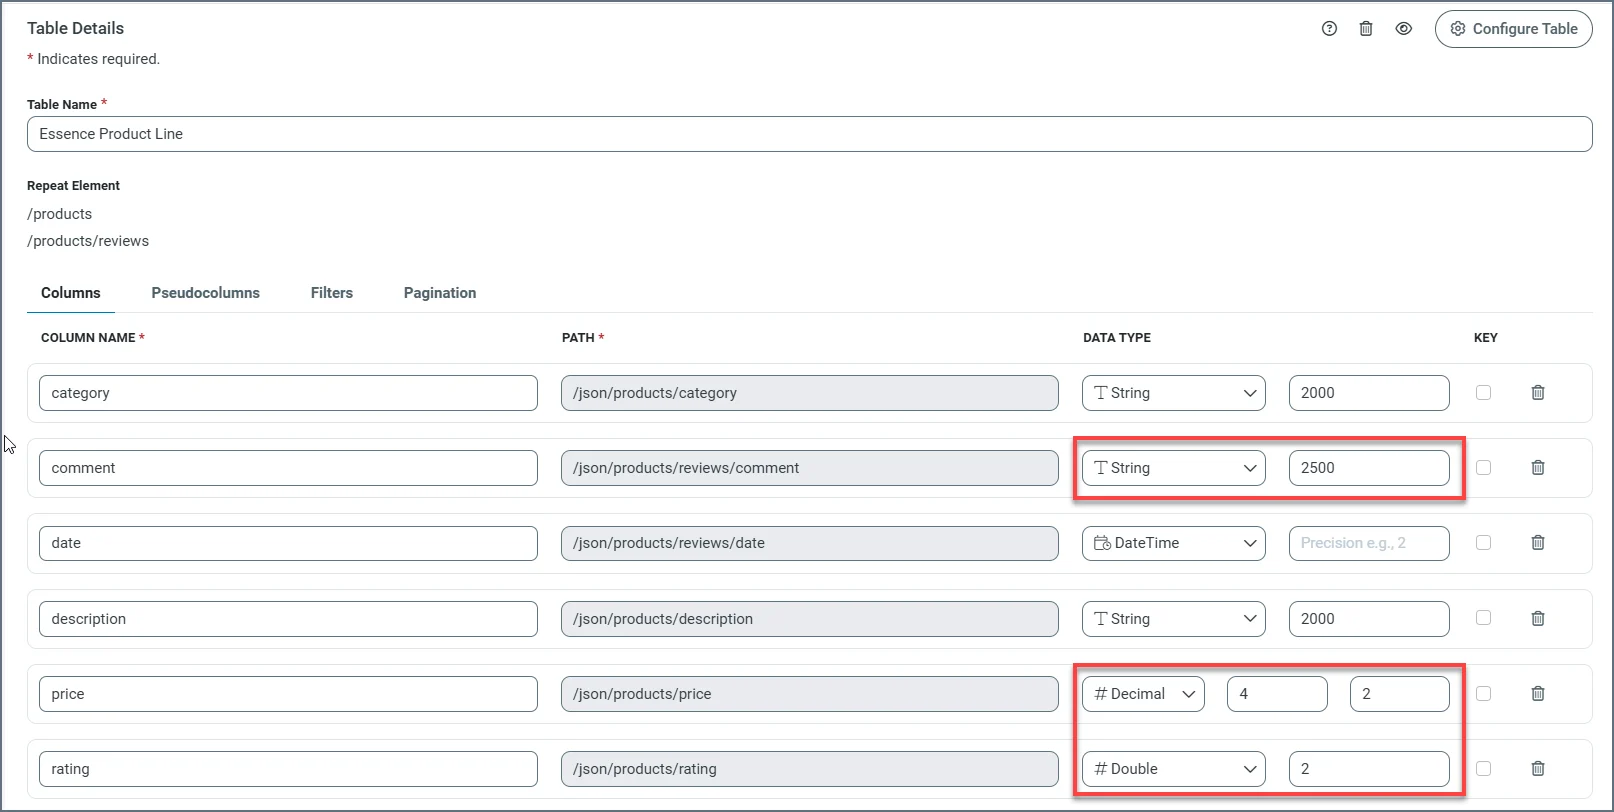
3. In the **Table Details** section of your table page, locate the data columns that you want to modify and edit their attributes in the **Data Type** column of the table.
The following example contains data columns that use String (column size), Decimal (scale), and Double (precision) types, with their default values modified.
To delete a pseudocolumn, click the **Delete** icon at the end of the pseudocolumn row.
5. Click **Save**.
## Modify Column Attributes in API Connector Tables
In the {siteNameShort} application, you can edit certain column attributes (column size, precision, and scale) for API connector tables from the **Table Details** section of your table page. These settings are saved in the connection configuration and are preserved during backup/restore and job import/export processes.
* **Column Size:** Available for the String and Binary types (the default size is 2000).
* **Precision:** Available for the Time, DateTime, Decimal, Float, and Double types.
* **Scale:** Available only for the Decimal type.
Replication works correctly with the updated definitions, and upgrading to later builds does not affect existing functionality.
To modify the column attributes, open your API connection and follow these steps:
1. Click the **Tables** tab. You can either edit an existing table or create a new table.
2. Click the name of the table that you want to edit (or click **Configure Table** to create a new table).
3. In the **Table Details** section of your table page, locate the data columns that you want to modify and edit their attributes in the **Data Type** column of the table.
The following example contains data columns that use String (column size), Decimal (scale), and Double (precision) types, with their default values modified.
 4. Click **Save** at the top of the table page to save your modifications.
## Add Filters
After you create a table with columns, you can create filters that define the behavior of the API connector when a WHERE clause is issued during a query. Filters improve performance by delegating the filtering process to the API on the server side. If you do not include filters, the query options are processed by {siteNameShort} instead.
### Creating a Filter
You can create filters for each column in your table.
To create a filter:
1. Click the **Filters** tab on the **New Table** page, as shown below.
4. Click **Save** at the top of the table page to save your modifications.
## Add Filters
After you create a table with columns, you can create filters that define the behavior of the API connector when a WHERE clause is issued during a query. Filters improve performance by delegating the filtering process to the API on the server side. If you do not include filters, the query options are processed by {siteNameShort} instead.
### Creating a Filter
You can create filters for each column in your table.
To create a filter:
1. Click the **Filters** tab on the **New Table** page, as shown below.
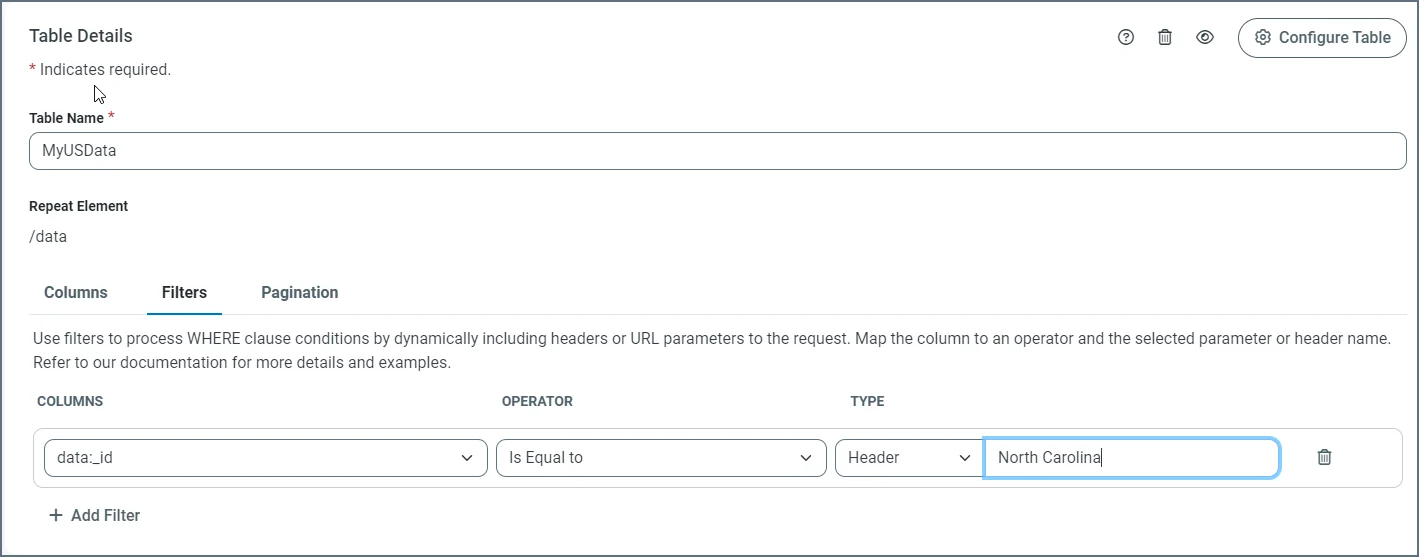 2. Click **Add Filter** under the **Columns** list.
3. Select the column (from the **Columns** list) that you want to filter.
4. Select criteria from the **Operator** list. You can choose from these options:
* **Is Equal to**
* **Is Not Equal to**
* **Is Less Than**
* **Is Less Than or Equal to**
* **Is Greater Than**
* **Is Greater Than or Equal to**
5. Select a type (**Parameter** or **Header**) from the **Type** list. Then enter the name of the parameter or header if it does not match the column name.
6. Click **Save** (top right of the page) to save your filter.
The following example illustrates how to create a filter that processes a query for filtering records in the Reports table by the date that the record was created.
**Example Query**
```sql theme={null}
SELECT * FROM Reports WHERE CreatedDate > 2022-12-31
```
If no filter is defined for this table, the connector processes this filter in memory by reading all the rows from the API and by filtering the list in memory by the specified **CreatedDate** column. However, the API for this example supports this type of filtering on the server side, which can improve performance substantially.
The following example shows what this query looks like to the API:
```
https://www.mycustomapi.org/api/reports?$startdate=2022-12-31
```
To specify how the connector should send this filter to the API, you need to specify the following fields:
* **Column:** CreatedDate
* **Operator:** Greater Than
* **Filter Type:** Parameter
* **Parameter Name:** startdate
These specifications instruct the connector to include the startDate URL parameter with the filter value in the API request when a Greater Than operator is specified for the CreatedDate column.
### Using the Request Per Row Feature to Filter Data
In the {siteNameShort} application, you can subset your data by using the **Request Per Row** feature. **Request Per Row** enables {siteNameShort} to pass separate requests for each filter value by using an SQL IN clause. This feature is useful when you query a child dataset and that query requires the identifier (Id) of the parent dataset. For example, you might have an invoice dataset (parent) from which you want to split out line items (child) as separate rows into a single destination table. The following query dynamically passes separate requests for an invoice Id value:
```sql theme={null}
REPLICATE [InvoiceLineItems] SELECT * FROM [InvoiceLineItems] WHERE InvoiceID IN ('1', '2', '3')
```
In addition, you can use an inner SELECT query in the filter to pass a dynamic list of invoice Ids:
```sql theme={null}
REPLICATE [InvoiceLineItems] SELECT * FROM [InvoiceLineItems] WHERE InvoiceID IN (SELECT Id FROM [Invoices])
```
To activate the **Request Per Row** feature:
1. Modify the request URL to include the name of the unique record-identifier column inside curly braces. After you add the column name in curly braces, the message **Request Per Row Detected** is displayed above the right end of the **Request URL** text box.
2. Click **Configure Table**.
3. Enter an example value for the unique record-identifier column.
4. Follow steps 7–13 in the [Add Tables](#add-tables) section.
Ensure that a column or pseudocolumn exists that matches the unique record-identifier column (case-sensitive). If they do not match, {siteNameShort} displays a warning.
5. Click **Save** (top right of the **New Tables** page).
## Add Pagination
{siteNameShort} supports multiple types of paging implementations. To add a pagination type:
1. Click the **Pagination** tab.
2. Select a pagination type from the **Type** list. You can choose from these types:
* **None:** Select this type if the API request returns the full data set in one response.
* **Offset:** Select this type when the API request provides a record offset parameter for paging. For more details, see [Offset](#offset).
* **Number:** Select this type when the API request includes a parameter to specify the current page number. For more details, see [Number](#number).
* **Token:** Select this type when the API response includes a token for the next page. For more details, see [Token](#token).
* **URL:** Select this type when the API response includes a URL for the next page. For more details, see [URL](#url).
3. Click **Save** (top right of the page) to save your pagination setting.
### Offset
When you select **Offset**, you must specify the following properties:
* **Offset Parameter:** Enter the name of the URL parameter that defines the offset in the API request.
* **Page Size:** Enter the number of records that you want to retrieve per page. The API connector uses this value to calculate the offset.
* (Optional) **Page Size Parameter:** Enter the name of the URL parameter that defines how many records to retrieve per page. If there is no parameter to control page size, the **Page Size Parameter** does not need to be set. However, in that case, you must set **Page Size** to the default page size.
**Example**
In the following request, **Offset Parameter** is set to **pageOffset**, **Page Size Parameter** is set to **pageSize**, and **Page Size** is set to **1000**. This example shows the request for page 6 of the data because the connector automatically increments the offset.
```
https://myapi?pageOffset=5000&pageSize=1000
```
### Number
When you select **Number**, you must also specify the following settings:
* **Page Number Parameter:** Enter the name of the URL parameter that defines the page number.
* (Optional) **Page Size Parameter:** Enter the name of the URL parameter that defines the page size.
* (Optional) **Page Size:** Enter the number of records that you want to retrieve per page.
**Example**
In the following request, **Page Number Parameter** is set to **pageNum**, **Page Size Parameter** is set to **pageSize**, and **Page Size** is set to **1000**. This example shows the request for page 6 of the data because the connector increments the page automatically.
```
https://myapi?pageNum=6&pageSize=1000
```
### Token
When you select **Token**, you must specify the following settings:
* **Token Path:** Enter the path in the API response that defines the next-page token.
* (Optional) **Has More Path:** Enter the path in the API response that defines whether records are available.
* **Token Source:** This setting determines whether the token should be sent in the request as a URL parameter or whether it should be sent in the request body. Select the option that you want:
* **Request Path:** Enter the path in the request body where {siteNameShort} should set the paging token.
* **URL Parameter:** Enter the name of the URL parameter that {siteNameShort} should pass to the paging token.
**Example Using the URL Parameter**
In the following request, **URL Parameter** is set to **pageToken**, and **Token Path** is set to **/results/nextpagetoken**.
**Request:** `https://myapi?pageToken=123456`
**Response:**
```json theme={null}
{
"results": [
{
"rows": [
{
"id": "123",
"name": "Acme",
"country": "United States",
"no_employees": 500
}
],
"nextpagetoken": 123457
}
]
}
```
**Example Using the Request Path**
In the following request, **Request Path** is set to **/request/pageToken**, **Token Path** is set to **/results/nextpagetoken**, and **Has More Path** is set to **/results/morePages**.
**Request Body**
```json theme={null}
{
"request": [
{
"country": "United States",
"pageToken": 123456
}
]
}
```
**Response**
```json theme={null}
{
"results": [
{
"rows": [
{
"id": "123",
"name": "Acme",
"country": "United States",
"no_employees": 500
}
],
"nextpagetoken": 123457,
"morePages": true
}
]
}
```
### URL
When you select **URL**, you also need to select the URL source:
* **Header Name:** Enter a header name if the next page URL is passed in the response headers along with a link header.
* **Request Path:** Enter the path in the API response that defines the next page URL. This value should be supplied in XPath notation. See the following example.
**Example Using the Request Path**
In the following example, the **Request Path** is set to **/results/nextpageurl**.
**Response:**
```json theme={null}
{
"results": [
{
"rows": [
{
"id": "123",
"name": "Acme",
"country": "United States",
"no_employees": 500
}
],
"nextpageurl": "https://myapi?nextpage=81a3ebdb-1483-45cd-84d1-f711d1308698"
}
]
}
```
{cloudEnv && (
<>
2. Click **Add Filter** under the **Columns** list.
3. Select the column (from the **Columns** list) that you want to filter.
4. Select criteria from the **Operator** list. You can choose from these options:
* **Is Equal to**
* **Is Not Equal to**
* **Is Less Than**
* **Is Less Than or Equal to**
* **Is Greater Than**
* **Is Greater Than or Equal to**
5. Select a type (**Parameter** or **Header**) from the **Type** list. Then enter the name of the parameter or header if it does not match the column name.
6. Click **Save** (top right of the page) to save your filter.
The following example illustrates how to create a filter that processes a query for filtering records in the Reports table by the date that the record was created.
**Example Query**
```sql theme={null}
SELECT * FROM Reports WHERE CreatedDate > 2022-12-31
```
If no filter is defined for this table, the connector processes this filter in memory by reading all the rows from the API and by filtering the list in memory by the specified **CreatedDate** column. However, the API for this example supports this type of filtering on the server side, which can improve performance substantially.
The following example shows what this query looks like to the API:
```
https://www.mycustomapi.org/api/reports?$startdate=2022-12-31
```
To specify how the connector should send this filter to the API, you need to specify the following fields:
* **Column:** CreatedDate
* **Operator:** Greater Than
* **Filter Type:** Parameter
* **Parameter Name:** startdate
These specifications instruct the connector to include the startDate URL parameter with the filter value in the API request when a Greater Than operator is specified for the CreatedDate column.
### Using the Request Per Row Feature to Filter Data
In the {siteNameShort} application, you can subset your data by using the **Request Per Row** feature. **Request Per Row** enables {siteNameShort} to pass separate requests for each filter value by using an SQL IN clause. This feature is useful when you query a child dataset and that query requires the identifier (Id) of the parent dataset. For example, you might have an invoice dataset (parent) from which you want to split out line items (child) as separate rows into a single destination table. The following query dynamically passes separate requests for an invoice Id value:
```sql theme={null}
REPLICATE [InvoiceLineItems] SELECT * FROM [InvoiceLineItems] WHERE InvoiceID IN ('1', '2', '3')
```
In addition, you can use an inner SELECT query in the filter to pass a dynamic list of invoice Ids:
```sql theme={null}
REPLICATE [InvoiceLineItems] SELECT * FROM [InvoiceLineItems] WHERE InvoiceID IN (SELECT Id FROM [Invoices])
```
To activate the **Request Per Row** feature:
1. Modify the request URL to include the name of the unique record-identifier column inside curly braces. After you add the column name in curly braces, the message **Request Per Row Detected** is displayed above the right end of the **Request URL** text box.
2. Click **Configure Table**.
3. Enter an example value for the unique record-identifier column.
4. Follow steps 7–13 in the [Add Tables](#add-tables) section.
Ensure that a column or pseudocolumn exists that matches the unique record-identifier column (case-sensitive). If they do not match, {siteNameShort} displays a warning.
5. Click **Save** (top right of the **New Tables** page).
## Add Pagination
{siteNameShort} supports multiple types of paging implementations. To add a pagination type:
1. Click the **Pagination** tab.
2. Select a pagination type from the **Type** list. You can choose from these types:
* **None:** Select this type if the API request returns the full data set in one response.
* **Offset:** Select this type when the API request provides a record offset parameter for paging. For more details, see [Offset](#offset).
* **Number:** Select this type when the API request includes a parameter to specify the current page number. For more details, see [Number](#number).
* **Token:** Select this type when the API response includes a token for the next page. For more details, see [Token](#token).
* **URL:** Select this type when the API response includes a URL for the next page. For more details, see [URL](#url).
3. Click **Save** (top right of the page) to save your pagination setting.
### Offset
When you select **Offset**, you must specify the following properties:
* **Offset Parameter:** Enter the name of the URL parameter that defines the offset in the API request.
* **Page Size:** Enter the number of records that you want to retrieve per page. The API connector uses this value to calculate the offset.
* (Optional) **Page Size Parameter:** Enter the name of the URL parameter that defines how many records to retrieve per page. If there is no parameter to control page size, the **Page Size Parameter** does not need to be set. However, in that case, you must set **Page Size** to the default page size.
**Example**
In the following request, **Offset Parameter** is set to **pageOffset**, **Page Size Parameter** is set to **pageSize**, and **Page Size** is set to **1000**. This example shows the request for page 6 of the data because the connector automatically increments the offset.
```
https://myapi?pageOffset=5000&pageSize=1000
```
### Number
When you select **Number**, you must also specify the following settings:
* **Page Number Parameter:** Enter the name of the URL parameter that defines the page number.
* (Optional) **Page Size Parameter:** Enter the name of the URL parameter that defines the page size.
* (Optional) **Page Size:** Enter the number of records that you want to retrieve per page.
**Example**
In the following request, **Page Number Parameter** is set to **pageNum**, **Page Size Parameter** is set to **pageSize**, and **Page Size** is set to **1000**. This example shows the request for page 6 of the data because the connector increments the page automatically.
```
https://myapi?pageNum=6&pageSize=1000
```
### Token
When you select **Token**, you must specify the following settings:
* **Token Path:** Enter the path in the API response that defines the next-page token.
* (Optional) **Has More Path:** Enter the path in the API response that defines whether records are available.
* **Token Source:** This setting determines whether the token should be sent in the request as a URL parameter or whether it should be sent in the request body. Select the option that you want:
* **Request Path:** Enter the path in the request body where {siteNameShort} should set the paging token.
* **URL Parameter:** Enter the name of the URL parameter that {siteNameShort} should pass to the paging token.
**Example Using the URL Parameter**
In the following request, **URL Parameter** is set to **pageToken**, and **Token Path** is set to **/results/nextpagetoken**.
**Request:** `https://myapi?pageToken=123456`
**Response:**
```json theme={null}
{
"results": [
{
"rows": [
{
"id": "123",
"name": "Acme",
"country": "United States",
"no_employees": 500
}
],
"nextpagetoken": 123457
}
]
}
```
**Example Using the Request Path**
In the following request, **Request Path** is set to **/request/pageToken**, **Token Path** is set to **/results/nextpagetoken**, and **Has More Path** is set to **/results/morePages**.
**Request Body**
```json theme={null}
{
"request": [
{
"country": "United States",
"pageToken": 123456
}
]
}
```
**Response**
```json theme={null}
{
"results": [
{
"rows": [
{
"id": "123",
"name": "Acme",
"country": "United States",
"no_employees": 500
}
],
"nextpagetoken": 123457,
"morePages": true
}
]
}
```
### URL
When you select **URL**, you also need to select the URL source:
* **Header Name:** Enter a header name if the next page URL is passed in the response headers along with a link header.
* **Request Path:** Enter the path in the API response that defines the next page URL. This value should be supplied in XPath notation. See the following example.
**Example Using the Request Path**
In the following example, the **Request Path** is set to **/results/nextpageurl**.
**Response:**
```json theme={null}
{
"results": [
{
"rows": [
{
"id": "123",
"name": "Acme",
"country": "United States",
"no_employees": 500
}
],
"nextpageurl": "https://myapi?nextpage=81a3ebdb-1483-45cd-84d1-f711d1308698"
}
]
}
```
{cloudEnv && (
<>
Edit the RSD Script
In {siteNameShort}, you can directly edit the RSD script for an API connector table from the UI. An RSD script is a schema definition that controls how {siteNameShort} represents API response data as a table. Editing this script allows you to override the automatic table configuration and define exactly how columns map to elements in the API response.
This capability is useful when the standard table builder cannot correctly map response values to columns, particularly for complex XML structures.
When to Edit the RSD Script
The standard table configuration in the UI uses repeat elements to map API responses into rows and columns. This approach works for most JSON and XML responses where each row contains both column names and values in a consistent structure.
However, some APIs return XML where column names and data values are separated into different sections. For example, column names might appear in a <header> element while row data appears in a <body> element. In this structure, the repeat-element configuration cannot associate header labels with the corresponding data values.
In these cases, editing the RSD script allows you to manually define the column-to-data mapping by using XPath expressions.
How to Map Columns with XPath
In the RSD script, each column is defined as an <attr> element. This element specifies the column name, data type, and the XPath expression that identifies the corresponding value in the API response.
To define a column:
- Set the name attribute to the column name that should appear in the output table.
- Set the
xs:type= attribute to the appropriate data type (for example, "string").
- Set the
other:xPath= attribute to an XPath expression that points to the column value within each row.
You must also define the row-level XPath by setting the XPath attribute in the RSD script to the element that represents each row.
Consider the XML response in the following example:
{`
Derek
Doe
`}
In this structure, the column labels are defined in the <header> section, while the row data is defined in the <body> section.
To map this data in the RSD script, define the row-level XPath as follows: /result/body/row
Then define the columns as shown here:
{`
`}
The positional index (col[1], col[2], and so on) corresponds to the order of the columns that is defined in the header. This approach enables you to map each column name to the correct value in the row data.
)}