> ## Documentation Index
> Fetch the complete documentation index at: https://docs.sync.cdata.com/llms.txt
> Use this file to discover all available pages before exploring further.
# DB2 (Native)
export const CommonDatasourceCompleteConnection = ({start = 2}) => {
return
- Advanced タブで詳細な接続設定を定義します。(ただし、ほとんどの場合、これらの設定は不要です。)
- 作成およびテストをクリックして接続を作成します。
;
};
export const CommonDatasourceAuthenticate = () => {
return コネクタを追加したら、必要なプロパティを設定します。
;
};
export const CommonDatasourceAddConnector = ({datasource = "the data source", title = "the connector", destination = false, siteNameShort = "Sync"}) => {
return <>
{siteNameShort} で{datasource} のデータを使用できるようにするには、まず以下の手順でコネクタを追加する必要があります:
- {siteNameShort} のダッシュボードから接続ページを開きます。
- 接続を追加をクリックしてコネクタを選択ページを開きます。
-
{destination ? "同期先" : "データソース"}タブをクリックして
{title} 行に移動します。
-
行末にある接続を設定アイコンをクリックして、新しい接続ページを開きます。この操作により、{' '}
接続を追加ダイアログボックスが開きます。
Note: 接続を設定アイコンが表示されない場合は、コネクタをダウンロードアイコンをクリックして {title} コネクタをインストールしてください。
- 接続を追加ダイアログボックスに接続名を入力します。
- 追加をクリックして、コネクタの設定タブを開きます。
新しいコネクタのインストールについての詳細は、{' '}
接続を参照してください。
;
};
export const CommonDatasourceIntroSource = ({datasource = "the data source", siteName = "CData Sync"}) => {
return
{siteName} アプリケーションから{datasource} コネクタを使用して、{datasource} からデータを取得してサポートされている任意の同期先に移動できます。これを行うには、コネクタを追加し、コネクタへの認証を行い、接続を完了する必要があります。
;
};
export const siteNameShort = "Sync";
export const siteName = "CData Sync";
export const datasource = "DB2";
export const pageTitle = "DB2 (Native)";
## Set Up {datasource} for Change Data Capture
Before you add and set up the {datasource} source connector, you need to configure the {datasource} database for change data capture (CDC), as explained in the following sections.
Before you set up {datasource} for CDC, ensure that the following requirements are met. These requirements are for both Linux and Microsoft Windows operating environments.
* DB2 version 11.5 or later.
* DB2 is installed and a DB2 instance is created on the host system.
* {siteNameShort} CDC requires the DB2 SQL Replication libraries (Abstract Syntax Notation, ASN) to be installed and available on the DB2 system. These libraries are essential for operation and require an IBM InfoSphere Data Replication (IIDR) license. However, IIDR installation is not necessary.
* A recent full database backup must be available before starting the ASN capture agent.
* The tables that you want to replicate must be placed in ASN capture mode.
### Configure CDC for DB2 on Linux
The following steps configure DB2 CDC in the Linux operating environment. Before you add your {datasource} connector, enable change data capture (CDC) in the database and put your tables in capture mode, as follows:
1. Log in to DB2 as the **db2inst1** user.
2. Start the ASN agent (capture program), create the schema where all captured table changes will be stored, and add the tables for which you want to capture changes, as follows. These steps are based on the {datasource} portions of the *IBM SQL Replication Guide and Reference*.
3. Download the required SQL Replication User-Defined Function (UDF) from here and extract it to your {datasource} server directory (for example, `$HOME/asncdctools/src`).
The {datasource} server's PATH environment variable contains the DB2 path to the `bldrtn` command (for example, `export PATH=$PATH:/opt/ibm/db2/V11.5.0.0/samples/c/` command appends the directory /opt/ibm/db2/V11.5.0.0/samples/c/ to the existing PATH variable). As a result, you can run the `bldrtn` command from anywhere in your terminal without specifying the full path. Use this command to compile the UDFs, as shown below:
```bash theme={null}
cd $HOME/asncdctools/src
bldrtn asncdc
```
4. Ensure that the JDBC driver can read the {datasource} metadata catalog by submitting the following commands:
```bash theme={null}
# Replace the {...} placeholders as required
cd $HOME/sqllib/bnd
db2 connect to YourDatabaseName
db2 bind db2schema.bnd blocking all grant public sqlerror continue
```
5. Ensure that the database was recently backed up. The ASN agents must have a recent starting point from which to read. If you need to perform a backup, run the following commands:
```bash theme={null}
db2 backup db YourDatabaseName to YourBackupLocation
db2 restart db YourDatabaseName
```
These commands trim (prune) the data so that only the most recent version is available. If you do not need to retain older versions of the data, specify `dev/null` for the backup location.
6. Connect to your {datasource} database to install the UDFs. Log in as the **db2inst1** user and execute the following commands:
```
db2 connect to YourDatabaseName
cp $HOME/asncdctools/src/asncdc $HOME/sqllib/function
chmod 777 $HOME/sqllib/function
```
7. Enable the functions that will start and stop the ASN capture agent.
`db2 -tvmf $HOME/asncdctools/src/asncdc_UDF.sql`
8. Create the ASN control tables.
`db2 -tvmf $HOME/asncdctools/src/asncdctables.sql`
9. Create the functions that will be used to add control tables to or remove them from capture mode.
`db2 -tvmf $HOME/asncdctools/src/asncdcaddremove.sql`
10. Submit the following statements to create a connection with your database, enable the {datasource} ASN capture agent, and add tables for capture mode.
```sql theme={null}
-- start the ASN agent
VALUES ASNCDC.ASNCDCSERVICES('start','asncdc');
-- add a table to capture mode
CALL ASNCDC.ADDTABLE('SchemaName', 'TableName');
CALL ASNCDC.ADDTABLE('DB2INST1', 'TEST_TABLE');
----------------------------------------------------
-- Other commands that you can use:
-- Reinitiate or stop the ASN agent
VALUES ASNCDC.ASNCDCSERVICES('reinit','asncdc');
VALUES ASNCDC.ASNCDCSERVICES('stop','asncdc');
-- check the status of the ASN agent
VALUES ASNCDC.ASNCDCSERVICES('status','asncdc');
-- remove a table from the change data capture mode:
CALL ASNCDC.REMOVETABLE('SchemaName', 'TableName');
```
After all the prerequisite steps complete successfully, continue to the [Add the {datasource} Connector](#add-the-db2-connector) section. For details about using CDC, see [Using the {siteNameShort} CDC Engine](../../jobs/change-data-capture#using-the-sync-cdc-engine).
### Configure CDC for DB2 on Microsoft Windows
The steps in this section configure DB2 CDC on Microsoft Windows by using the ASN Capture Agent (asncap.exe). These steps were validated with DB2 Community Edition 12.1.
Before you perform the steps, ensure that the following requirements (Windows specific) are met.
Before you configure CDC on Windows:
* Install DB2 on Windows and a DB2 instance is created.
* Add the ASN binaries to the DB2 installation directory, as shown below:
```
\IBM\SQLLIB\BIN\asncap.exe
\IBM\SQLLIB\BIN\asnccmd.exe
```
* Ensure that a Windows user account (local or domain) with a non-blank password is available for {siteNameShort} to connect to DB2.
After you verify that the requirements are met, follow these steps:
1. Download the required SQL Replication User-Defined Function (UDF) package from here and extract it to a directory on the DB2 server, as shown in this example:
`C:\asncdctools\src`
The UDF package includes files such as asncdc.c and asncdc\_UDF.sql, which are used on Linux to create SQL-callable functions for starting and stopping the ASN capture agent. On Windows, the capture agent is managed using the asncap.exe command-line utility or Windows Task Scheduler instead of SQL-callable start and stop functions.
2. Back up the database. The ASN agents must have a recent starting point from which to read. To back up the database, open the **DB2 Command Window - Administrator** via the Windows **Start** menu and submit the following commands:
```
db2 connect to YourDatabaseName
db2 backup db YourDatabaseName to YourBackupLocation
db2 restart db YourDatabaseName
```
3. Submit the following commands to create the ASN control tables and procedures that add and remove tables from capture mode:
```
db2 connect to YourDatabaseName
db2 -tvf C:\asncdctools\src\asncdctables.sql
db2 -tvf C:\asncdctools\src\asncdcaddremove.sql
```
In the statements above, replace `C:\asncdctools\src` with the actual directory path to which you saved the user-defined functions, if they are located elsewhere.
4. Upgrade control tables for ARCH\_LEVEL 1021 (only if you use InfoSphere Data Replication 11.4.0).
**If you use InfoSphere Data Replication 11.4.0**, you must upgrade your control tables for ARCH-LEVEL 1021 (a specific architecture level in IBM InfoSphere Data Replication). Because later versions include columns that are not present in the scripts that were provided earlier in step 1, starting the capture agent can produce missing column errors, such as shown in the following example:
 In such cases, IBM provides guidance in SQL Replication – Migrating to ARCH\_LEVEL 1021 on Linux, UNIX, and Windows and includes the required update scripts with the DB2 installation. You can find the script in the following directory:
`\SQLLIB\samples\repl\mig1021\sql\asncapluwv1021.sql`
The bundled script contains placeholders for `!capschema!` and `!captablespace!`. Update the script by replacing `!capschema!` with `ASNCDC`. For `!captablespace!`, you can either remove all references so that the default tablespace is used or replace it with the name of the tablespace where the SQL capture control tables are created.
Save a copy of the edited script in the same directory where you downloaded the UDFs. Then, submit the following command to update the control tables:
`db2 -tvmf C:\asncdctools\src\asncapluwv1021.sql`
5. Add tables to capture mode by using the `ADDTABLE('schema', 'table')` function, as shown below:
```sql theme={null}
db2 connect to YourDatabase
CALL ASNCDC.ADDTABLE('SchemaName', 'TableName');
```
The control tables and metadata are created in the ASNCDC schema, as shown in this example:
In such cases, IBM provides guidance in SQL Replication – Migrating to ARCH\_LEVEL 1021 on Linux, UNIX, and Windows and includes the required update scripts with the DB2 installation. You can find the script in the following directory:
`\SQLLIB\samples\repl\mig1021\sql\asncapluwv1021.sql`
The bundled script contains placeholders for `!capschema!` and `!captablespace!`. Update the script by replacing `!capschema!` with `ASNCDC`. For `!captablespace!`, you can either remove all references so that the default tablespace is used or replace it with the name of the tablespace where the SQL capture control tables are created.
Save a copy of the edited script in the same directory where you downloaded the UDFs. Then, submit the following command to update the control tables:
`db2 -tvmf C:\asncdctools\src\asncapluwv1021.sql`
5. Add tables to capture mode by using the `ADDTABLE('schema', 'table')` function, as shown below:
```sql theme={null}
db2 connect to YourDatabase
CALL ASNCDC.ADDTABLE('SchemaName', 'TableName');
```
The control tables and metadata are created in the ASNCDC schema, as shown in this example:
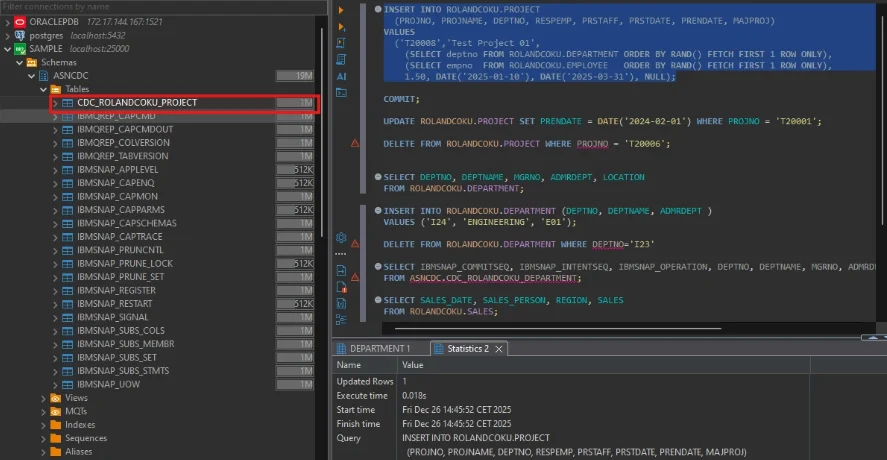 6. Start the ASN capture agent. You can run the capture agent either in the foreground or in the background (recommended method). Both methods are explained below.
**Run the ASN Capture Agent in the Foreground**
Submit the following command in the DB2 Command Window - Administrator:
`asncap capture_schema=ASNCDC capture_server=YourDatabase`
This command starts the agent process on the terminal, and it logs the status, as shown below:
6. Start the ASN capture agent. You can run the capture agent either in the foreground or in the background (recommended method). Both methods are explained below.
**Run the ASN Capture Agent in the Foreground**
Submit the following command in the DB2 Command Window - Administrator:
`asncap capture_schema=ASNCDC capture_server=YourDatabase`
This command starts the agent process on the terminal, and it logs the status, as shown below:
 If the command window closes, the ASN capture agent process terminates.
**(Recommended) Run the ASN Capture Agent in the Background**
Because running the ASN capture agent from the command line terminates the agent when the command window is closed, it is a best practice to use the Windows Task Scheduler to run the agent in the background, as follows:
1. Create a directory where the replication service can write operation logs (for example, `C:\ASNCDC\capture_files\`).
2. Open the Windows Task Scheduler and select **Create Task** in the right pane.
3. On the **General** tab, specify these settings:
* **Name:** Supply a name for the task (for example, **ASNCDC Capture**).
* **Security options:**
If the command window closes, the ASN capture agent process terminates.
**(Recommended) Run the ASN Capture Agent in the Background**
Because running the ASN capture agent from the command line terminates the agent when the command window is closed, it is a best practice to use the Windows Task Scheduler to run the agent in the background, as follows:
1. Create a directory where the replication service can write operation logs (for example, `C:\ASNCDC\capture_files\`).
2. Open the Windows Task Scheduler and select **Create Task** in the right pane.
3. On the **General** tab, specify these settings:
* **Name:** Supply a name for the task (for example, **ASNCDC Capture**).
* **Security options:**
- Click Change User or Group.
- Enter the Windows user that has rights to create tasks and connect to the database. Then, select Check Names > OK.
- Select Run whether user is logged on or not.
- Select the Run with highest privilege checkbox.
- (Optional) Select the Hidden checkbox if you do not want to see the UI.
4. On the **Triggers** tab, click **New** and specify these settings:
* **Begin the task:** Select **At startup**.
* **Enabled:** Select this checkbox. Then, click **OK**.
5. On the **Actions** tab, click **New** and specify these settings:
* **Action:** Select **Start a program**.
* **Program/script:** Enter this path:
`\IBM\SQLLIB\BIN\db2cmd.exe`.
* **Add arguments:** Add the following arguments:
`/c /w "asncap capture_schema=ASNCDC capture_server=YourDatabaseName capture_path=C:\ASNCDC\capture_files"`
* **Start in:** Enter the path `C:\ASNCDC\capture_files`.
6. Click **Save** to save your settings.
7. Right-click the task and select **Run**.
8. Verify that the agent is running by submitting this command:
`tasklist | findstr /i asncap.exe`
After all the prerequisite steps complete successfully, continue to the [Add the {datasource} Connector](#add-the-db2-connector) section. For details about using CDC, see [Using the {siteNameShort} CDC Engine](../../jobs/change-data-capture#using-the-sync-cdc-engine).
## DB2 コネクタを追加
## DB2 への認証
* **Server:** Enter the address or host name of the {pageTitle} server. The default server is **localhost**.
* **Port:** Enter the port on which your {datasource} server is listening. The default port is **50000**.
* **Database:** Enter the name of your {pageTitle} database.
* **User:** Enter the username that you use to authenticate to the {pageTitle} database.
* **Password:** Enter the password that you use to authenticate to the {pageTitle} database.
## 接続を完了する