> ## Documentation Index
> Fetch the complete documentation index at: https://docs.sync.cdata.com/llms.txt
> Use this file to discover all available pages before exploring further.
# SQL Transformations
export const siteNameShort = "Sync";
An *SQL transformation* processes SQL queries midstream (ETL) in a pipeline. This type of transformation processes external SQL scripts or SQL queries that you create in an SQL editor. You can use these queries to insert, delete, update, and retrieve rows from a database. The SQL transformation processes the queries, returning rows and database errors.
## Creating an SQL Transformation
To add an SQL transformation:
1. Open {siteNameShort} and navigate to the **Transformations** page.
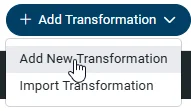
2. Select **Add Transformations > Add New Transformation**.
 3. Fill out the fields in the **Add Transformation** dialog box, as follows:
* **Name:** Enter a name for your transformation.
* **Type:** Select **SQL** as the transformation type.
* **Destination:** Select a destination on which to run the transformation.
4. Click **Add Transformation**.
After you create your transformation, you can manage your transformation from the options menu (**...**).
## Specifying SQL Transformation Settings
To modify transformation settings, select **... > Edit** at the end of the transformation row. The settings page contains three tabs from which you can manage settings:
* **Overview**
* **Queries**
* **Comments**
### **Overview** Tab
The **Overview** tab enables you to manage general settings, triggers, and email alerts. You can also see details from the last run of your transformation on this page.
#### **Settings** Category
The **Settings** category enables you to specify automatic job retry, logfile verbosity, and command timeout, as follows.
1. Select **... > Edit** at the end of the transformation row. This action opens the **Edit Settings** dialog box.
3. Fill out the fields in the **Add Transformation** dialog box, as follows:
* **Name:** Enter a name for your transformation.
* **Type:** Select **SQL** as the transformation type.
* **Destination:** Select a destination on which to run the transformation.
4. Click **Add Transformation**.
After you create your transformation, you can manage your transformation from the options menu (**...**).
## Specifying SQL Transformation Settings
To modify transformation settings, select **... > Edit** at the end of the transformation row. The settings page contains three tabs from which you can manage settings:
* **Overview**
* **Queries**
* **Comments**
### **Overview** Tab
The **Overview** tab enables you to manage general settings, triggers, and email alerts. You can also see details from the last run of your transformation on this page.
#### **Settings** Category
The **Settings** category enables you to specify automatic job retry, logfile verbosity, and command timeout, as follows.
1. Select **... > Edit** at the end of the transformation row. This action opens the **Edit Settings** dialog box.
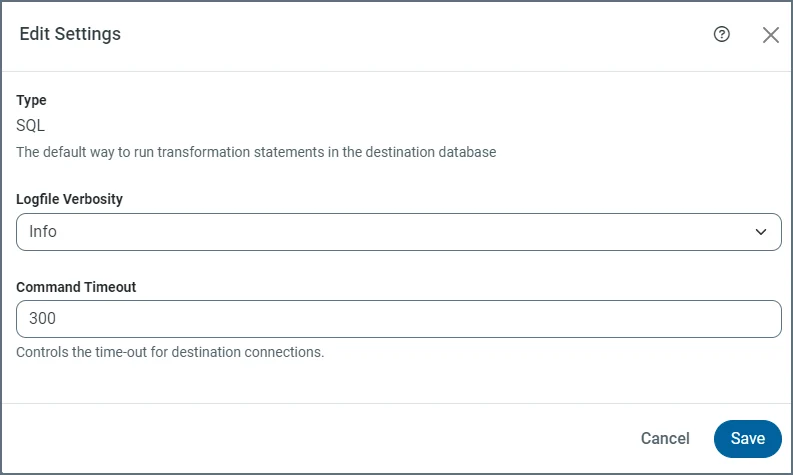 2. (Optional) Select **Enabled** if you want {siteNameShort} to retry the transformation if one or more tasks fail. Only failed tasks are re-executed.
3. Select a level for **Logfile Verbosity**. The default level is **Info**.
4. Enter a timeout value in the **Command Timeout** field.
5. Click **Save**.
#### **Trigger** Category
The **Triggers** category enables you to set a specific schedule by which to run your transformation, as follows.
1. Click **Configure** in the **Triggers** category. This action opens the **Trigger** dialog box.
2. Specify the type of trigger that you want. You can select from the following types:
* **None:** Turns off scheduling options, allowing you to start a transformation manually.
* **Scheduled:** Enables you to set a specific schedule by which to run your transformation. This setting also activates the **Intervals** and **Minutes Past The Hour** fields. You can choose more granular settings for the **Intervals** setting:
* **Minute:** Activates the **Every** option where you can specify increments in minutes (every 10, 15, 20, or 30 minutes) in which to run your transformation.
* **Hourly:** Activates a **Minutes Past The Hour** field so you can set your transformation to run hourly at specific numbers of minutes past the hour (0-59). For example, you might want to run the transformation every hour at 15 minutes past the hour.
* **Daily:** Activates a **Time of Day** field so you can set the specific time each day that you want your transformation to run.
* **Weekly:** Activates two fields (**Days** and **Time of Day**) where you can specify a specific day of the week and time to run your transformation.
* **Monthly:** Activates **Day** and **Time** fields. However, for **Day**, you choose a specific day of each month (values of 1 through 31 or Last Day) along with the time.
* **Cron:** Activates a **Cron Statement** field where you can write a cron job to initiate a transformation run.
The **Scheduled** type is useful when you run multiple jobs. You cannot use the **After Job** option for multiple jobs because you cannot specify after which job to run the transformation.
* **After Job:** Activates a **Job** drop-down list that presents a list of all available jobs. You can choose the specific job after which you want the transformation to run.
You can also specify various tasks to run on your data by clicking **Select Specific Tasks** under the **Job** field. Simply select the task or tasks that you want to run.
3. Click **Save**.
To disable schedule triggers, slide the toggle switch in the **Trigger** category to the left (the switch turns gray when it is disabled).
#### **Labels** Category
This category enables you to add a label:
1. Click **Add Labels** in the **Labels** category. This action opens the ***TransformationName* - Add Label** dialog box. You can search and select a label currently available in the list or you can add a new label.
2. To add a new label, enter the label in the **Search or Add Label** text box and click **Add**.
2. (Optional) Select **Enabled** if you want {siteNameShort} to retry the transformation if one or more tasks fail. Only failed tasks are re-executed.
3. Select a level for **Logfile Verbosity**. The default level is **Info**.
4. Enter a timeout value in the **Command Timeout** field.
5. Click **Save**.
#### **Trigger** Category
The **Triggers** category enables you to set a specific schedule by which to run your transformation, as follows.
1. Click **Configure** in the **Triggers** category. This action opens the **Trigger** dialog box.
2. Specify the type of trigger that you want. You can select from the following types:
* **None:** Turns off scheduling options, allowing you to start a transformation manually.
* **Scheduled:** Enables you to set a specific schedule by which to run your transformation. This setting also activates the **Intervals** and **Minutes Past The Hour** fields. You can choose more granular settings for the **Intervals** setting:
* **Minute:** Activates the **Every** option where you can specify increments in minutes (every 10, 15, 20, or 30 minutes) in which to run your transformation.
* **Hourly:** Activates a **Minutes Past The Hour** field so you can set your transformation to run hourly at specific numbers of minutes past the hour (0-59). For example, you might want to run the transformation every hour at 15 minutes past the hour.
* **Daily:** Activates a **Time of Day** field so you can set the specific time each day that you want your transformation to run.
* **Weekly:** Activates two fields (**Days** and **Time of Day**) where you can specify a specific day of the week and time to run your transformation.
* **Monthly:** Activates **Day** and **Time** fields. However, for **Day**, you choose a specific day of each month (values of 1 through 31 or Last Day) along with the time.
* **Cron:** Activates a **Cron Statement** field where you can write a cron job to initiate a transformation run.
The **Scheduled** type is useful when you run multiple jobs. You cannot use the **After Job** option for multiple jobs because you cannot specify after which job to run the transformation.
* **After Job:** Activates a **Job** drop-down list that presents a list of all available jobs. You can choose the specific job after which you want the transformation to run.
You can also specify various tasks to run on your data by clicking **Select Specific Tasks** under the **Job** field. Simply select the task or tasks that you want to run.
3. Click **Save**.
To disable schedule triggers, slide the toggle switch in the **Trigger** category to the left (the switch turns gray when it is disabled).
#### **Labels** Category
This category enables you to add a label:
1. Click **Add Labels** in the **Labels** category. This action opens the ***TransformationName* - Add Label** dialog box. You can search and select a label currently available in the list or you can add a new label.
2. To add a new label, enter the label in the **Search or Add Label** text box and click **Add**.
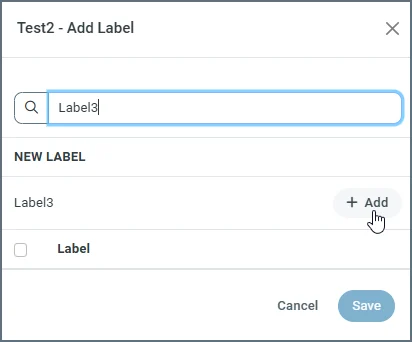 Then, the new label appears in the list of available labels, as shown below.
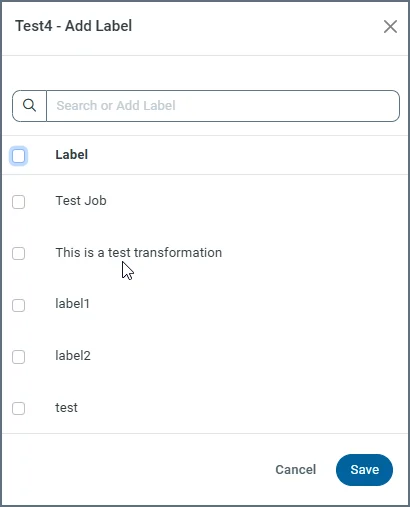 3. Click **Save**.
After you complete these steps, the new label appears in the **Labels** category box on the settings page.
#### **Notifications** Category
The **Notifications** category enables you to set email alerts for transformations, as follows.
1. Select **... > Edit** at the end of the transformation row for which you want to set alerts.
2. Click **Configure** in the **Notifications** category.
3. Set the following options in the **Notifications** dialog box:
* **To:** The email to which to send alerts.
* **Subject:** The subject for alert emails.
* **Errors Only:** An option that you can select to specify that alert emails should be sent only when the job encounters an error. If you do not select this option, {siteNameShort} sends alerts after each job run.
4. Click **Save**.
To disable alerts, slide the **Notifications** toggle switch to the left (the switch turns gray when it is disabled). The toggle switch appears to the right of **Notifications** in the category box.
### **Queries** Tab
This tab enables you to add and manage queries that execute as part of your transformations.
#### Adding a Query
To add a query:
1. Click **Add Query** to open the **Add Query** dialog box.
2. Enter your query in the text box. If you have multiple statements, make sure that you separate each statement with a semicolon.
3. Click **Add Query**. If the addition of the query is successful, {siteNameShort} displays a message saying it is successful at the top of the **Queries** page.
If you want to run your query, click **Run** at the top of the **Queries** page.
After you add and run queries, the **Queries** page displays a table of the queries as well as the **LAST RUN** date.
#### Editing a Query
To edit a query:
1. Select **... > Edit** at the end of the query row.
2. Modify your query, as necessary, in the **Edit Query** dialog box.
3. Click **Save**.
### **Transformations History** Tab
This tab provides details about your transformation job run. Details include **Run Date**, **Status**, **Records Affected**, and **Run Time**. You can also filter your report to show transformations by status (**All Status**, **SUCCESS**, **FAILED**, or **ERROR**). In addition, you can export the history by clicking **Export History**.
### Comments Tab
This tab records and tracks notes that are related to your transformation. Each comment appears with a timestamp. You can change the sort order based on timestamp by using the drop-down menu in the top-right corner, with options for **Newest First** (default) or **Oldest First**. You can also edit a comment or delete it by clicking, respectively, the **Edit Comment** icon (
3. Click **Save**.
After you complete these steps, the new label appears in the **Labels** category box on the settings page.
#### **Notifications** Category
The **Notifications** category enables you to set email alerts for transformations, as follows.
1. Select **... > Edit** at the end of the transformation row for which you want to set alerts.
2. Click **Configure** in the **Notifications** category.
3. Set the following options in the **Notifications** dialog box:
* **To:** The email to which to send alerts.
* **Subject:** The subject for alert emails.
* **Errors Only:** An option that you can select to specify that alert emails should be sent only when the job encounters an error. If you do not select this option, {siteNameShort} sends alerts after each job run.
4. Click **Save**.
To disable alerts, slide the **Notifications** toggle switch to the left (the switch turns gray when it is disabled). The toggle switch appears to the right of **Notifications** in the category box.
### **Queries** Tab
This tab enables you to add and manage queries that execute as part of your transformations.
#### Adding a Query
To add a query:
1. Click **Add Query** to open the **Add Query** dialog box.
2. Enter your query in the text box. If you have multiple statements, make sure that you separate each statement with a semicolon.
3. Click **Add Query**. If the addition of the query is successful, {siteNameShort} displays a message saying it is successful at the top of the **Queries** page.
If you want to run your query, click **Run** at the top of the **Queries** page.
After you add and run queries, the **Queries** page displays a table of the queries as well as the **LAST RUN** date.
#### Editing a Query
To edit a query:
1. Select **... > Edit** at the end of the query row.
2. Modify your query, as necessary, in the **Edit Query** dialog box.
3. Click **Save**.
### **Transformations History** Tab
This tab provides details about your transformation job run. Details include **Run Date**, **Status**, **Records Affected**, and **Run Time**. You can also filter your report to show transformations by status (**All Status**, **SUCCESS**, **FAILED**, or **ERROR**). In addition, you can export the history by clicking **Export History**.
### Comments Tab
This tab records and tracks notes that are related to your transformation. Each comment appears with a timestamp. You can change the sort order based on timestamp by using the drop-down menu in the top-right corner, with options for **Newest First** (default) or **Oldest First**. You can also edit a comment or delete it by clicking, respectively, the **Edit Comment** icon ( ) or the **Remove Comment** icon (
 ) at the end of the row.
## Sample Query for All Databases
The following SQL query deduplicates records:
```sql theme={null}
CREATE OR REPLACE TABLE dbo.Accounts_Deduplicated as (
SELECT *, row_number() over (partition by id order by modified desc) as duplicate_rank
FROM dbo.Accounts
);
DELETE FROM dbo.Accounts_Deduplicated WHERE duplicate_rank > 1;
```
) at the end of the row.
## Sample Query for All Databases
The following SQL query deduplicates records:
```sql theme={null}
CREATE OR REPLACE TABLE dbo.Accounts_Deduplicated as (
SELECT *, row_number() over (partition by id order by modified desc) as duplicate_rank
FROM dbo.Accounts
);
DELETE FROM dbo.Accounts_Deduplicated WHERE duplicate_rank > 1;
```