> ## Documentation Index
> Fetch the complete documentation index at: https://docs.sync.cdata.com/llms.txt
> Use this file to discover all available pages before exploring further.
# Tasks
export const siteNameShort = "Sync";
export const siteName = "CData Sync";
*Tasks* control the data flow from a source into a destination table. In a standard replication job, all source tables and views are available to be added to the job as replication tasks.
## Accessing Tasks in a Job
To access tasks in your job:
1. Click **Jobs** in the navigation bar to open the **Jobs** page.
2. Select your job and click the **Task** tab to open a table of tasks for the job.
## Adding a Task to a Job
To add a task to a job:
1. Select the task or tasks that you want to add to your job from the table of tasks. You also can enter the name of a task in the **Search** field to locate a specific task.
 * To include all tasks, select the checkbox next to the job source and destination at the top of the table.
* When you search or filter tables and views, schemas with no matching results are automatically hidden.
By default, {siteNameShort} displays all tables and views in the **Add Tasks** dialog box. However, you can choose to display a list of tables only or views only by selecting the type that you want to see from the drop-down menu above the tasks list.
* To include all tasks, select the checkbox next to the job source and destination at the top of the table.
* When you search or filter tables and views, schemas with no matching results are automatically hidden.
By default, {siteNameShort} displays all tables and views in the **Add Tasks** dialog box. However, you can choose to display a list of tables only or views only by selecting the type that you want to see from the drop-down menu above the tasks list.
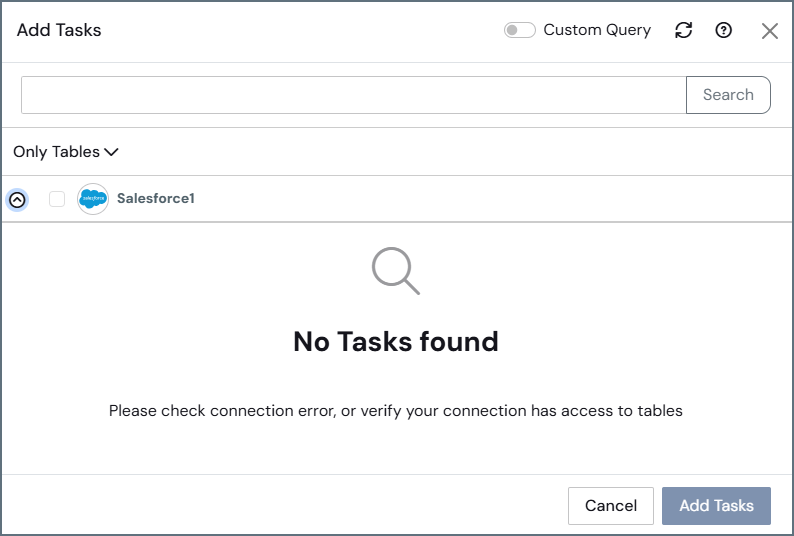
 When you select **Only Tables** or **Only Views** and no list appears for the entity that you choose, the following message is displayed:
 2. Click **Add Tasks** to add the tasks to your job.
3. Select the checkbox next to individual tasks that you want to run in your job (on the **Task** tab). If you want to include all tasks, select the checkbox next to the job source and destination at the top of the table.
4. Run the tasks that you want by selecting the checkboxes to the left of those tasks. Then click **Run** in the bulk edit bar that is displayed. You can also run a specific task by clicking the **Run** arrow at the end of the task row.
{siteName} automatically builds the replication tasks and saves your job. When a task runs correctly, {siteNameShort} displays the message `Successful` appears in the **Last Run** column.
* If you select the [**Sync All** option as the replication type](../../getting-started/configuring-jobs#adding-a-new-job) when you create your job, all available tables and views are added automatically as replication tasks to the job. Each time the job executes, {siteNameShort} first searches for any new tables or views in your source and appends additional replication tasks to your job so that they are included in the run.
* If you want to exclude certain tasks from the job, select the tasks on the **Task** tab and click **Exclude**. When you do this, future job executions ignore those tables.
* Click the **Refresh** button (
2. Click **Add Tasks** to add the tasks to your job.
3. Select the checkbox next to individual tasks that you want to run in your job (on the **Task** tab). If you want to include all tasks, select the checkbox next to the job source and destination at the top of the table.
4. Run the tasks that you want by selecting the checkboxes to the left of those tasks. Then click **Run** in the bulk edit bar that is displayed. You can also run a specific task by clicking the **Run** arrow at the end of the task row.
{siteName} automatically builds the replication tasks and saves your job. When a task runs correctly, {siteNameShort} displays the message `Successful` appears in the **Last Run** column.
* If you select the [**Sync All** option as the replication type](../../getting-started/configuring-jobs#adding-a-new-job) when you create your job, all available tables and views are added automatically as replication tasks to the job. Each time the job executes, {siteNameShort} first searches for any new tables or views in your source and appends additional replication tasks to your job so that they are included in the run.
* If you want to exclude certain tasks from the job, select the tasks on the **Task** tab and click **Exclude**. When you do this, future job executions ignore those tables.
* Click the **Refresh** button ( ) on the **Task** tab to clear the metadata cache and obtain the most up-to-date table listing.
## Pausing and Resuming Tasks
{siteName} enables you to pause and resume tasks. A task's **Active** or **Paused** status only determines whether the task runs when the entire job is executed (either on a schedule or manually). However, you can still run a paused task directly at any time.
### Pause Tasks
To pause a task, do one of the following:
* **Pause multiple tasks:** Select the checkboxes for one or more tasks. When the bulk edit bar appears at the top of the table, click **Pause**.
) on the **Task** tab to clear the metadata cache and obtain the most up-to-date table listing.
## Pausing and Resuming Tasks
{siteName} enables you to pause and resume tasks. A task's **Active** or **Paused** status only determines whether the task runs when the entire job is executed (either on a schedule or manually). However, you can still run a paused task directly at any time.
### Pause Tasks
To pause a task, do one of the following:
* **Pause multiple tasks:** Select the checkboxes for one or more tasks. When the bulk edit bar appears at the top of the table, click **Pause**.
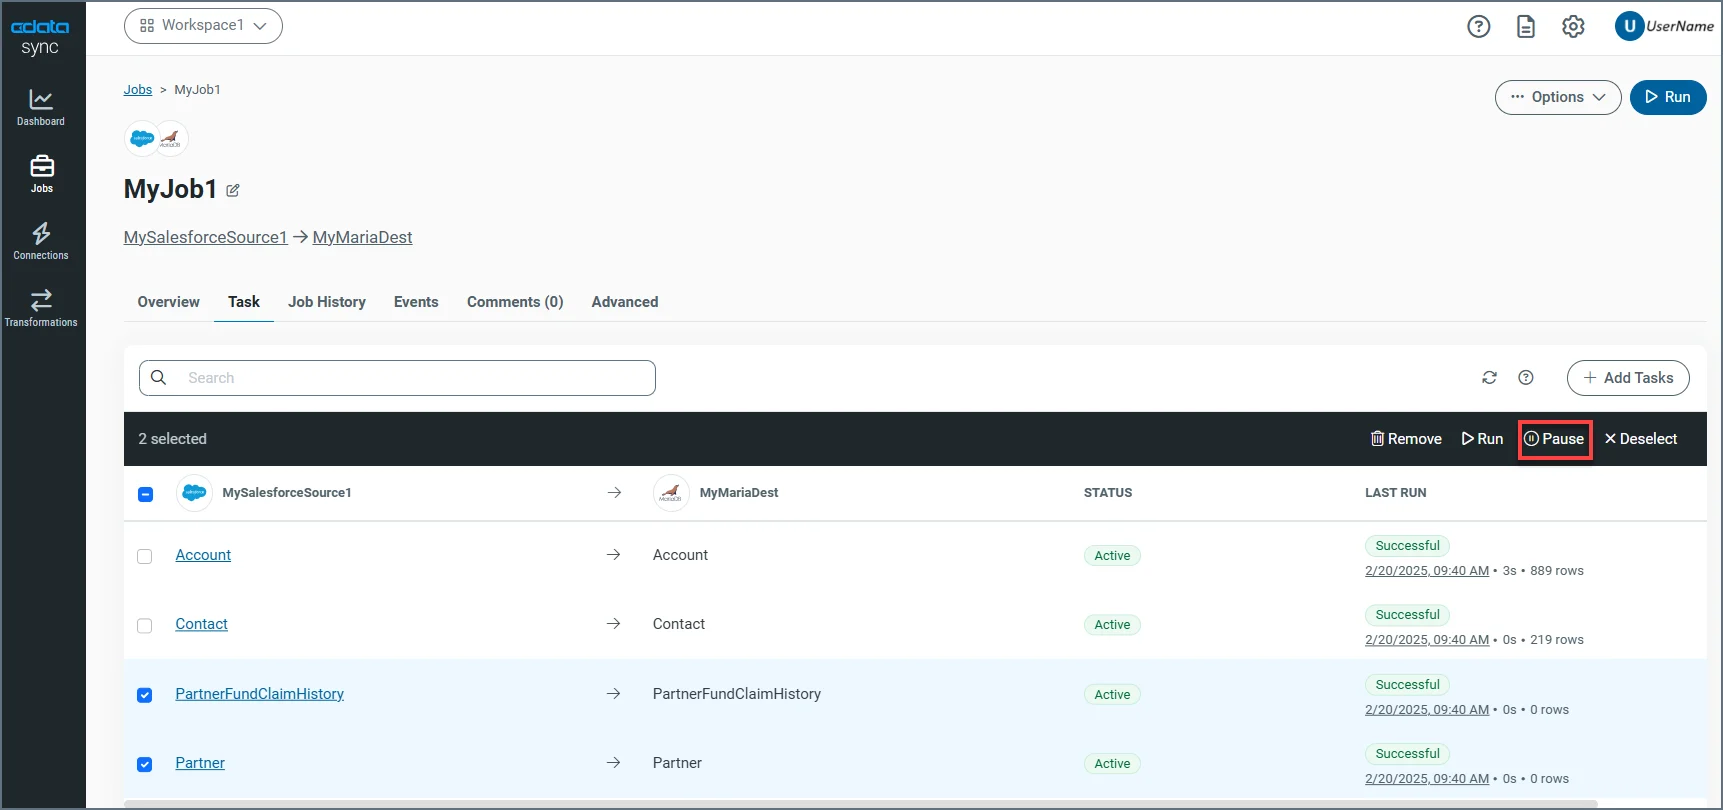 * **Pause a single task:** Click the options menu (**...**) at the end of the task's row and select **Pause**. You do not need to select the checkbox next to the task name when you use this method.
 This method pauses only that specific task, whereas the **Pause** option on the bulk edit bar enables you to pause multiple tasks at once.
When a task is paused, the value in the **STATUS** column changes from **Active** to **Paused**.
Even though a task is paused, you can still run it by selecting the task and clicking **Run** on the bulk edit bar or by selecting ... > Run at the end of the task row.
### Resume Tasks
To resume paused tasks, use either of the following methods:
* **Resume multiple tasks:** Select the checkboxes for the tasks. Then, click **Resume** on the bulk edit bar.
* **Resume a single task:** Select **... > Resume** at the end of the task row. You do not need to select the checkbox next to the task name to use this method.
## Task Settings
You can configure each task in your job individually by clicking a row on the **Task** tab. This action opens the task's properties page where you can adjust the task settings that are described in the following sections.
### Source Information
The **Source Information** category provides an overview of the source table's capabilities and key features:
* **Key/Index Column:** Specifies the column or columns that make up the primary key index for the table.
* **Incremental Check Column:** Specifies the column that is used by {siteName} to identify new or modified records during subsequent replication intervals. See [Incremental Check Column](../../getting-started/features#incremental-check-column) for more information.
* **Captures Deletes:** Specifies whether {siteNameShort} can detect when data has been deleted in the source. See [Deletion Captures](../../getting-started/features#deletion-captures) for more information.
### Destination Information
The **Destination Information** category gives you full control over where to land your source data.
This category provides an overview of the following options:
* **Schema Name:** The schema name is inherited from the **Destination Schema** advanced job option. For destinations that support multiple schemas, select from a list of available schemas in your database.
* **Table Name:** By default, {siteNameShort} creates a new table with the same name as the source table in the target destination where you want to replicate the data. You can rename that table by clicking the edit icon in the **Destination Information** category and then renaming the table in the **Table Name** field of the **Destination Information** dialog box.
### Column Mapping
The **Columns** tab gives you more control over which data to retrieve from your source table and how you want that data to be represented in the target table. See [Mapping Columns](#mapping-columns) for information about how to remove or adjust column mappings and apply different transformations to each task.
### Replication Options
Replication options control the flow from your source application to your target destination. While you can set [replication options](../advanced-job-options) in your job that affect the job as a whole, replication options that you set in the query only affect that specific query. By default, each replication option that you set in the job is inherited by each query, and any replication option that you set in the query overrides those values.
### Write Custom Queries
The task settings on the **Overview** tab automatically update the REPLICATE query as you make changes in the dialog boxes. In addition, you can click the **Query** tab to edit the generated query manually. See [Custom Querying: REPLICATE Command](./replicate-command) for REPLICATE command syntax; see [Custom Querying: CHECKCACHE Command](./checkcache-command) for CHECKCACHE command syntax. Each of these pages contain common examples, as well.
## Load Folder
For connectors that support the **Load Folder** job type, {siteNameShort} enables you to configure a single `LoadFolder` task that continuously replicates files from a directory or bucket into a single destination table. Connectors that support the **Load Folder** job type include the following:
* Amazon S3
* Azure Blob Storage
* Azure Data Lake Storage
* Azure One Lake
* CSV
* Google Cloud Storage
* Local File Storage **(Sync Self-Hosted only)**
When you create a job with one of the valid connectors, you can set the **Load Folder** type in the **Add Job** dialog box, as shown below:
This method pauses only that specific task, whereas the **Pause** option on the bulk edit bar enables you to pause multiple tasks at once.
When a task is paused, the value in the **STATUS** column changes from **Active** to **Paused**.
Even though a task is paused, you can still run it by selecting the task and clicking **Run** on the bulk edit bar or by selecting ... > Run at the end of the task row.
### Resume Tasks
To resume paused tasks, use either of the following methods:
* **Resume multiple tasks:** Select the checkboxes for the tasks. Then, click **Resume** on the bulk edit bar.
* **Resume a single task:** Select **... > Resume** at the end of the task row. You do not need to select the checkbox next to the task name to use this method.
## Task Settings
You can configure each task in your job individually by clicking a row on the **Task** tab. This action opens the task's properties page where you can adjust the task settings that are described in the following sections.
### Source Information
The **Source Information** category provides an overview of the source table's capabilities and key features:
* **Key/Index Column:** Specifies the column or columns that make up the primary key index for the table.
* **Incremental Check Column:** Specifies the column that is used by {siteName} to identify new or modified records during subsequent replication intervals. See [Incremental Check Column](../../getting-started/features#incremental-check-column) for more information.
* **Captures Deletes:** Specifies whether {siteNameShort} can detect when data has been deleted in the source. See [Deletion Captures](../../getting-started/features#deletion-captures) for more information.
### Destination Information
The **Destination Information** category gives you full control over where to land your source data.
This category provides an overview of the following options:
* **Schema Name:** The schema name is inherited from the **Destination Schema** advanced job option. For destinations that support multiple schemas, select from a list of available schemas in your database.
* **Table Name:** By default, {siteNameShort} creates a new table with the same name as the source table in the target destination where you want to replicate the data. You can rename that table by clicking the edit icon in the **Destination Information** category and then renaming the table in the **Table Name** field of the **Destination Information** dialog box.
### Column Mapping
The **Columns** tab gives you more control over which data to retrieve from your source table and how you want that data to be represented in the target table. See [Mapping Columns](#mapping-columns) for information about how to remove or adjust column mappings and apply different transformations to each task.
### Replication Options
Replication options control the flow from your source application to your target destination. While you can set [replication options](../advanced-job-options) in your job that affect the job as a whole, replication options that you set in the query only affect that specific query. By default, each replication option that you set in the job is inherited by each query, and any replication option that you set in the query overrides those values.
### Write Custom Queries
The task settings on the **Overview** tab automatically update the REPLICATE query as you make changes in the dialog boxes. In addition, you can click the **Query** tab to edit the generated query manually. See [Custom Querying: REPLICATE Command](./replicate-command) for REPLICATE command syntax; see [Custom Querying: CHECKCACHE Command](./checkcache-command) for CHECKCACHE command syntax. Each of these pages contain common examples, as well.
## Load Folder
For connectors that support the **Load Folder** job type, {siteNameShort} enables you to configure a single `LoadFolder` task that continuously replicates files from a directory or bucket into a single destination table. Connectors that support the **Load Folder** job type include the following:
* Amazon S3
* Azure Blob Storage
* Azure Data Lake Storage
* Azure One Lake
* CSV
* Google Cloud Storage
* Local File Storage **(Sync Self-Hosted only)**
When you create a job with one of the valid connectors, you can set the **Load Folder** type in the **Add Job** dialog box, as shown below:
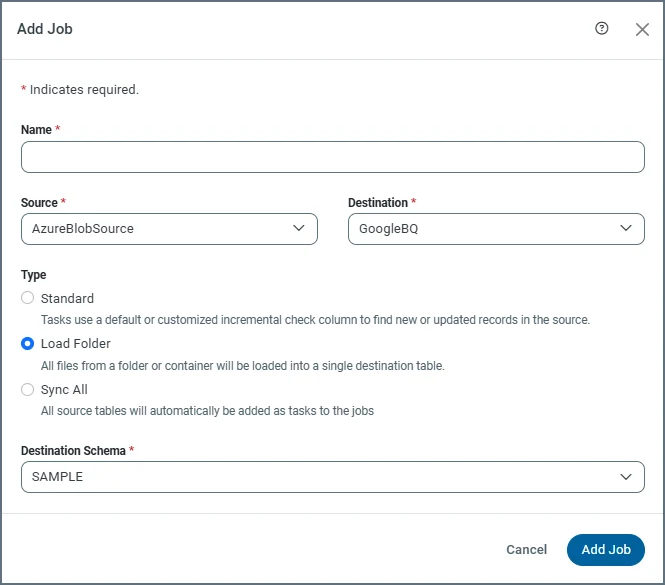 When {siteNameShort} runs a `LoadFolder` task, it compares the last modified date of each source file to the value stored in the destination table. To help facilitate this task, {siteNameShort} adds these required system columns to your destination table:
| Column Name | Data Type | Primary Key |
| -------------------------------------------------- | --------- | ------------------------------- |
|
When {siteNameShort} runs a `LoadFolder` task, it compares the last modified date of each source file to the value stored in the destination table. To help facilitate this task, {siteNameShort} adds these required system columns to your destination table:
| Column Name | Data Type | Primary Key |
| -------------------------------------------------- | --------- | ------------------------------- |
| \_filename | Varchar | Yes |
| \_line | Integer | Yes |
| \_lastModified | BigInt | Yes if Modified Action = APPEND |
### Configuring Load-Folder Task Settings
To configure `LoadFolder` task settings, select **Load > Task Settings**. The **Task Settings** page is divided into two categories: **Source Information** and **Destination Information**.
Click **Edit** ( ) in the **Source Information** category. In the **Source Information** dialog box, you can configure the following properties:
* **Modified Action:** Determines how updates are handled when a previously replicated file changes:
* **APPEND:** Appends all rows from the modified file.
* **UPSERT:** Updates existing rows and inserts new rows as needed.
* **Folder:** Specify the folder or subpath folder from which files are replicated.
* **File Mask:** Defines a search pattern to match specific file names within the folder.
Click **Edit** () in the **Destination Information** category. In the **Destination Information** dialog box, you can configure the following properties:
* **Schema Name:** Select one or more schemas. For destinations that support multiple schemas, you can select from a list of available schemas in your database.
* **Table Name:** Select the destination table name. By default, {siteNameShort} creates a new table with the same name as the job name in the target destination where you want to replicate the data. You can rename the table by selecting **Create New Table**.
### Mapping Columns
After you create a **Load Folder** task, you can choose a sample file from which to build the column mapping from the **Columns** tab on the **Task Settings** page. See [Mapping Columns](#mapping-columns) for more information about how to edit the mappings and apply different transformations to the task.
) in the **Source Information** category. In the **Source Information** dialog box, you can configure the following properties:
* **Modified Action:** Determines how updates are handled when a previously replicated file changes:
* **APPEND:** Appends all rows from the modified file.
* **UPSERT:** Updates existing rows and inserts new rows as needed.
* **Folder:** Specify the folder or subpath folder from which files are replicated.
* **File Mask:** Defines a search pattern to match specific file names within the folder.
Click **Edit** () in the **Destination Information** category. In the **Destination Information** dialog box, you can configure the following properties:
* **Schema Name:** Select one or more schemas. For destinations that support multiple schemas, you can select from a list of available schemas in your database.
* **Table Name:** Select the destination table name. By default, {siteNameShort} creates a new table with the same name as the job name in the target destination where you want to replicate the data. You can rename the table by selecting **Create New Table**.
### Mapping Columns
After you create a **Load Folder** task, you can choose a sample file from which to build the column mapping from the **Columns** tab on the **Task Settings** page. See [Mapping Columns](#mapping-columns) for more information about how to edit the mappings and apply different transformations to the task.