> ## Documentation Index
> Fetch the complete documentation index at: https://docs.sync.cdata.com/llms.txt
> Use this file to discover all available pages before exploring further.
# Configuring Your First Replication Job
export const siteName = "CData Sync";
export const siteNameShort = "Sync";
After you start the server, you are ready to configure your first replication job. A *replication job* consists of a source connection, a destination connection, and a list of tasks. The following sections provide step-by-step instructions for creating a connection, creating a job, adding tasks, setting up your first replication job, and running the job.
## Creating Connections
After you log in, you need to configure connections to the sources and destinations with which you want to work. For details about how to establish a connection to a particular source or destination, see [Connections](../connections/connections).
To create a connection, follow these steps:
1. Click **Connections** in the navigation bar to open the **Connections** page.
2. Click **Add Connection**. This action opens the **Select Connectors** page.
3. Select either the **Sources** tab or the **Destinations** tab, depending on which kind of connector you want to create.
4. Locate the connector that you want to add and click the Install Connector icon ( ) at the end of the row. This action opens the Install Connector dialog box, which allows you to install a connector automatically or manually (by using a local file system.)
If you need to reconfigure a connector that is already installed, click the Update Connector icon (
) at the end of the row. This action opens the Install Connector dialog box, which allows you to install a connector automatically or manually (by using a local file system.)
If you need to reconfigure a connector that is already installed, click the Update Connector icon ( ) at the end of the row.
5. Select **Automatically install connector** in the dialog box. Then, click **Install**.
If you need to install a connector manually from a local file system (for example, for a connector that is not already in your {siteNameShort} bundle), see the instructions in [Connections](../connections/connections).
6. At the end of the connector row, click the **Configure Connection** arrow (→) to open the **New Connection** page.
7. Enter settings for your connection on the **Settings** tab of the **New Connection** page:
1. Enter a name for your connection. This name is used to refer to the connection when you create a job. If you have multiple connections for the same source or destination, choose a name that describes the purpose of the connection.
2. Enter authentication details and other connection properties.
3. Define advanced connection settings on the **Advanced** tab. (In most cases, though, you should not need these settings.)
8. Click **Create & Test** to ensure that the connection configuration is correct. If the message is successful, {siteNameShort} displays a message to that effect. If the test fails, check your configuration settings to ensure that they are correct. Then, retest the connection.
After you test your connection, the **Create & Test** button is replaced by an **Options** menu and a **Test** button. The **Options** menu displays these options:
* **Clone:** Enables you to clone your connection.
* **Update Connector:** Enables you to update your connection properties.
* **Move:** Enables you to move your connection to a new workspace.
* **Remove:** Permanently deletes your connection.
9. Click the **Connections** link in the top right of the page (or use the browser's back arrow) to return to the **Connections** page.
## Adding a New Job
After you [create the connections](#creating-connections) that you need, follow these steps to add your first [job](../jobs/jobs).
To add a new job:
1. Click **Jobs** in the navigation bar to open the **Jobs** page.
2. Click **Add Job** (upper right corner) and select **Add New Job** from the menu. This action opens the **Add Job** dialog box where you can enter job information.
3. Enter a job name and select the source and destination connections.
Job names must not include illegal characters. If you use an illegal character, {siteNameShort} generates an error message.
) at the end of the row.
5. Select **Automatically install connector** in the dialog box. Then, click **Install**.
If you need to install a connector manually from a local file system (for example, for a connector that is not already in your {siteNameShort} bundle), see the instructions in [Connections](../connections/connections).
6. At the end of the connector row, click the **Configure Connection** arrow (→) to open the **New Connection** page.
7. Enter settings for your connection on the **Settings** tab of the **New Connection** page:
1. Enter a name for your connection. This name is used to refer to the connection when you create a job. If you have multiple connections for the same source or destination, choose a name that describes the purpose of the connection.
2. Enter authentication details and other connection properties.
3. Define advanced connection settings on the **Advanced** tab. (In most cases, though, you should not need these settings.)
8. Click **Create & Test** to ensure that the connection configuration is correct. If the message is successful, {siteNameShort} displays a message to that effect. If the test fails, check your configuration settings to ensure that they are correct. Then, retest the connection.
After you test your connection, the **Create & Test** button is replaced by an **Options** menu and a **Test** button. The **Options** menu displays these options:
* **Clone:** Enables you to clone your connection.
* **Update Connector:** Enables you to update your connection properties.
* **Move:** Enables you to move your connection to a new workspace.
* **Remove:** Permanently deletes your connection.
9. Click the **Connections** link in the top right of the page (or use the browser's back arrow) to return to the **Connections** page.
## Adding a New Job
After you [create the connections](#creating-connections) that you need, follow these steps to add your first [job](../jobs/jobs).
To add a new job:
1. Click **Jobs** in the navigation bar to open the **Jobs** page.
2. Click **Add Job** (upper right corner) and select **Add New Job** from the menu. This action opens the **Add Job** dialog box where you can enter job information.
3. Enter a job name and select the source and destination connections.
Job names must not include illegal characters. If you use an illegal character, {siteNameShort} generates an error message.
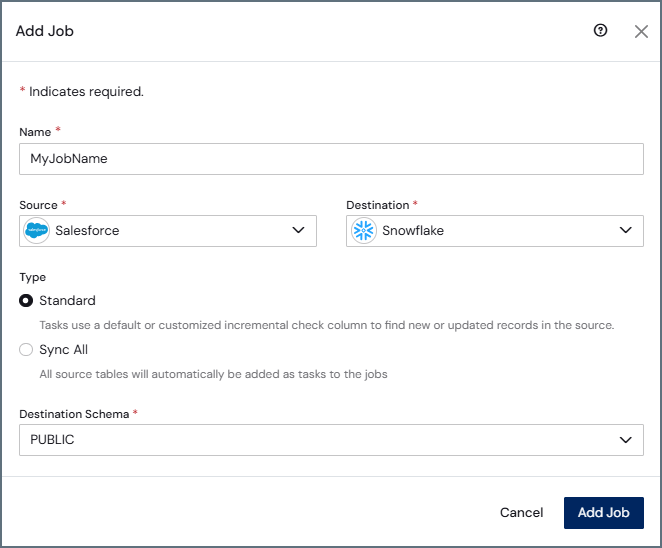 4. Select a job type. The default setting is **Standard**.
* **Standard:** When you select this type, {siteNameShort} adds one or more source tables as tasks to the job. Each task uses either a default or a customized incremental check column to find new or updated records in the source.
* **Change Data Capture:** With this type, each task uses the native change data capture (CDC) mechanism in the source to retrieve changes.
This text box is displayed only for the following connectors, which support change data capture: Informix (Native), MariaDB, Microsoft Dynamics 365, MySQL, Oracle, PostgreSQL, SQL Server
* **Sync All:** When you select this job type, {siteNameShort} automatically adds all source tables as tasks to the jobs.
* **Load Folder:** With this job type, {siteNameShort} loads all files from a folder or container into a single destination table during execution.
This text box is displayed only for the following connectors, which support the **Load Folder** process: Amazon S3, Azure Blob Storage, Azure Data Lake Storage, Google Cloud Storage, Local File Storage, Microsoft Onelake
5. Click **Add Job** to create your new job.
From your specific job page (**Jobs > *YourJobName***), you can set your job to [run on a schedule](../jobs/scheduling-jobs), [set incremental replication](./configuring-jobs#defining-settings-for-your-initial-replication-job), and [create email alerts](../jobs/notifications). In addition, you can view your [logs and job history](../jobs/logging-history) to obtain more information or to troubleshoot errors.
## Adding a Task to a Job
After you add your job, you can add one or more tasks to it.
To add a task:
1. Select your job and click the **Task** tab.
2. Click **Add Tasks** to open the **Add Tasks** dialog box.
3. Select the task or tasks that you want to add to your job from the table of tasks. You also can enter the name of a task in the **Search** field to locate a specific task.
4. Select a job type. The default setting is **Standard**.
* **Standard:** When you select this type, {siteNameShort} adds one or more source tables as tasks to the job. Each task uses either a default or a customized incremental check column to find new or updated records in the source.
* **Change Data Capture:** With this type, each task uses the native change data capture (CDC) mechanism in the source to retrieve changes.
This text box is displayed only for the following connectors, which support change data capture: Informix (Native), MariaDB, Microsoft Dynamics 365, MySQL, Oracle, PostgreSQL, SQL Server
* **Sync All:** When you select this job type, {siteNameShort} automatically adds all source tables as tasks to the jobs.
* **Load Folder:** With this job type, {siteNameShort} loads all files from a folder or container into a single destination table during execution.
This text box is displayed only for the following connectors, which support the **Load Folder** process: Amazon S3, Azure Blob Storage, Azure Data Lake Storage, Google Cloud Storage, Local File Storage, Microsoft Onelake
5. Click **Add Job** to create your new job.
From your specific job page (**Jobs > *YourJobName***), you can set your job to [run on a schedule](../jobs/scheduling-jobs), [set incremental replication](./configuring-jobs#defining-settings-for-your-initial-replication-job), and [create email alerts](../jobs/notifications). In addition, you can view your [logs and job history](../jobs/logging-history) to obtain more information or to troubleshoot errors.
## Adding a Task to a Job
After you add your job, you can add one or more tasks to it.
To add a task:
1. Select your job and click the **Task** tab.
2. Click **Add Tasks** to open the **Add Tasks** dialog box.
3. Select the task or tasks that you want to add to your job from the table of tasks. You also can enter the name of a task in the **Search** field to locate a specific task.
 To include all tasks, select the checkbox next to the job name at the top of the table.
By default, {siteNameShort} displays all tables and views in the **Add Tasks** dialog box. However, you can choose to display a list of tables only or views only by selecting the type that you want to see from the drop-down menu above the tasks list.
To include all tasks, select the checkbox next to the job name at the top of the table.
By default, {siteNameShort} displays all tables and views in the **Add Tasks** dialog box. However, you can choose to display a list of tables only or views only by selecting the type that you want to see from the drop-down menu above the tasks list.
 When you select **Only Tables** or **Only Views** and no list appears for the entity that you choose, the following message is displayed:
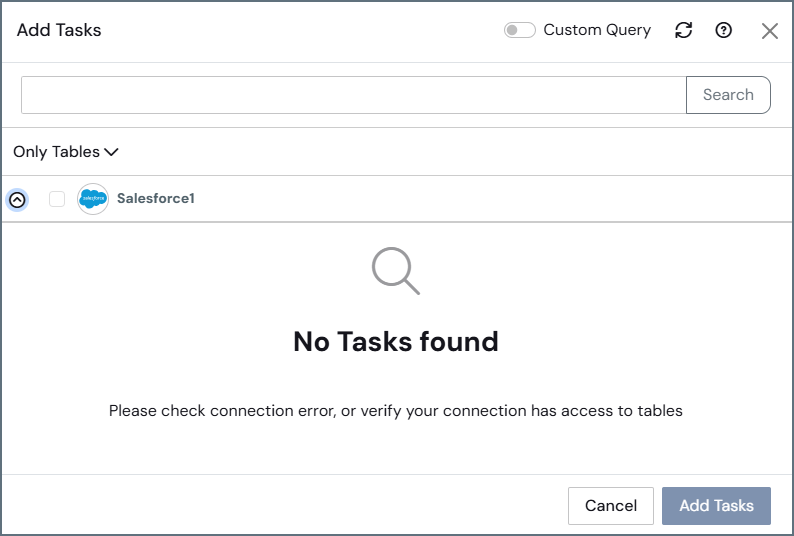 4. Click **Add Tasks** to add the tasks to your job.
5. Select the checkbox next to individual tasks that you want to run in your job (on the **Task** tab). If you want to include all tasks, select the checkbox next to the job source and destination at the top of the table.
6. Run the tasks that you want by selecting the checkboxes to the left of those tasks. Then click **Run** in the black task bar that is displayed. You can also run a specific task by clicking the **Run** arrow at the end of the task row.
When a task runs correctly, {siteNameShort} displays the message `Successful` in the **Last Run** column.
**Notes:**
* If you select the [**Sync All** option as the replication type](#adding-a-new-job) when you create your job, all available tables and views are added automatically as replicate tasks to the job. Each time the job executes, {siteNameShort} first searches for any new tables or views in your source and appends additional replicate tasks to your job so that they are included in the run.
* If you want to exclude certain tasks from the job, select the tasks on the **Task** tab and click **Exclude**. When you do this, future job executions ignore those tables.
## Defining Settings for Your Initial Replication Job
You can control how {siteNameShort} processes an initial replication job by using certain settings that are available on the **Overview** tab that is displayed when you open a job.
These settings are available by clicking **Configure** in the **Snapshot Settings** category. Clicking **Configure** opens the **Edit Snapshot Settings** dialog box. The available settings depend on the type of job that you are configuring:
* **Standard** and **Sync All** jobs
* **Change Data Capture** jobs
### Snapshot Settings for **Standard** and **Sync All** Jobs
For **Standard** and **Sync All** jobs, the **Edit Snapshot Settings** dialog box contains the following settings that define how the initial snapshot and subsequent incremental updates are processed.
The main setting for these job types is **Start Value Type**. Depending on your selection for this setting, {siteNameShort} begins replicating data from a defined starting boundary that is based on either a datetime value or a numeric value. Available options for this setting include the following:
* (Default) **Date-based:** When you set **Start Value Type** to **Date-based**, you can select a date from the **Start Date** field. You must specify a date to create a job.
* **Number-based:** When you set **Start Value Type** to **Number-based**, you can specify a numeric value in the **Start Number** field.
When you select **Date-based** as the start-value type, the following settings are displayed:
* **Start Date:** This setting is available when you select **Date-based** as the start-value type. The **Start Date** setting specifies the minimum date from which to begin replication. You must specify a date in order to exit the dialog box.
4. Click **Add Tasks** to add the tasks to your job.
5. Select the checkbox next to individual tasks that you want to run in your job (on the **Task** tab). If you want to include all tasks, select the checkbox next to the job source and destination at the top of the table.
6. Run the tasks that you want by selecting the checkboxes to the left of those tasks. Then click **Run** in the black task bar that is displayed. You can also run a specific task by clicking the **Run** arrow at the end of the task row.
When a task runs correctly, {siteNameShort} displays the message `Successful` in the **Last Run** column.
**Notes:**
* If you select the [**Sync All** option as the replication type](#adding-a-new-job) when you create your job, all available tables and views are added automatically as replicate tasks to the job. Each time the job executes, {siteNameShort} first searches for any new tables or views in your source and appends additional replicate tasks to your job so that they are included in the run.
* If you want to exclude certain tasks from the job, select the tasks on the **Task** tab and click **Exclude**. When you do this, future job executions ignore those tables.
## Defining Settings for Your Initial Replication Job
You can control how {siteNameShort} processes an initial replication job by using certain settings that are available on the **Overview** tab that is displayed when you open a job.
These settings are available by clicking **Configure** in the **Snapshot Settings** category. Clicking **Configure** opens the **Edit Snapshot Settings** dialog box. The available settings depend on the type of job that you are configuring:
* **Standard** and **Sync All** jobs
* **Change Data Capture** jobs
### Snapshot Settings for **Standard** and **Sync All** Jobs
For **Standard** and **Sync All** jobs, the **Edit Snapshot Settings** dialog box contains the following settings that define how the initial snapshot and subsequent incremental updates are processed.
The main setting for these job types is **Start Value Type**. Depending on your selection for this setting, {siteNameShort} begins replicating data from a defined starting boundary that is based on either a datetime value or a numeric value. Available options for this setting include the following:
* (Default) **Date-based:** When you set **Start Value Type** to **Date-based**, you can select a date from the **Start Date** field. You must specify a date to create a job.
* **Number-based:** When you set **Start Value Type** to **Number-based**, you can specify a numeric value in the **Start Number** field.
When you select **Date-based** as the start-value type, the following settings are displayed:
* **Start Date:** This setting is available when you select **Date-based** as the start-value type. The **Start Date** setting specifies the minimum date from which to begin replication. You must specify a date in order to exit the dialog box.
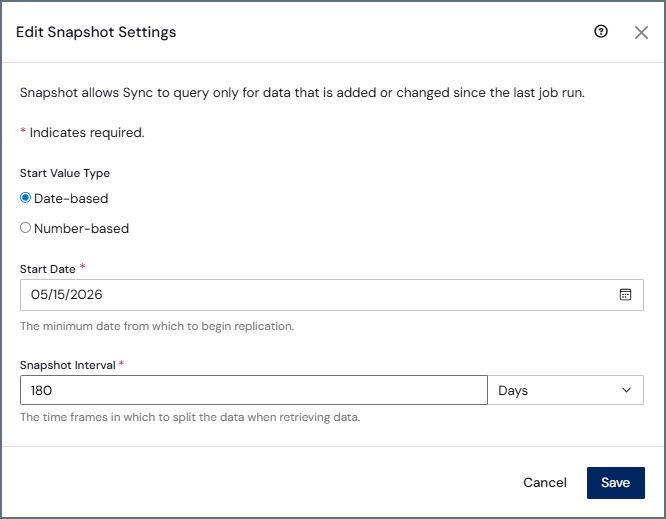 * **Snapshot Interval:** Paired with the interval-unit selection (available from the drop-down list at the right end of this field), this setting defines how frequently {siteNameShort} checks for new or updated data. {siteNameShort} uses this interval to batch updates so that if a failure occurs or if the replication job is interrupted, the next attempt starts where the last run ended.
By default, {siteNameShort} uses an interval of 180 days. However, you can adjust this interval based on how much data you have and how frequently your data changes. You can enter a number manually or use the (▲) and down (▼) arrows for the field.
After you click **Save** in the dialog box, your settings are displayed in the **Snapshot Settings** category on the **Overview** tab for your job:
* **Snapshot Interval:** Paired with the interval-unit selection (available from the drop-down list at the right end of this field), this setting defines how frequently {siteNameShort} checks for new or updated data. {siteNameShort} uses this interval to batch updates so that if a failure occurs or if the replication job is interrupted, the next attempt starts where the last run ended.
By default, {siteNameShort} uses an interval of 180 days. However, you can adjust this interval based on how much data you have and how frequently your data changes. You can enter a number manually or use the (▲) and down (▼) arrows for the field.
After you click **Save** in the dialog box, your settings are displayed in the **Snapshot Settings** category on the **Overview** tab for your job:
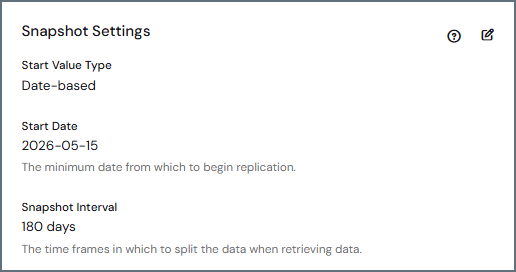 When you select **Number-based** as the start-value type, the following settings are displayed:
* **Start Number:** This setting specifies the minimum value of the numeric column that {siteNameShort} uses to track incremental changes. {siteNameShort} begins replicating records whose value in that column is greater than or equal to the specified number.
When you select **Number-based** as the start-value type, the following settings are displayed:
* **Start Number:** This setting specifies the minimum value of the numeric column that {siteNameShort} uses to track incremental changes. {siteNameShort} begins replicating records whose value in that column is greater than or equal to the specified number.
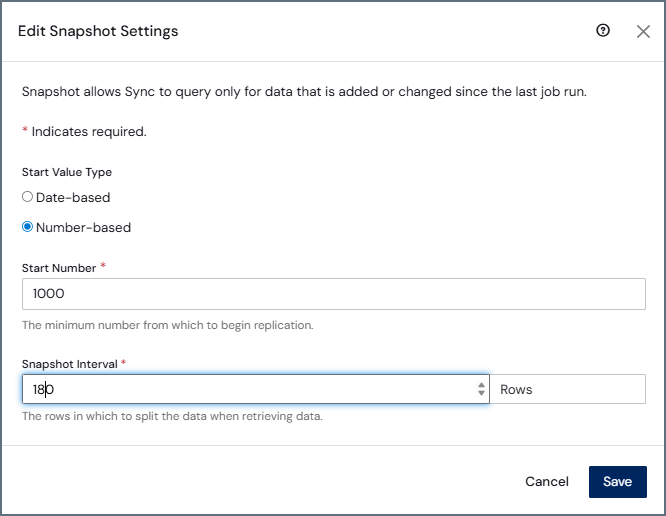 * **Snapshot Interval:** Paired with the **Rows** interval unit (the only selection that is available for this start-value type), this setting defines the number of rows in which {siteNameShort} should split the data when it retrieves data.
By default, {siteNameShort} uses 0 for the number of rows. However, you can adjust this interval by entering a number manually or by using the up (▲) and down (▼) arrows for the field.
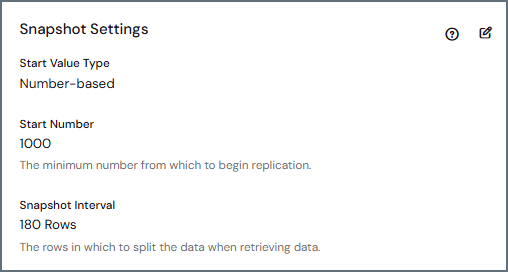
After you click **Save** in the dialog box, your settings are displayed in the **Snapshot Settings** category on the **Overview** tab for your job:
* **Snapshot Interval:** Paired with the **Rows** interval unit (the only selection that is available for this start-value type), this setting defines the number of rows in which {siteNameShort} should split the data when it retrieves data.
By default, {siteNameShort} uses 0 for the number of rows. However, you can adjust this interval by entering a number manually or by using the up (▲) and down (▼) arrows for the field.
After you click **Save** in the dialog box, your settings are displayed in the **Snapshot Settings** category on the **Overview** tab for your job:
 ### Snapshot Settings for Change Data Capture (CDC) Jobs
The **Edit Snapshot Settings** dialog box for CDC jobs contains the following settings that control how the snapshot phase is handled before change data capture begins:
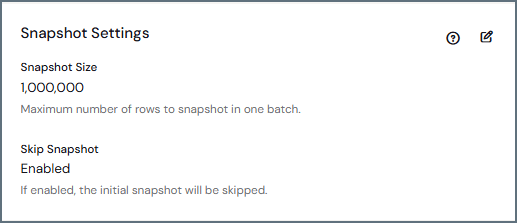
* **Snapshot Size:** This setting specifies the number of rows to snapshot in each batch.
By default, the snapshot size is 1,000,000 rows. Adjusting this value can help manage large initial loads and control transaction size during snapshot processing. You can adjust this interval by entering a number manually or by using the (▲) and down (▼) arrows for the field.
### Snapshot Settings for Change Data Capture (CDC) Jobs
The **Edit Snapshot Settings** dialog box for CDC jobs contains the following settings that control how the snapshot phase is handled before change data capture begins:
* **Snapshot Size:** This setting specifies the number of rows to snapshot in each batch.
By default, the snapshot size is 1,000,000 rows. Adjusting this value can help manage large initial loads and control transaction size during snapshot processing. You can adjust this interval by entering a number manually or by using the (▲) and down (▼) arrows for the field.
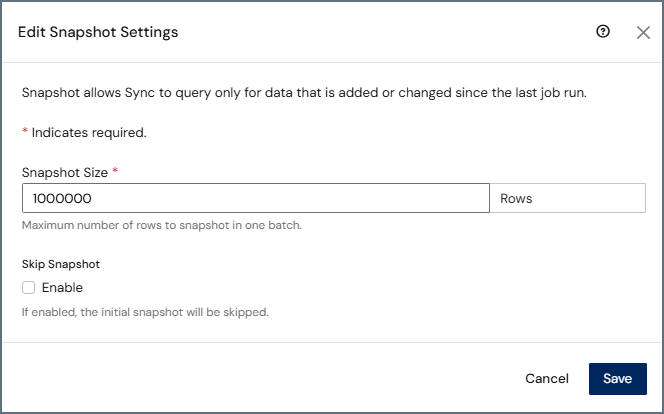 * **Skip Snapshot:** This setting determines whether the initial snapshot of existing data is performed.
* (Default) When **Skip Snapshot** is disabled, {siteNameShort} performs an initial snapshot and then continues processing CDC changes.
* When **Skip Snapshot** is enabled, the initial snapshot is skipped. The first job run transfers zero rows, and only new changes from the CDC stream are processed.
* **Skip Snapshot:** This setting determines whether the initial snapshot of existing data is performed.
* (Default) When **Skip Snapshot** is disabled, {siteNameShort} performs an initial snapshot and then continues processing CDC changes.
* When **Skip Snapshot** is enabled, the initial snapshot is skipped. The first job run transfers zero rows, and only new changes from the CDC stream are processed.
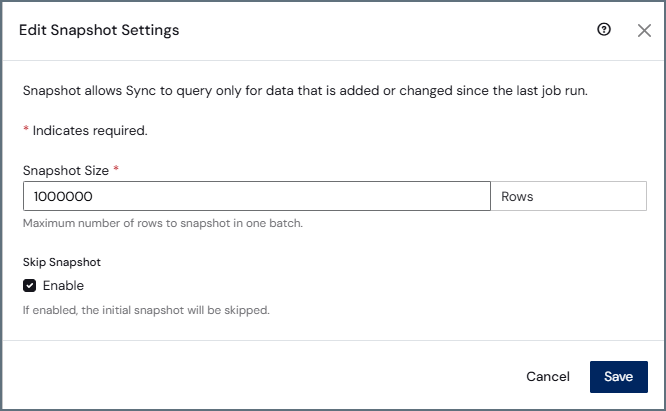 After you click **Save** in the dialog box, your settings are displayed in the **Snapshot Settings** category on the **Overview** tab for your job:
 ### Snapshot Performance with Parallel Partitioned Reads
For large datasets, *parallel partitioned reads* improve snapshot performance by enabling {siteNameShort} to read data from a source table in parallel. The system divides the data into multiple partitions that run concurrently instead of scanning the table sequentially.
Parallel partitioned reads are available for both standard and change data capture (CDC) jobs.
#### Configuration of Parallel Partitioned Reads
You configure parallel partitioned reads for a job on the **Query** tab at the task level. On this tab, enable the feature by adding the appropriate options to the WITH clause of the REPLICATE query. The following options control how partitioning is applied:
* `enableparallelreadpartitioning`: Enables parallel partitioned reads when it is set to `'true'`. The default value is `'false'`.
* `partitionkey`: Specifies the column that {siteNameShort} uses to divide the source data into partitions. This column must be a datetime or integer column.
* `partitionsize`: Defines the size of each partition. For datetime columns, the value represents the number of days. For integer columns, the value is used directly without unit conversion.
* `maxparallelpartitions`: Specifies the maximum number of partitions that can run concurrently. The default value is `2`.
**Example:**
```sql theme={null}
REPLICATE [dest_schema].[DestTable]
WITH maxparallelpartitions = '2',
partitionkey = 'CreatedDateTime',
enableparallelreadpartitioning = 'true',
partitionsize = '180'
SELECT * FROM [src_schema].[SrcTable]
```
#### Behavior of Parallel Partitioned Reads
When you enable parallel partitioned reads, {siteNameShort} divides the source data into partitions based on the partition key that you specify and processes those partitions concurrently. This approach reduces the total time that is required to complete the snapshot phase, especially for large tables.
If a partition fails during execution, {siteNameShort} records the progress in the status table. Then, when you retry a job, {siteNameShort} resumes from the last successful partition instead of restarting the entire snapshot.
#### Requirements and Limitations of Parallel Partitioned Reads
With parallel partitioned reads, the application database must support multiple concurrent connections. Derby and other file-based application databases are not supported. If you use one of these databases, the feature is unavailable.
The following sources support parallel partitioned reads:
* DB2
* DB2 for i
* Informix
* MariaDB
* Microsoft SQL Server
* MySQL
* Oracle
* PostgreSQL
## Running Your Job
The first time that you run a job, {siteName} processes the entirety of the source's historical data. This data can encompass a huge amount of information. Therefore, {siteNameShort} uses several strategies to maximize efficiency, performance, and integrity. {siteNameShort} also provides user-controlled options that you can use to optimize the synchronization strategy for your specific data set. These options are explained in [Defining Settings for Your Initial Replication Job](#defining-settings-for-your-initial-replication-job).
You can run a job in either of these ways:
* Select the checkbox to the left of the job name and click **Run** in the black task bar at the top of the **Jobs** page.
* Click **Run Job** (▷) that is displayed when you position your cursor at the end of the job row, as shown below.
### Snapshot Performance with Parallel Partitioned Reads
For large datasets, *parallel partitioned reads* improve snapshot performance by enabling {siteNameShort} to read data from a source table in parallel. The system divides the data into multiple partitions that run concurrently instead of scanning the table sequentially.
Parallel partitioned reads are available for both standard and change data capture (CDC) jobs.
#### Configuration of Parallel Partitioned Reads
You configure parallel partitioned reads for a job on the **Query** tab at the task level. On this tab, enable the feature by adding the appropriate options to the WITH clause of the REPLICATE query. The following options control how partitioning is applied:
* `enableparallelreadpartitioning`: Enables parallel partitioned reads when it is set to `'true'`. The default value is `'false'`.
* `partitionkey`: Specifies the column that {siteNameShort} uses to divide the source data into partitions. This column must be a datetime or integer column.
* `partitionsize`: Defines the size of each partition. For datetime columns, the value represents the number of days. For integer columns, the value is used directly without unit conversion.
* `maxparallelpartitions`: Specifies the maximum number of partitions that can run concurrently. The default value is `2`.
**Example:**
```sql theme={null}
REPLICATE [dest_schema].[DestTable]
WITH maxparallelpartitions = '2',
partitionkey = 'CreatedDateTime',
enableparallelreadpartitioning = 'true',
partitionsize = '180'
SELECT * FROM [src_schema].[SrcTable]
```
#### Behavior of Parallel Partitioned Reads
When you enable parallel partitioned reads, {siteNameShort} divides the source data into partitions based on the partition key that you specify and processes those partitions concurrently. This approach reduces the total time that is required to complete the snapshot phase, especially for large tables.
If a partition fails during execution, {siteNameShort} records the progress in the status table. Then, when you retry a job, {siteNameShort} resumes from the last successful partition instead of restarting the entire snapshot.
#### Requirements and Limitations of Parallel Partitioned Reads
With parallel partitioned reads, the application database must support multiple concurrent connections. Derby and other file-based application databases are not supported. If you use one of these databases, the feature is unavailable.
The following sources support parallel partitioned reads:
* DB2
* DB2 for i
* Informix
* MariaDB
* Microsoft SQL Server
* MySQL
* Oracle
* PostgreSQL
## Running Your Job
The first time that you run a job, {siteName} processes the entirety of the source's historical data. This data can encompass a huge amount of information. Therefore, {siteNameShort} uses several strategies to maximize efficiency, performance, and integrity. {siteNameShort} also provides user-controlled options that you can use to optimize the synchronization strategy for your specific data set. These options are explained in [Defining Settings for Your Initial Replication Job](#defining-settings-for-your-initial-replication-job).
You can run a job in either of these ways:
* Select the checkbox to the left of the job name and click **Run** in the black task bar at the top of the **Jobs** page.
* Click **Run Job** (▷) that is displayed when you position your cursor at the end of the job row, as shown below.
 * Select the job that you want to run. Then run the job from the **Tasks** tab, as described in [Adding a Task to a Job](#adding-a-task-to-a-job).
When a job runs correctly, {siteNameShort} displays the message `Successful` in the **Last Run** column.
* Select the job that you want to run. Then run the job from the **Tasks** tab, as described in [Adding a Task to a Job](#adding-a-task-to-a-job).
When a job runs correctly, {siteNameShort} displays the message `Successful` in the **Last Run** column.