> ## Documentation Index
> Fetch the complete documentation index at: https://docs.sync.cdata.com/llms.txt
> Use this file to discover all available pages before exploring further.
# Transformations Page
export const cloudEnv = false;
export const siteNameShort = "Sync";
export const siteName = "CData Sync";
*Transformations* take raw data from your source and clean, shape, and organize it into a form that best fits your needs as you proceed through your data pipeline. Transformations allow you to decide how your data should be shaped, giving you only the data you need in the form you need.
The following sections explain the features of the **Transformations** summary page as well as the following tasks:
* [adding a new transformation](#adding-a-new-transformation)
* [adding labels to transformations](#adding-labels-to-transformations)
* [exporting an SQL transformation](#exporting-an-sql-transformation)
* [importing an SQL transformation](#importing-an-sql-transformation)
* [enabling and disabling the scheduler](#enabling-and-disabling-the-scheduler)
* [starting and stopping transformations](#starting-and-stopping-transformations)
## Viewing Your Transformations
To access the **Transformations** page, click the **Transformations** icon in the left navigation pane in the {siteName} interface. You can view a list of all your transformations from this page. The **Transformations** page has two tabs (**Overview** and **History**) that provide all the details about your transformations. The following sections explain the information on each of these tabs.
### Overview Tab
The table on this page summarizes your transformations, enabling you to manage them from one access point.
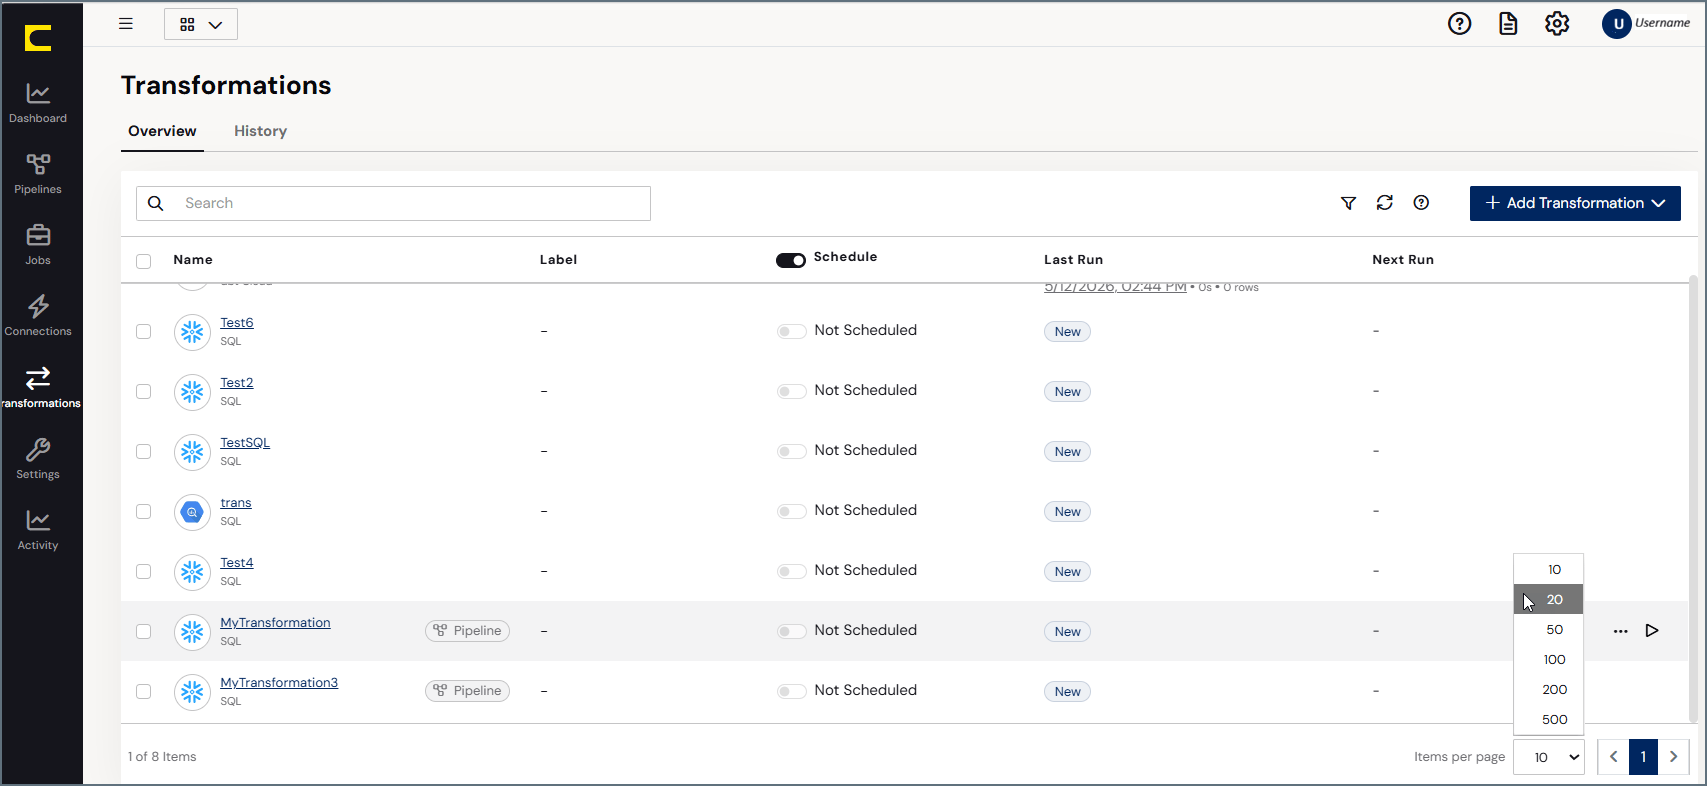 The transformation records are displayed in rows, with columns that provide details about each transformation. As shown above, you can specify the number of rows that you want to display on the page by selecting a number from the ***X* records per page** list at the bottom of the page.
{siteNameShort} provides details about your transformations in five columns:
* **NAME:** Lists the name of the transformation, the destination connectors, and the transformation type (either **SQL** or **dbt Cloud**).
* **LABEL:** Displays labels that you assign to your transformation. You add labels in either of these ways:
* Select **. . . > Add Labels** at the end of the transformation row.
* Click **Add Labels** in the **Labels** section on the **Overview** tab in the transformation settings.
* **SCHEDULE:** Specifies the run schedule for your transformation. For more details, see [Enabling and Disabling the Scheduler](#enabling-and-disabling-the-scheduler).
* **LAST RUN:** Specifies the last date and time that the transformation ran, how long the run took, and the number of rows that were affected.
* **NEXT RUN:** Specifies the next date and time that the transformation will run.
If you click a transformation name, {siteNameShort} opens the **Settings** page for that transformation.
You can organize your transformations list in ascending or descending order for the **NAME**, **LAST RUN**, or **NEXT RUN** columns. To order the columns, simply click the up (↑) and down (↓) arrows next to the column by which you want to sort.
### Filtering the Transformation Table
In addition, you can filter the table by transformation type, status, destination, and label. After you set filters, you can clear all filter options by clicking the **Reset** link to the right of the filter menu. {siteNameShort} also enables you to save filters that you define so that you can use them later.
To save a filter:
1. Choose your filter options.
2. Select **Saved Filters > Add Saved Filter**.
The transformation records are displayed in rows, with columns that provide details about each transformation. As shown above, you can specify the number of rows that you want to display on the page by selecting a number from the ***X* records per page** list at the bottom of the page.
{siteNameShort} provides details about your transformations in five columns:
* **NAME:** Lists the name of the transformation, the destination connectors, and the transformation type (either **SQL** or **dbt Cloud**).
* **LABEL:** Displays labels that you assign to your transformation. You add labels in either of these ways:
* Select **. . . > Add Labels** at the end of the transformation row.
* Click **Add Labels** in the **Labels** section on the **Overview** tab in the transformation settings.
* **SCHEDULE:** Specifies the run schedule for your transformation. For more details, see [Enabling and Disabling the Scheduler](#enabling-and-disabling-the-scheduler).
* **LAST RUN:** Specifies the last date and time that the transformation ran, how long the run took, and the number of rows that were affected.
* **NEXT RUN:** Specifies the next date and time that the transformation will run.
If you click a transformation name, {siteNameShort} opens the **Settings** page for that transformation.
You can organize your transformations list in ascending or descending order for the **NAME**, **LAST RUN**, or **NEXT RUN** columns. To order the columns, simply click the up (↑) and down (↓) arrows next to the column by which you want to sort.
### Filtering the Transformation Table
In addition, you can filter the table by transformation type, status, destination, and label. After you set filters, you can clear all filter options by clicking the **Reset** link to the right of the filter menu. {siteNameShort} also enables you to save filters that you define so that you can use them later.
To save a filter:
1. Choose your filter options.
2. Select **Saved Filters > Add Saved Filter**.
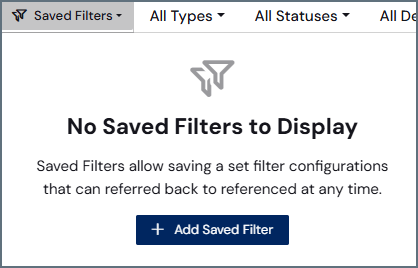 This selection opens the **Add Saved Filter** dialog box.
3. Enter a name for your filter. Then, click **Add Saved Filter**.
This selection opens the **Add Saved Filter** dialog box.
3. Enter a name for your filter. Then, click **Add Saved Filter**.
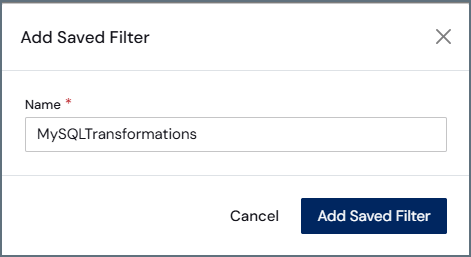 After you save the filter, the filter name appears in the **Saved Filter** list. Then, you can choose that filter from the list any time that you want to apply it.
### Running Bulk Operations on Transformations
To use bulk operations on multiple transformations:
1. Select the checkbox next to one or more transformations.
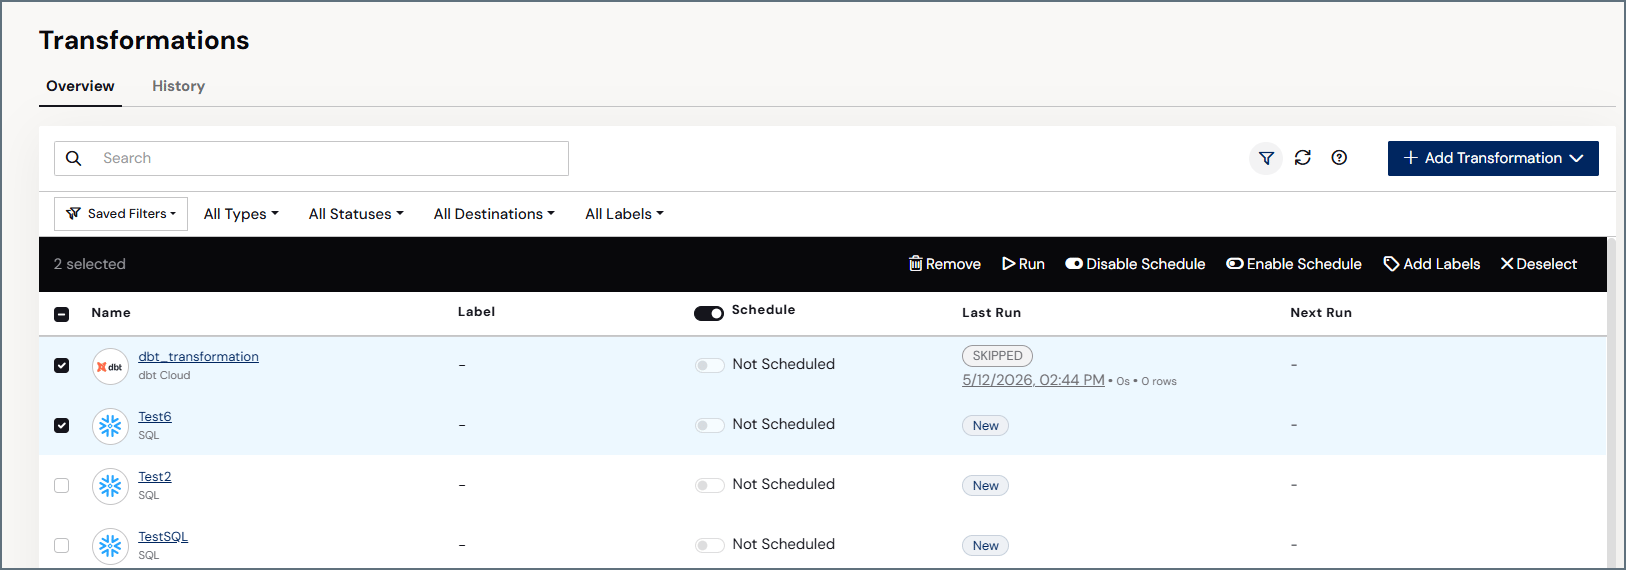
2. Click the bulk operation (**Remove**, **Run**, **Disable Schedule**, **Enable Schedule**, **Add Label**, and **Deselect**) that you want to run in the black navigation bar, as shown below:
After you save the filter, the filter name appears in the **Saved Filter** list. Then, you can choose that filter from the list any time that you want to apply it.
### Running Bulk Operations on Transformations
To use bulk operations on multiple transformations:
1. Select the checkbox next to one or more transformations.
2. Click the bulk operation (**Remove**, **Run**, **Disable Schedule**, **Enable Schedule**, **Add Label**, and **Deselect**) that you want to run in the black navigation bar, as shown below:
 ### History Tab
The **History** tab displays history information about transformations that you have run. The table on this page contains three columns with details about your transformations:
* **NAME:** Lists the name of the transformation and the transformation type.
* **RUN DATE:** Specifies the run status (**Successful**, **Failed**, or **ERROR**), the date and time that your transformation ran, how long the transformation took to run, and the number of rows that were affected. If an error occurs, the error message is displayed in this column.
* **INSTANCE ID:** Specifies the instance identifier (Id) that ran the transformation. This Id is important for clustered environments because it indicates which machine executed the transformation.
On this tab, you can also manage your transformation histories in the following ways:
* You can organize your transformation history list in ascending or descending order for the **RUN DATE** or **INSTANCE ID** columns. To order the columns, simply click the up (↑) and down (↓) arrows next to the column by which you want to sort.
* You can filter the table by transformation type, status, and destination connection. Unlike other pages, the **History** tab does not allow you to reset or save filter options. You can clear the filter and return to the transformations table either by clicking the **Overview** tab or by clicking the **Transformations** icon in the navigation bar.
* You can export the transformation history to your local machine by clicking the **Export History** button (upper right of the window). You can choose to export a history over 1, 2, or 5 days.
* You can edit settings for a transformation, download the history log, or obtain details by clicking the options menu (**...**) at the end of a transformation row and selecting the option that you want.
### History Tab
The **History** tab displays history information about transformations that you have run. The table on this page contains three columns with details about your transformations:
* **NAME:** Lists the name of the transformation and the transformation type.
* **RUN DATE:** Specifies the run status (**Successful**, **Failed**, or **ERROR**), the date and time that your transformation ran, how long the transformation took to run, and the number of rows that were affected. If an error occurs, the error message is displayed in this column.
* **INSTANCE ID:** Specifies the instance identifier (Id) that ran the transformation. This Id is important for clustered environments because it indicates which machine executed the transformation.
On this tab, you can also manage your transformation histories in the following ways:
* You can organize your transformation history list in ascending or descending order for the **RUN DATE** or **INSTANCE ID** columns. To order the columns, simply click the up (↑) and down (↓) arrows next to the column by which you want to sort.
* You can filter the table by transformation type, status, and destination connection. Unlike other pages, the **History** tab does not allow you to reset or save filter options. You can clear the filter and return to the transformations table either by clicking the **Overview** tab or by clicking the **Transformations** icon in the navigation bar.
* You can export the transformation history to your local machine by clicking the **Export History** button (upper right of the window). You can choose to export a history over 1, 2, or 5 days.
* You can edit settings for a transformation, download the history log, or obtain details by clicking the options menu (**...**) at the end of a transformation row and selecting the option that you want.
 ### Managing Transformations
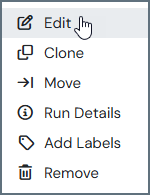
You can manage your transformations from the options menu (**...**) that appears when you hover your cursor over the end of a transformation row. The following options are available from that menu:
* **Edit:** Modify your transformation settings, including modifying general settings, setting email alerts, scheduling the transformation to run, and viewing the history for a transformation.
* **Clone:** Create a copy of your transformation. You can clone it to a different workspace, choose a different destination, and copy tasks and settings.
* **Export:** Save your transformation as a SYNCJOB file to your local machine. You can also export and encrypt sensitive values by specifying a password.
* **Move:** Transfer your transformation from one workspace to another workspace.
* **Add Labels:** Apply labels to your transformation, which are displayed in the **LABEL** column for the transformation on the **Transformations** summary page.
* **Remove:** Delete the transformation permanently.
Details about using these menu options are explained in later sections on this page.
## Adding a New Transformation
Adding a transformation requires preconfigured destination connections or dbt transformations (depending on the type of transformation you want to create). After you [define a supported destination connection to your database](../../connections/connections) or you [set up a dbt transformation](../../transformations/post-job-elt/dbt-transformations), follow these steps to create a new transformation:
1. Click **Transformations** in the navigation bar to open the **Transformations** page.
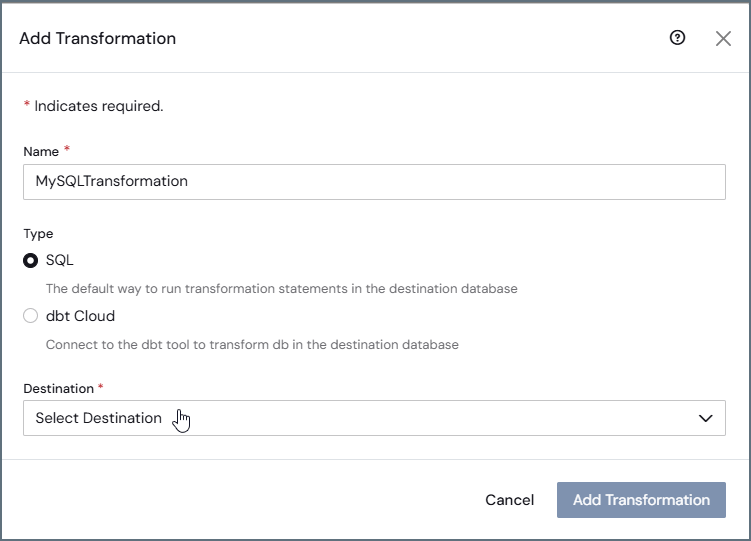
2. Select **Add Transformation > Add New Transformation** (upper right corner). This action opens the **Add Transformation** dialog box where you can enter transformation information.
3. Enter a transformation name. Then, select a transformation type (either **SQL** or **dbt Cloud**) and either a destination (for **SQL**) or a dbt transformation (for **dbt Cloud**).
### Managing Transformations
You can manage your transformations from the options menu (**...**) that appears when you hover your cursor over the end of a transformation row. The following options are available from that menu:
* **Edit:** Modify your transformation settings, including modifying general settings, setting email alerts, scheduling the transformation to run, and viewing the history for a transformation.
* **Clone:** Create a copy of your transformation. You can clone it to a different workspace, choose a different destination, and copy tasks and settings.
* **Export:** Save your transformation as a SYNCJOB file to your local machine. You can also export and encrypt sensitive values by specifying a password.
* **Move:** Transfer your transformation from one workspace to another workspace.
* **Add Labels:** Apply labels to your transformation, which are displayed in the **LABEL** column for the transformation on the **Transformations** summary page.
* **Remove:** Delete the transformation permanently.
Details about using these menu options are explained in later sections on this page.
## Adding a New Transformation
Adding a transformation requires preconfigured destination connections or dbt transformations (depending on the type of transformation you want to create). After you [define a supported destination connection to your database](../../connections/connections) or you [set up a dbt transformation](../../transformations/post-job-elt/dbt-transformations), follow these steps to create a new transformation:
1. Click **Transformations** in the navigation bar to open the **Transformations** page.
2. Select **Add Transformation > Add New Transformation** (upper right corner). This action opens the **Add Transformation** dialog box where you can enter transformation information.
3. Enter a transformation name. Then, select a transformation type (either **SQL** or **dbt Cloud**) and either a destination (for **SQL**) or a dbt transformation (for **dbt Cloud**).
 4. Select a transformation type.
5. Click **Add Transformation** to create your new transformation.
From your specific transformation page (**Transformations > *YourTransformationName***), you can set specific features, including [setting triggers for run schedules](../../transformations/post-job-elt/sql-transformations#trigger-category), [adding and managing queries](../../transformations/post-job-elt/sql-transformations#queries-tab) (for SQL queries only), [mapping columns](../../transformations/etl#mapping-columns), and more.
## Adding Labels to Transformations
{siteNameShort} enables you to add labels to transformations, which can be useful for organization and tracking. Labels can be anything that you want, for example, the transformation priority level (for example,**High Priority**, **Medium Priority**, or **Low Priority**).
To add a label:
1. Click the **Overview** tab on the **Transformations** page.
2. Select **... > Add Labels** from the end of the row for the transformation that you want to export. This selection opens the ***TransformationName* - Add Label** dialog box.
3. In the **Search or Add Label** text box, enter the label that you want to add. Then click **Add**.
4. Select a transformation type.
5. Click **Add Transformation** to create your new transformation.
From your specific transformation page (**Transformations > *YourTransformationName***), you can set specific features, including [setting triggers for run schedules](../../transformations/post-job-elt/sql-transformations#trigger-category), [adding and managing queries](../../transformations/post-job-elt/sql-transformations#queries-tab) (for SQL queries only), [mapping columns](../../transformations/etl#mapping-columns), and more.
## Adding Labels to Transformations
{siteNameShort} enables you to add labels to transformations, which can be useful for organization and tracking. Labels can be anything that you want, for example, the transformation priority level (for example,**High Priority**, **Medium Priority**, or **Low Priority**).
To add a label:
1. Click the **Overview** tab on the **Transformations** page.
2. Select **... > Add Labels** from the end of the row for the transformation that you want to export. This selection opens the ***TransformationName* - Add Label** dialog box.
3. In the **Search or Add Label** text box, enter the label that you want to add. Then click **Add**.
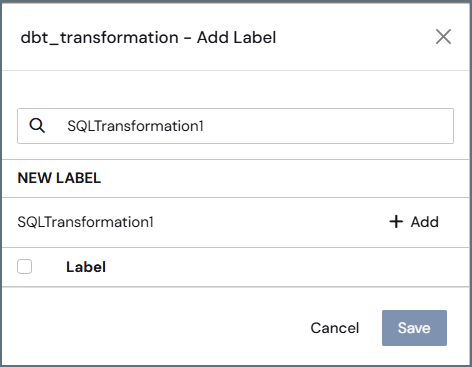 The new text is added alphabetically in the list of labels, as shown below:
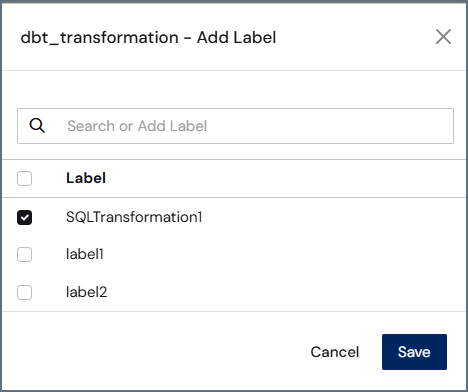 Repeat this step if you want to include additional labels.
4. Click **Save** and your label is added to the **Label** column in the transformation row on the **Overview** tab.
After you create labels, you can also edit them in the ***TransformationName* - Edit Labels** dialog box by clicking **Edit Labels** on the options (**...**) menu in the transformation row.
You cannot delete labels. However, you can remove them from appearing in the transformations table, as follows:
Repeat this step if you want to include additional labels.
4. Click **Save** and your label is added to the **Label** column in the transformation row on the **Overview** tab.
After you create labels, you can also edit them in the ***TransformationName* - Edit Labels** dialog box by clicking **Edit Labels** on the options (**...**) menu in the transformation row.
You cannot delete labels. However, you can remove them from appearing in the transformations table, as follows:
- Select ... > Edit Labels.
- Clear the checkbox next to the label name in the TransformationName - Edit Labels dialog box.
- Click Save. Once you exit the dialog box, the label is removed from the LABEL column in the transformation's row.
## Editing Transformation Settings
After you create a transformation, you might want to edit the settings and configuration options. For details about modifying these settings and configurations, see [Specifying SQL Transformation Settings](../../transformations/post-job-elt/sql-transformations#specifying-sql-transformation-settings) and [Specifying DBT Transformation Settings](../../transformations/post-job-elt/dbt-transformations#specifying-dbt-transformation-settings).
## Cloning a Transformation
To clone a transformation:
1. Click the **Overview** tab on the **Transformations** page.
2. Select **... > Clone** from the end of the row for the transformation that you want to copy. This selection opens the **Clone Transformation** dialog box.
3. Enter a name for your transformation in the **Name** field. You can use the default name or provide a new one.
To reuse the original name, you must move the cloned transformation to a different workspace because workspaces cannot contain multiple transformations with the same name.
4. (Optional) Select the **Clone in a different workspace** checkbox if you want to place the transformation in another workspace or reuse the original name. When you select this option, {siteNameShort} expands the dialog to display a **New Workspace** drop-down list, which allows you to choose a workspace. A **Select Destination** list also appears, where you must choose a destination (either the original destination or a new one).
5. (Optional) Select the **Choose a different destination** checkbox if you want the new transformation to use a different destination. Like the **Clone in a different workspace** option, this selection reveals a **Select Destination** list where you must choose a destination.
6. (Optional) Select **Tasks**, **Additional Settings**, or both if you want the new transformation to contain the tasks and additional settings from the original transformation.
7. Click **Clone** to create your new transformation.
## Exporting an SQL Transformation
In {siteNameShort}, you can export only SQL transformations. You can export these transformations from the **Transformations** page to a location on your machine.
To export an SQL transformation:
1. Open the **Transformations** page and click the **Overview** tab.
2. Select **... > Export** at the end of the transformation row in the transformation table. This selection opens the **Export Tranformation** dialog box.
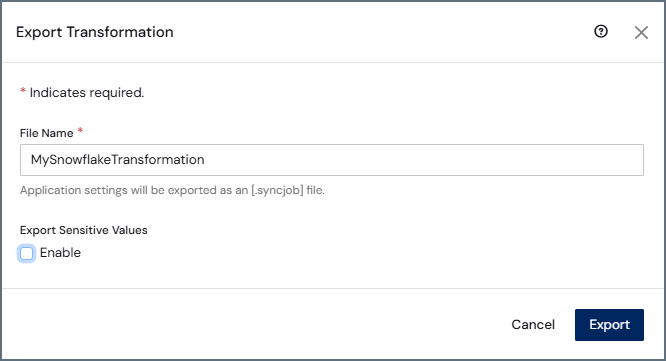 By default, the transformation name is included in the **File Name** text box and the **Enable** option **Export sensitive values** is not selected. Application settings are exported as a SYNCJOB file (for example, *MySettings*.syncjob).
If you enable the exporting of sensitive values, a **Password** text box is displayed. You must enter a password, which is used to export and encrypt sensitive values. You also need this password if you import the transformation at a later time.
3. Click **Export** to upload your transformation. {siteNameShort} exports the transformation to your **Downloads** folder. From there, you can move it to any other location on your machine. The resulting SYNCJOB file contains the details of the exported transformation, including the destination, tasks, and additional settings.
## Importing an SQL Transformation
In {siteNameShort}, you can import only SQL transformations. You can import these transformations from your machine to the **Transformations** table.
To import an SQL transformation:
1. Select **Add Transformation > Import Transformation** from the **Transformations** page. This action opens the **Import Transformation** dialog box.
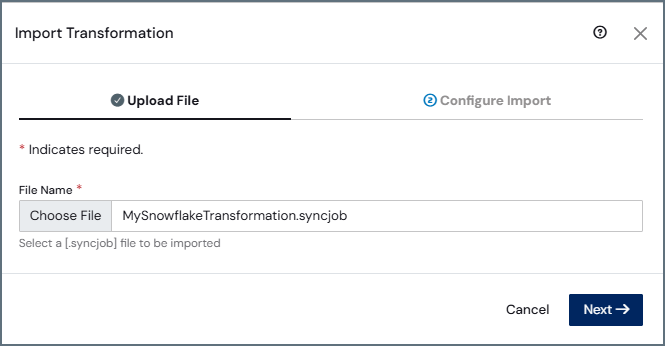
2. Click **Choose File** to open an explorer window where you can select the transformation that you want to import. (The transformation file must be a SYNCJOB file, as shown below.) Once you select your file, the dialog box expands, as shown below.
By default, the transformation name is included in the **File Name** text box and the **Enable** option **Export sensitive values** is not selected. Application settings are exported as a SYNCJOB file (for example, *MySettings*.syncjob).
If you enable the exporting of sensitive values, a **Password** text box is displayed. You must enter a password, which is used to export and encrypt sensitive values. You also need this password if you import the transformation at a later time.
3. Click **Export** to upload your transformation. {siteNameShort} exports the transformation to your **Downloads** folder. From there, you can move it to any other location on your machine. The resulting SYNCJOB file contains the details of the exported transformation, including the destination, tasks, and additional settings.
## Importing an SQL Transformation
In {siteNameShort}, you can import only SQL transformations. You can import these transformations from your machine to the **Transformations** table.
To import an SQL transformation:
1. Select **Add Transformation > Import Transformation** from the **Transformations** page. This action opens the **Import Transformation** dialog box.
2. Click **Choose File** to open an explorer window where you can select the transformation that you want to import. (The transformation file must be a SYNCJOB file, as shown below.) Once you select your file, the dialog box expands, as shown below.
 3. Keep the original transformation name or modify it, as necessary. Then, choose whether to create a new destination or to select an existing destination.
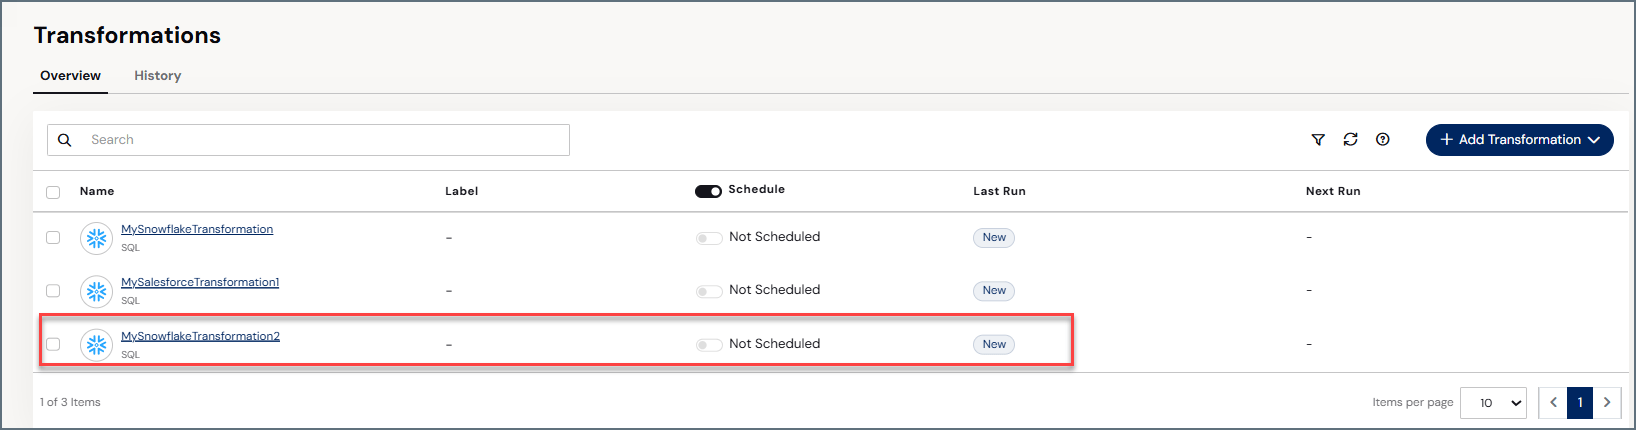
4. Click **Import** to import the transformation into the **Transformations** table.
3. Keep the original transformation name or modify it, as necessary. Then, choose whether to create a new destination or to select an existing destination.
4. Click **Import** to import the transformation into the **Transformations** table.
 ## Moving a Transformation between Workspaces
In {siteNameShort}, a transformation can exist only in one workspace at a time. However, you can easily move a transformation from one workspace to another workspace, as follows:
1. Click the **Overview** tab on the **Transformations** page.
2. Select **... > Move** from the end of the row for the transformation that you want to move. This selection opens the **Move Transformation** dialog box, which displays the originating workspace.
## Moving a Transformation between Workspaces
In {siteNameShort}, a transformation can exist only in one workspace at a time. However, you can easily move a transformation from one workspace to another workspace, as follows:
1. Click the **Overview** tab on the **Transformations** page.
2. Select **... > Move** from the end of the row for the transformation that you want to move. This selection opens the **Move Transformation** dialog box, which displays the originating workspace.
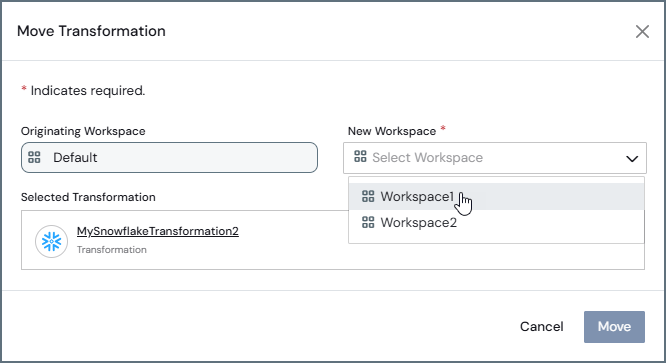 3. Select the destination workspace from the **New Workspace** list.
4. Click **Move** to transport your transformation to the new workspace.
## Enabling and Disabling the Scheduler
You can enable or disable the scheduler via these two methods:
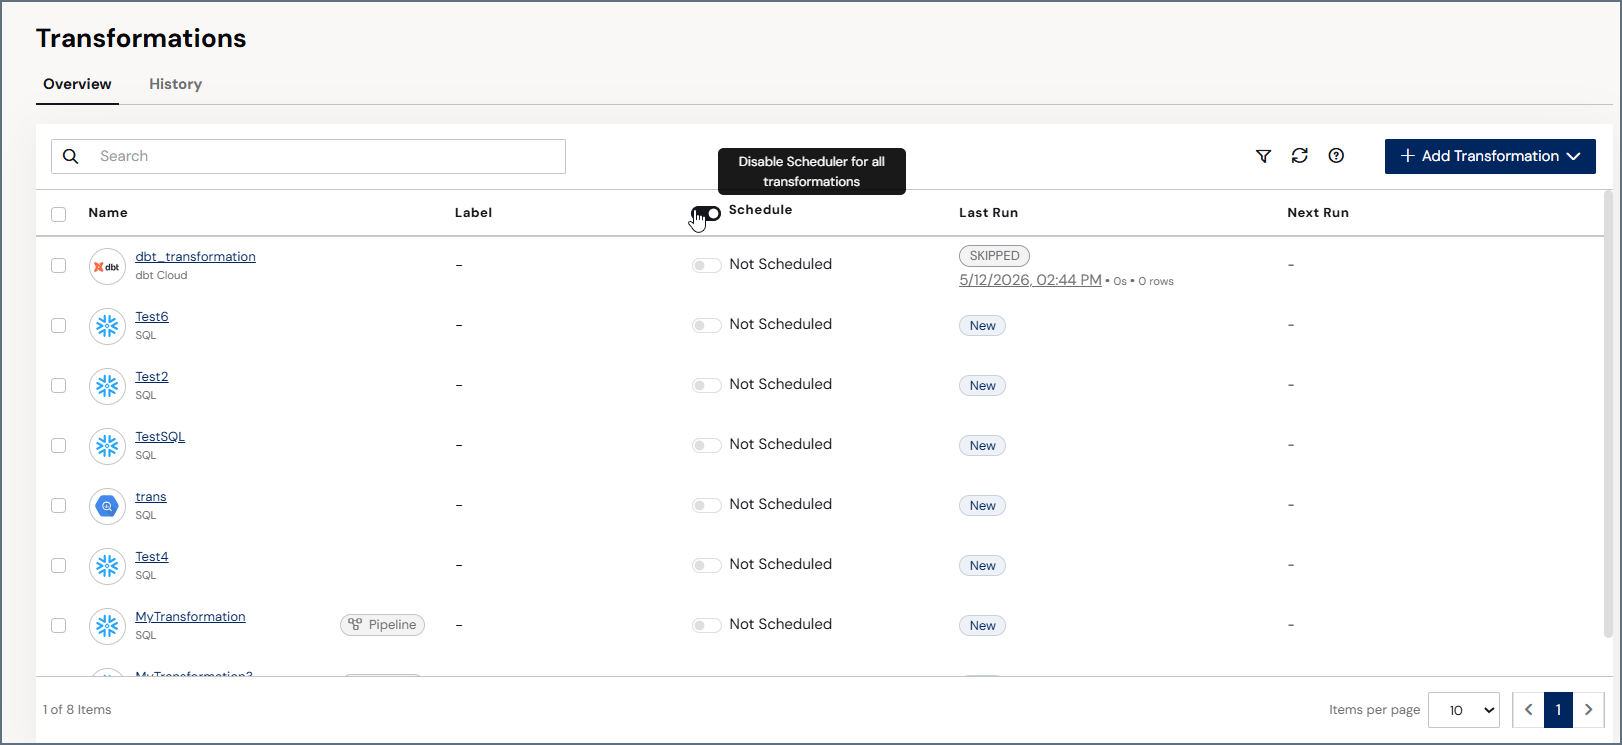
* the **SCHEDULE** column on the main **Transformations** page (for all transformations). This option allows you to enable or disable a schedule that is already defined, for all transformations on that page. To enable scheduling, slide the switch to the right. When scheduling is enabled, the switch turns blue.
3. Select the destination workspace from the **New Workspace** list.
4. Click **Move** to transport your transformation to the new workspace.
## Enabling and Disabling the Scheduler
You can enable or disable the scheduler via these two methods:
* the **SCHEDULE** column on the main **Transformations** page (for all transformations). This option allows you to enable or disable a schedule that is already defined, for all transformations on that page. To enable scheduling, slide the switch to the right. When scheduling is enabled, the switch turns blue.
 * the **Trigger** category on the **Overview** tab of the settings page (for an individual transformation). This category enables you to configure a specific schedule by which to run your transformation. Click **Configure** in the **Trigger** category to open the **Edit Trigger** dialog box.
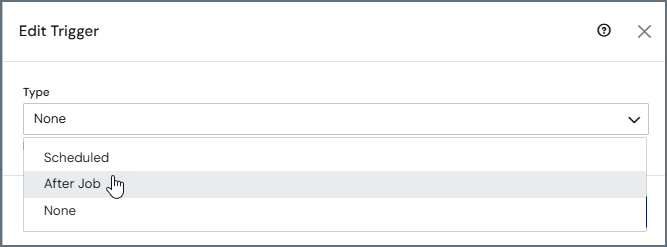 If you select **Scheduled** or **After Job**, the dialog box changes dynamically to show the configuration options that are relevant to each of those selections. If you select **None**, no trigger is set and you must run the transformation manually.
## Starting and Stopping Transformations
You can start a transformation by positioning your cursor over the end of the transformation row and clicking the **Run Transformation** (▷) icon.
When a transformation is running, you cancel that run by clicking the **Stop Transformation** (■) icon.
## More Information
For more detailed information about {siteNameShort} transformations and how they work, see [Transformations](../../transformations/transformations).
If you select **Scheduled** or **After Job**, the dialog box changes dynamically to show the configuration options that are relevant to each of those selections. If you select **None**, no trigger is set and you must run the transformation manually.
## Starting and Stopping Transformations
You can start a transformation by positioning your cursor over the end of the transformation row and clicking the **Run Transformation** (▷) icon.
When a transformation is running, you cancel that run by clicking the **Stop Transformation** (■) icon.
## More Information
For more detailed information about {siteNameShort} transformations and how they work, see [Transformations](../../transformations/transformations).