> ## Documentation Index
> Fetch the complete documentation index at: https://docs.sync.cdata.com/llms.txt
> Use this file to discover all available pages before exploring further.
# Settings Page
export const cloudEnv = false;
export const companyNameLower = "cdata";
export const siteNameShortLower = "sync";
export const siteNameShort = "Sync";
export const siteName = "CData Sync";
The **Settings** page in the {siteName} application contains global settings and user management tools. You access this page by clicking the gear icon in the top-right menu bar, as shown below:
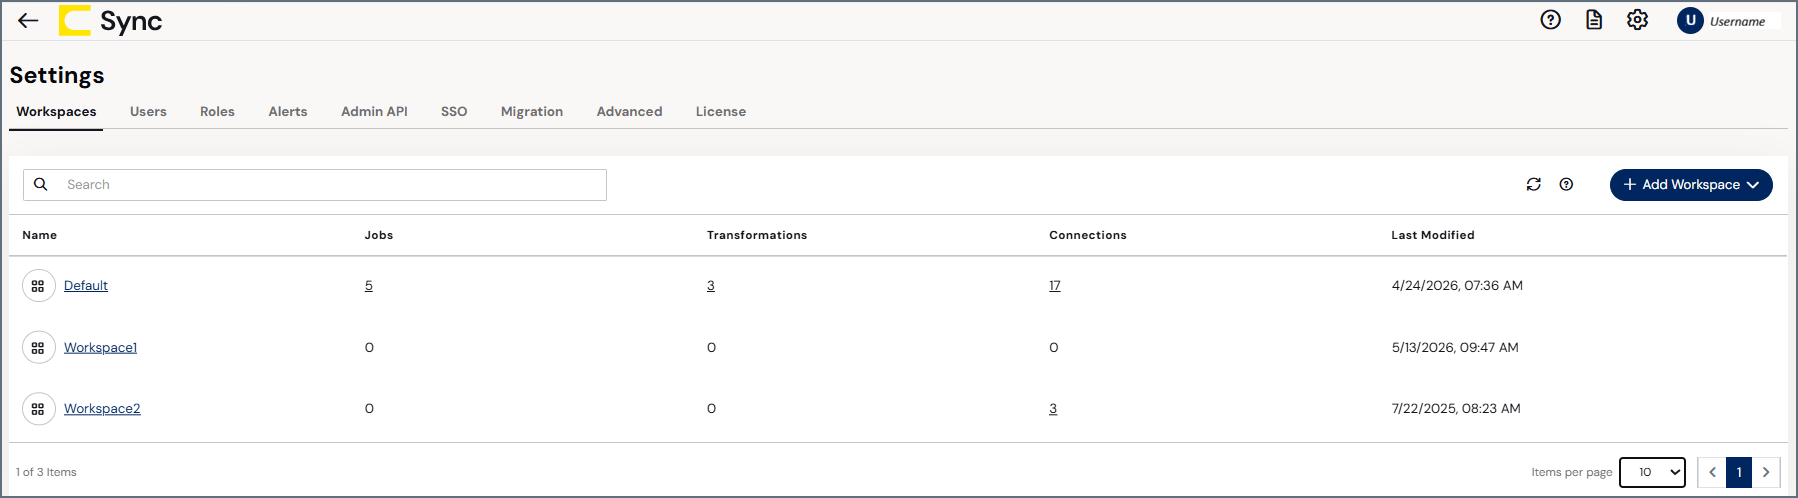
 By default, the **Settings** page opens on the **Workspaces** tab, as shown below:
 The following sections explain the purpose of each tab on this page.
## Workspaces Tab
The **Workspaces** tab summarizes your workspaces and enables you to manage them from one access point. The table on this page contains a row for each workspace that you have created (including the default workspace). Each workspace row details the number of jobs, transformations, and connections a workspace has as well as the number of users for the workspace and last-modified data. For more information, see [Workspace Management](./workspace-management).
## Users Tab
The **Users** tab contains a table of the users that are authorized to access the application. This table displays the credentials information, role, and status for each user. For more information, see [User Management](./user-management/user-management).
## Roles Tab
The **Roles** tab provides descriptions for each role and it displays the number of users that are assigned to each role. For more information, see [Roles](./user-management/roles).
## Alerts Tab
The **Alerts** tab enables you to configure global email alerts and system health alerts. You can choose to have alerts sent to you after the completion of a job run. Alerts contain information regarding the overall job run, including the status of each query. For more information about both email and system health alerts, see [Alerts](../../../jobs/notifications).
By default, each job that you create automatically uses your global alert settings for that job.
The following sections explain the purpose of each tab on this page.
## Workspaces Tab
The **Workspaces** tab summarizes your workspaces and enables you to manage them from one access point. The table on this page contains a row for each workspace that you have created (including the default workspace). Each workspace row details the number of jobs, transformations, and connections a workspace has as well as the number of users for the workspace and last-modified data. For more information, see [Workspace Management](./workspace-management).
## Users Tab
The **Users** tab contains a table of the users that are authorized to access the application. This table displays the credentials information, role, and status for each user. For more information, see [User Management](./user-management/user-management).
## Roles Tab
The **Roles** tab provides descriptions for each role and it displays the number of users that are assigned to each role. For more information, see [Roles](./user-management/roles).
## Alerts Tab
The **Alerts** tab enables you to configure global email alerts and system health alerts. You can choose to have alerts sent to you after the completion of a job run. Alerts contain information regarding the overall job run, including the status of each query. For more information about both email and system health alerts, see [Alerts](../../../jobs/notifications).
By default, each job that you create automatically uses your global alert settings for that job.
Email Server Settings
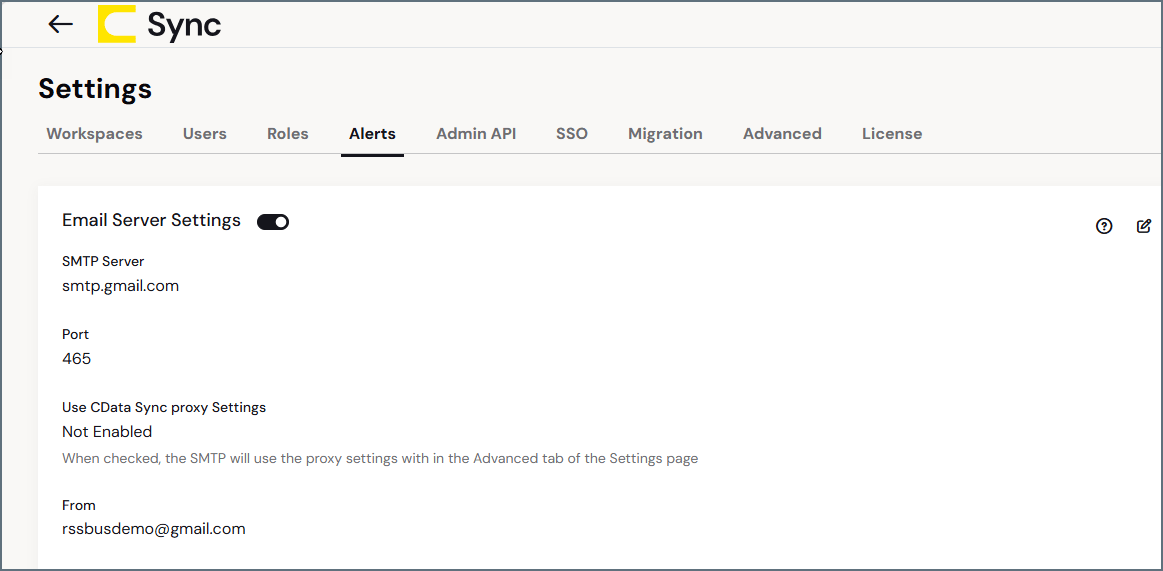
To enable email alerts for a job, you need to configure your global email server, as follows:
- Navigate to the Settings page and click the Alerts tab.
- Click the Edit icon (
 ) in the Email Server Settings box to open the Email Server Settings dialog box.
-
Configure the following properties for the SMTP mail server that is used to send alerts:
- From: Enter the email address to display in the From text box. The default address is cloud@{companyNameLower}.com.
- To: Enter the default email address to which alerts should be sent.
- Errors Only: This property specifies whether {siteNameShort} sends alerts for all job runs or only for job runs where errors occur. By default, {siteNameShort} sends alerts for all job runs. To enable global alerts only when errors occur, select Enable under the Errors Only property.
- Click Save to save your settings and return to the Alerts tab.
To enable or disable email alerts globally for jobs, use the toggle switch in the Email Server Settings section. When global alerts are enabled, the switch is blue, as shown below.
 ### System Health Alerts
The **System Health Alerts** section displays information related to the performance and integrity of the {siteNameShort} system.
To configure the system-health properties:
1. Navigate to the **Settings** page and click the **Alerts** tab.
2. Click the **Edit** icon () in the **Email Server Settings** box to open the **System Health Alerts** dialog box.
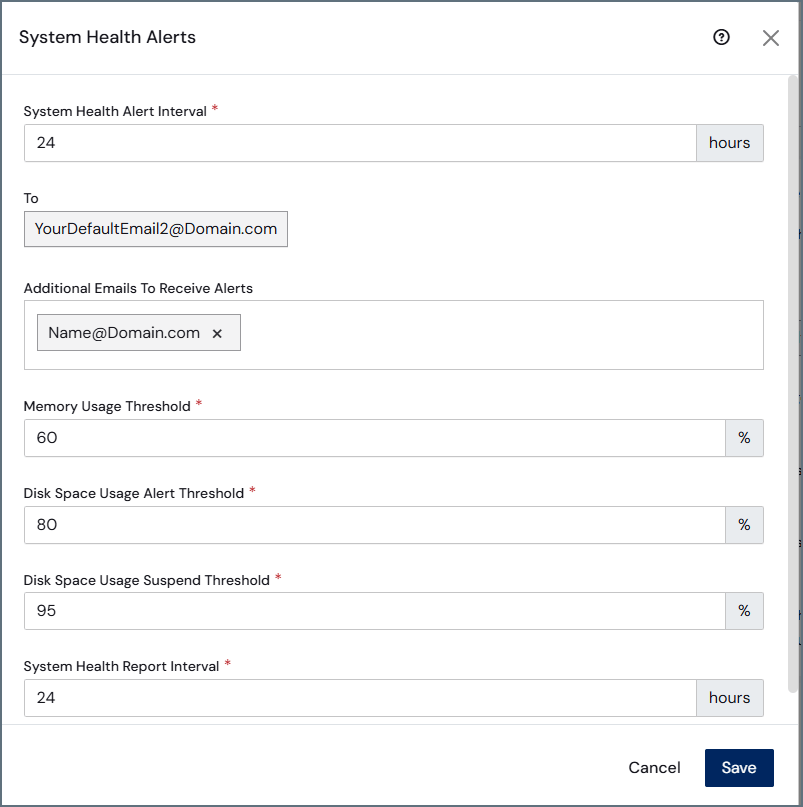
3. Configure the following system-health properties:
* **System Health Alert Interval:** The interval, in hours, at which the health alerts are run. The default interval is **Every 1 hour**.
* **To:** The email address to which alerts should be sent.
* **Additional Emails To Receive Alerts:** Optional email addresses to which the alerts should be sent.
* **Memory Usage Threshold:** The percentage of memory used that, when exceeded, triggers {siteNameShort} to send an alert. The default threshold value is **60%**.
* **Disk Space Usage Alert Threshold:** The percentage of disk storage used that, when exceeded, triggers {siteNameShort} to send an alert. The default threshold value is **80%**.
* **Disk Space Usage Suspend Threshold:** The percentage of disk space used at which {siteNameShort} automatically stops the job schedule so that no more jobs run until the space issue is resolved. When this issue occurs, a warning is displayed in a bar at the top of the **Alerts** page. The default threshold value is **95%**.
* **System Health Report Interval:** The interval at which {siteNameShort} generates a health report for your system. The default interval is **Every 24 hours**.
4. Click **Save** to save your settings and return to the **Alerts** tab.
### System Health Alerts
The **System Health Alerts** section displays information related to the performance and integrity of the {siteNameShort} system.
To configure the system-health properties:
1. Navigate to the **Settings** page and click the **Alerts** tab.
2. Click the **Edit** icon () in the **Email Server Settings** box to open the **System Health Alerts** dialog box.
3. Configure the following system-health properties:
* **System Health Alert Interval:** The interval, in hours, at which the health alerts are run. The default interval is **Every 1 hour**.
* **To:** The email address to which alerts should be sent.
* **Additional Emails To Receive Alerts:** Optional email addresses to which the alerts should be sent.
* **Memory Usage Threshold:** The percentage of memory used that, when exceeded, triggers {siteNameShort} to send an alert. The default threshold value is **60%**.
* **Disk Space Usage Alert Threshold:** The percentage of disk storage used that, when exceeded, triggers {siteNameShort} to send an alert. The default threshold value is **80%**.
* **Disk Space Usage Suspend Threshold:** The percentage of disk space used at which {siteNameShort} automatically stops the job schedule so that no more jobs run until the space issue is resolved. When this issue occurs, a warning is displayed in a bar at the top of the **Alerts** page. The default threshold value is **95%**.
* **System Health Report Interval:** The interval at which {siteNameShort} generates a health report for your system. The default interval is **Every 24 hours**.
4. Click **Save** to save your settings and return to the **Alerts** tab.
 ## Admin API Tab
The **Admin API** tab of the **Settings** page enables you to control settings that are related to the {siteName} API. This tab contains two categories:
* **Trusted IP Addresses**
* **Additional Settings**
### Trusted IP Addresses
This section defines the IP addresses that are allowed to make connections to the {siteNameShort} API. The following functions are available:
* **Add:** Opens a dialog box where you can enter a new IP address range.
* **Edit:** Opens a dialog box where you can modify the selected IP address range.
* **Delete:** Deletes the selected IP address range from the list.
The following behaviors apply for the **Trusted IP Addresses** property:
* `localhost` is always allowed to access the {siteNameShort} API. This behavior cannot be changed.
* Ranges are supported. For example, the entry `100.10.100.1-15` indicates that IP addresses between `100.10.100.1` and `100.10.100.15` are allowed. Any IP addresses outside of that range are rejected.
* Wildcard patterns are supported (in the wildcard text box). For example, the entry `100.10.100.*` indicates that IP addresses beginning with `100.10.100` are allowed. Any IP addresses outside of that range are rejected.
### Additional Settings
The **Additional Settings** section enables you to enable and configure cross-origin resource sharing (CORS) and to choose whether to include an authorization (auth) token in the request URL.
#### Cross-Origin Resource Sharing (CORS)
CORS enables browser-based clients to connect to the {siteNameShort} application. Without CORS, browser-based scripts cannot connect to the {siteNameShort} API because of the same-origin policy that is enforced by the browser. This policy restricts client-side scripts and documents from replicating resources outside of their origin. The origin of a script consists of the protocol, the host, and the port.
If you enable CORS, you can configure it with the following options:
* **Allow all domains without '\*':** When this option is enabled, {siteNameShort} allows any origin that is passed by the client by returning that origin in the **Access-Control-Allow-Origin** header.
* **Access-Control-Allow-Origin:** Enter the origins for which {siteNameShort} will participate in CORS. {siteNameShort} returns these origins in the **Access-Control-Allow-Origin** header. When this option is set to an asterisk (\*), {siteNameShort} allows any origin and passes the asterisk in the **Access-Control-Allow-Origin** header. This behavior is suitable for public APIs.
* **Access-Control-Allow-Methods:** For this option, enter a comma-separated list of allowed methods.
* **Access-Control-Allow-Headers:** For this option, enter a comma-separated list of headers that can be used in requests that are made by the script.
* **Access-Control-Allow-Credentials:** Set this option to **True** if you want to require that clients provide credentials.
* **Access-Control-Max-Age:** Enter the number of seconds that the user agent can cache preflight requests.
#### Include an Auth Token in the Request URL
You can choose whether to include an auth token in the request URL in this section. For more information about this option, see [Authentication](../../../rest-api/authentication).
## SSO Tab
The single sign-on (**SSO**) tab contains settings that are required in order to link user authentication in {siteNameShort} with identity providers such as Microsoft Entra ID or Okta, both of which support the OpenID Connect and SAML 2.0 authentication standards. For details about configuring the properties on this tab, see [Single Sign-On](./user-management/single-sign-on).
## Migration Tab
The **Migration** tab enables you to perform a full import or export of your application, including all of the global application data (for example, connections, jobs, and pipelines) and settings.
## Admin API Tab
The **Admin API** tab of the **Settings** page enables you to control settings that are related to the {siteName} API. This tab contains two categories:
* **Trusted IP Addresses**
* **Additional Settings**
### Trusted IP Addresses
This section defines the IP addresses that are allowed to make connections to the {siteNameShort} API. The following functions are available:
* **Add:** Opens a dialog box where you can enter a new IP address range.
* **Edit:** Opens a dialog box where you can modify the selected IP address range.
* **Delete:** Deletes the selected IP address range from the list.
The following behaviors apply for the **Trusted IP Addresses** property:
* `localhost` is always allowed to access the {siteNameShort} API. This behavior cannot be changed.
* Ranges are supported. For example, the entry `100.10.100.1-15` indicates that IP addresses between `100.10.100.1` and `100.10.100.15` are allowed. Any IP addresses outside of that range are rejected.
* Wildcard patterns are supported (in the wildcard text box). For example, the entry `100.10.100.*` indicates that IP addresses beginning with `100.10.100` are allowed. Any IP addresses outside of that range are rejected.
### Additional Settings
The **Additional Settings** section enables you to enable and configure cross-origin resource sharing (CORS) and to choose whether to include an authorization (auth) token in the request URL.
#### Cross-Origin Resource Sharing (CORS)
CORS enables browser-based clients to connect to the {siteNameShort} application. Without CORS, browser-based scripts cannot connect to the {siteNameShort} API because of the same-origin policy that is enforced by the browser. This policy restricts client-side scripts and documents from replicating resources outside of their origin. The origin of a script consists of the protocol, the host, and the port.
If you enable CORS, you can configure it with the following options:
* **Allow all domains without '\*':** When this option is enabled, {siteNameShort} allows any origin that is passed by the client by returning that origin in the **Access-Control-Allow-Origin** header.
* **Access-Control-Allow-Origin:** Enter the origins for which {siteNameShort} will participate in CORS. {siteNameShort} returns these origins in the **Access-Control-Allow-Origin** header. When this option is set to an asterisk (\*), {siteNameShort} allows any origin and passes the asterisk in the **Access-Control-Allow-Origin** header. This behavior is suitable for public APIs.
* **Access-Control-Allow-Methods:** For this option, enter a comma-separated list of allowed methods.
* **Access-Control-Allow-Headers:** For this option, enter a comma-separated list of headers that can be used in requests that are made by the script.
* **Access-Control-Allow-Credentials:** Set this option to **True** if you want to require that clients provide credentials.
* **Access-Control-Max-Age:** Enter the number of seconds that the user agent can cache preflight requests.
#### Include an Auth Token in the Request URL
You can choose whether to include an auth token in the request URL in this section. For more information about this option, see [Authentication](../../../rest-api/authentication).
## SSO Tab
The single sign-on (**SSO**) tab contains settings that are required in order to link user authentication in {siteNameShort} with identity providers such as Microsoft Entra ID or Okta, both of which support the OpenID Connect and SAML 2.0 authentication standards. For details about configuring the properties on this tab, see [Single Sign-On](./user-management/single-sign-on).
## Migration Tab
The **Migration** tab enables you to perform a full import or export of your application, including all of the global application data (for example, connections, jobs, and pipelines) and settings.
This tab also enables you to migrate your default application database to an external database (via the Application Database Migration tool). This process is separate from migrating (importing or exporting) your {siteNameShort} configuration to another {siteNameShort} installation. For details about migrating your application database, see Migration.
To export global application data, use the **Export** button. This action generates a ZIP file that contains all global data, including multiple workspaces, settings, users, reports, and other configuration details.
Similarly, you can import application data by clicking the **Import** button and selecting a ZIP file. The file should contain exported global data such as workspaces, settings, users, and reports.
The following steps explain how to export or import your {siteNameShort} configuration:
1. Click the **Settings** tab on the {siteNameShort} top navigation bar.
2. Click the **Migration** tab to export or import settings, as follows:
**Export:**
1. Click **Export** to download all jobs, transformations, connections, tasks, and {siteNameShort} settings as a zipped CSV file.
2. Configure the following properties:
**Type:** Select **Export all jobs, transformations, and connections** to export everything, or select **Custom export** to choose specific items. If you select **Custom export** and click **Next**, a dialog box appears that lists available jobs and transformations (along with their associated connections, tasks, and settings) that you can select for export.
**File Name:** Specify a filename for the exported ZIP file (or keep the default name, **CDataSync**). This file contains the selected application settings.
**Export Sensitive Values:** When you export all jobs, transformations, connections, tasks, and settings, the **Export Sensitive Values** checkbox is enabled by default. If you select **Custom export**, this checkbox is disabled by default and must be enabled manually. When the checkbox is enabled, you must supply a password to encrypt sensitive values that are included in the export.
3. Click **Export** to export your file.
**Import:**
1. Click **Import** to import a ZIP file with custom jobs, transformations, connections, tasks, and {siteNameShort} settings.
2. Click **Choose File** and select a ZIP file to import.
3. Click **Import** to import your file.
## Advanced Tab
{siteNameShort} enables you to archive and cleanup logs, either in the same instance of {siteNameShort} that is running (local disk) or in an Amazon S3 bucket. You can perform cleanup activities from the **Cleanup Settings** category on the **Advanced** tab.
### Cleanup Settings
To clean up and archive your logs:
1. Open {siteNameShort} and navigate to the **Clean-up Settings** category on the **Advanced** tab. (**Settings > Advanced**).
2. Click the **Edit** icon () to set the properties that are listed below. (The edit icon is next to the documentation icon at the top right of that category.)
3. Specify the type of cleanup (**Archive** or **Delete**) that you want to perform.
**Archive**
If you select **Archive**, specify these properties:
* **Retention Period (Days):** Set the number of days that you want the log files to be held in the original directory. The default number of days is **7**.
* **0:** All logs are cleaned up immediately when the cleanup task runs.
* **-1:** Logs are never cleaned up.
* **Any positive integer (1 or higher):** Logs are retained for the specified number of days.
When the retention period expires, {siteNameShort} automatically moves the files into the archive location that you configured. If you configure Amazon S3 settings, archived files are stored in the designated bucket after the retention period ends.
* **Daily Clean-up Time:** Specify the time that you want to run the cleanup job each day. If you want to run the cleanup job immediately, return to the **Clean-up Settings** category on the **Advanced** tab and click **Run Clean-up**.
* **S3 Bucket:** Specify the name of your S3 bucket.
* **S3 Access Key:** Specify the access key for your S3 bucket.
* **S3 Secret Key:** Specify the secret key for your S3 bucket.
* **S3 Region:** Specify the region where Amazon stores your bucket.
After you specify these settings, click **Test Connection** to verify that your S3 connection works.
**Delete**
If you select **Delete** (the default type), specify these properties:
* **Retention Period (Days):** Set the number of days that you want the log files to be held in the original directory. The default number of days is **7**.
* **0:** All logs are deleted immediately when the cleanup task runs.
* **Any positive integer (1 or higher):** Logs are retained for the specified number of days.
When the retention period expires, {siteNameShort} automatically deletes these files.
* **Daily Clean-up Time:** Specify the time that you want to run the cleanup job each day. If you want to run the cleanup job immediately, return to the **Clean-up Settings** category on the **Advanced** tab and click **Run Clean-up**.
4. Click **Save** to save your settings and return to the **Advanced** tab.
### dbt Cloud
*dbt Cloud* enables you to write, run, and test code as well as manage version control in your dbt project from your browser (no command-line use is required). For details about how to connect to dbt Cloud to {siteNameShort} via global settings on the **Advanced** tab, see [dbt Cloud Details](../../../transformations/post-job-elt/dbt-transformations#dbt-cloud-details).
### Proxy Settings
The **Proxy Settings** category on the **Advanced** tab defines the global network configuration that {siteNameShort} uses for outbound connections. This section describes how to configure the proxy protocol and related settings that apply across the application. It also discusses how connections can either inherit these global settings or use their own proxy or firewall configuration.
#### Configuring Proxy Settings
To modify your proxy settings:
1. Open {siteNameShort} and navigate to the **Proxy Settings** category on the **Advanced** tab. (**Settings > Advanced**).
2. Click the **Edit** icon () to open the **Proxy Settings** dialog box.
3. Select the proxy protocol that you want to use from the **Type** list in the dialog box.
* (Default) **None:** Indicates that you do not want to use a proxy server.
* **Tunnel:** Transmits data securely across networks by encapsulating one protocol within another.
* **SOCKS4:** Enables applications to exchange data through a proxy server.
* **SOCKS5:** The latest version of the SOCKS protocol.
* **HTTP:** Forwards connection requests from you to the target website and returns the requested data.
4. Configure the following properties for all proxy protocols except **None** (which has no additional properties).
* **Host:** Enter the name or IP address of your proxy-based firewall.
* **Port:** Enter the TCP port for your proxy-based firewall. The default port is **25**.
* **Authentication Scheme:** Select the authentication (auth) scheme that you want to use. Available auth schemes are as follows:
* **None**
* **Basic**
* **Digest**
* **Proprietary**
* **NTLM** (default)
* **Username:** Enter the username that you use to authenticate with a proxy-based firewall.
* **Proxy Password:** Enter the password that you use to authenticate to a proxy-based firewall.
5. Click **Save** to save your settings and exit the dialog box.
Using Global Proxy Settings with Connections
Connections can inherit the global proxy configuration that is defined on this page. Each connection includes a Use Global Proxy Settings option that controls this behavior.
When this option is enabled, the connection uses the global proxy settings and hides its own proxy and firewall configuration. When it is disabled, the connection displays and uses its own proxy or firewall settings.
For more information, see Controlling Proxy and Firewall Settings at the Connection Level.
### Additional Settings
The **Additional Settings** category enables you to configure the additional application settings, as follows:
1. Open {siteNameShort} and navigate to the **Additional Settings** category on the **Advanced** tab. (**Settings > Advanced**).
2. Click the **Edit** icon () to set the properties that are listed below. (The edit icon is next to the documentation icon at the top right of that category.)
3. Configure the following properties:
Logs Folder: Enter the folder in which you want to store all jobs and logs. The default logs folder is Logs, which is located in the AppData folder.
* **Application Log Level:** Select the logging level for the current application:
* **None**
* **Error**
* **Warning**
* **Info** (default)
* **Debug**
* **Trace**
* **Log Subfolder Scheme:** Specify the scheme for creating subfolders to organize log files by time period:
* **Daily**
* **Weekly**
* **Monthly**
* **Yearly**
<>
Allow Cluster Mode: Enable this setting to allow multiple {siteNameShort} installations to work together and process the same jobs with the same configurations.
Base URL: Enter the base URL from which {siteNameShort} will be accessed through a proxy server.
* **Two-Factor Authentication:** Specify whether users can enable two-factor authentication for their account:
* **Enabled**
* **Required**
* **Disabled**
* **Other Settings:** Enter hidden connector settings in a semicolon-separated list (for example, `enablecdatasqlserverdestination=true`).
4. Click **Save** to save your settings and to exit the dialog box.
## License Tab
The **License** tab provides your licensing information, connector-usage information, and the version of {siteNameShort} that you are running. This tab also displays the number of connections that you are currently using, your license expiration date, and your node identifier (Id). In addition, you can access information about upgrading your license by clicking **Compare licenses** in the settings section. You can also see how much disk space you have used in the **Disk Space Usage** category on this tab.
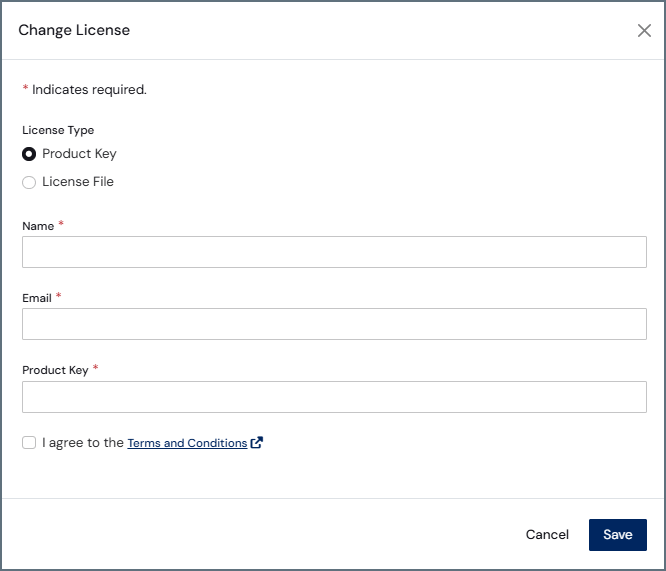
If you purchase a new license, you can install the license by clicking the Change License Edit icon () in the settings section category. This icon opens the Change License dialog box (shown below), from which you can you can add the new license.
 You can extend a trial license by contacting syncsales@{companyNameLower}.com and giving them your node Id.