> ## Documentation Index
> Fetch the complete documentation index at: https://docs.sync.cdata.com/llms.txt
> Use this file to discover all available pages before exploring further.
# Jobs Page
export const siteNameShort = "Sync";
export const siteName = "CData Sync";
A *{siteName} job* is a unit of execution that includes the source connection, the destination connection, and a set of one or more tasks that represent data flows for different tables. All the tasks within a job are executed sequentially, which enables you to order data flows as you see fit.
The following sections explain the features of the **Jobs** summary page as well as the following tasks:
* [adding a new job](#adding-a-new-job)
* [cloning a job](#cloning-a-job)
* [adding labels to jobs](#adding-labels-to-jobs)
* [editing job settings](#editing-job-settings)
* [exporting a job](#exporting-a-job)
* [importing a job](#importing-a-job)
* [moving a job between workspaces](#moving-a-job-between-workspaces)
* [enabling and disabling the job scheduler](#enabling-and-disabling-the-scheduler)
* [starting and stopping jobs](#starting-and-stopping-jobs)
* [re-syncing job task execution](#re-syncing-job-task-execution)
## Viewing Your Jobs
To access the **Jobs** page, click the **Jobs** icon in the left navigation pane in the {siteName} interface. You can view a list of all your jobs from this page. The **Jobs** page has two tabs (**Overview** and **History**) that provide all the details about your jobs. The following sections explain the information on each of these tabs.
### Overview Tab
The table on this tab summarizes your jobs and enables you to manage them from one access point.
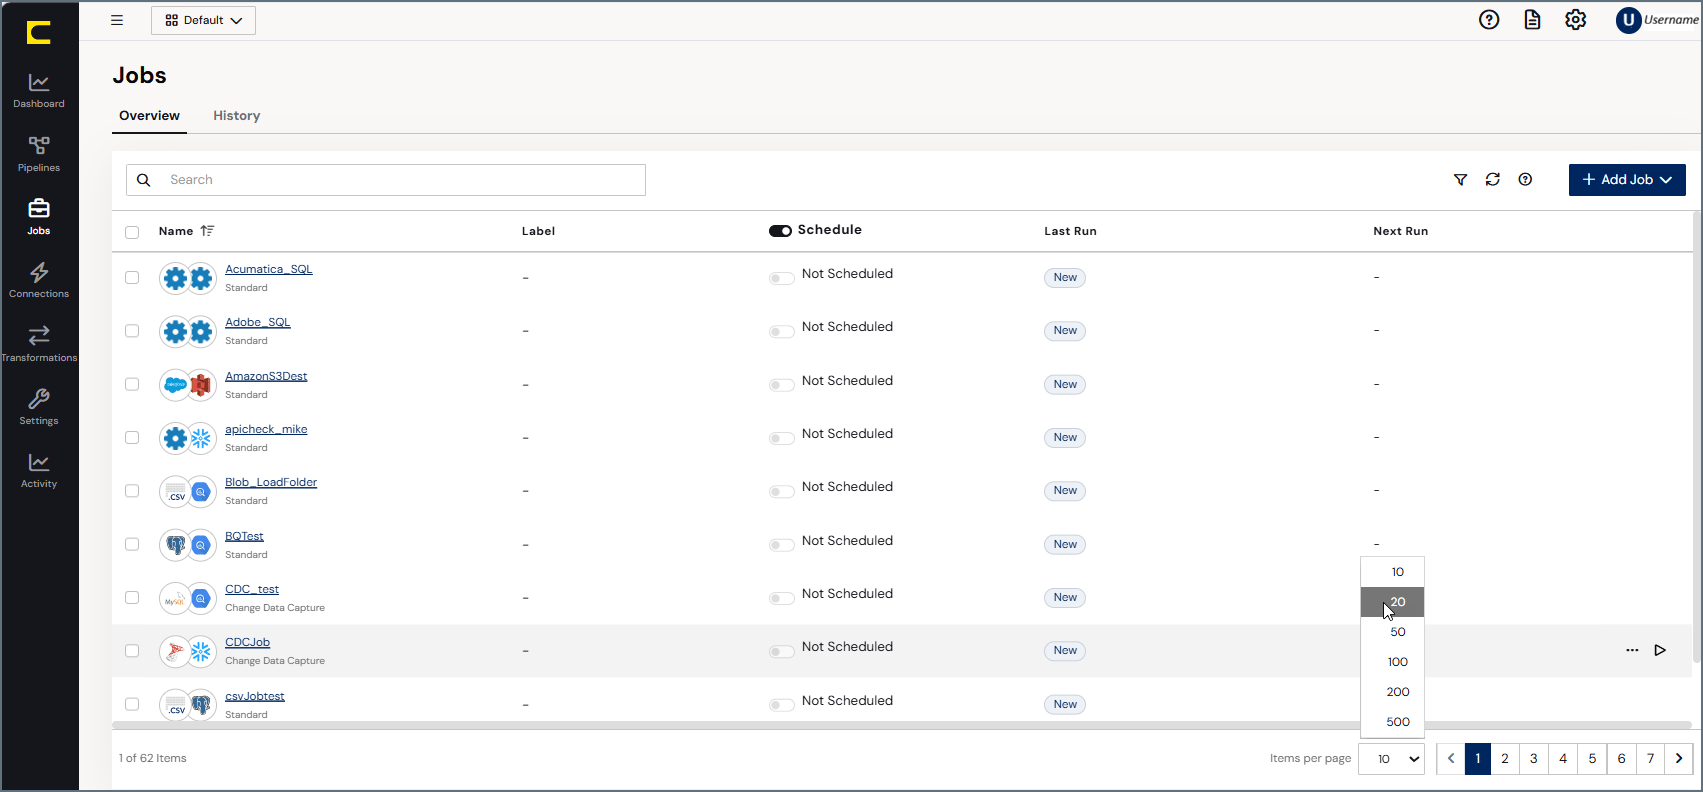 The job records are displayed in rows, with columns that provide details about each job. As shown above, you can specify the number of rows that you want to display on the page by selecting a number from the ***X* records per page** list at the bottom of the page.
{siteNameShort} provides details about your jobs in five columns:
* **NAME:** Lists the name of the job, the source and destination connectors, and the job type.
* **LABEL:** Displays labels that you assign to your job. You add labels in either of these ways:
* Select **. . . > Add Labels** at the end of the job row.
* Click **Add Labels** in the **Labels** section on the **Overview** tab in the job settings.
* **SCHEDULE:** Specifies the run schedule for your job. For more details, see [Enabling and Disabling the Scheduler](#enabling-and-disabling-the-scheduler).
* **LAST RUN:** Specifies the last date and time that the job ran, how long the job took to run, and the number of rows that were affected.
* **NEXT RUN:** Specifies the next date and time that the job will run.
If you click a job name, {siteNameShort} opens the **Settings** page for that job.
You can organize your job list in ascending or descending order for the **NAME**, **LAST RUN**, or **NEXT RUN** columns. To order the columns, simply click the up (↑) and down (↓) arrows next to the column by which you want to sort.
In addition, you can filter the table by job type, status, source connection, destination connection, and label. After you set filters, you can clear all filter options by clicking the **Reset** link to the right of the filter menu. {siteNameShort} also enables you to save filters that you define so that you can use them later.
To save a filter:
1. Choose your filter options.
2. Select **Saved Filters > Add Saved Filter**.
The job records are displayed in rows, with columns that provide details about each job. As shown above, you can specify the number of rows that you want to display on the page by selecting a number from the ***X* records per page** list at the bottom of the page.
{siteNameShort} provides details about your jobs in five columns:
* **NAME:** Lists the name of the job, the source and destination connectors, and the job type.
* **LABEL:** Displays labels that you assign to your job. You add labels in either of these ways:
* Select **. . . > Add Labels** at the end of the job row.
* Click **Add Labels** in the **Labels** section on the **Overview** tab in the job settings.
* **SCHEDULE:** Specifies the run schedule for your job. For more details, see [Enabling and Disabling the Scheduler](#enabling-and-disabling-the-scheduler).
* **LAST RUN:** Specifies the last date and time that the job ran, how long the job took to run, and the number of rows that were affected.
* **NEXT RUN:** Specifies the next date and time that the job will run.
If you click a job name, {siteNameShort} opens the **Settings** page for that job.
You can organize your job list in ascending or descending order for the **NAME**, **LAST RUN**, or **NEXT RUN** columns. To order the columns, simply click the up (↑) and down (↓) arrows next to the column by which you want to sort.
In addition, you can filter the table by job type, status, source connection, destination connection, and label. After you set filters, you can clear all filter options by clicking the **Reset** link to the right of the filter menu. {siteNameShort} also enables you to save filters that you define so that you can use them later.
To save a filter:
1. Choose your filter options.
2. Select **Saved Filters > Add Saved Filter**.
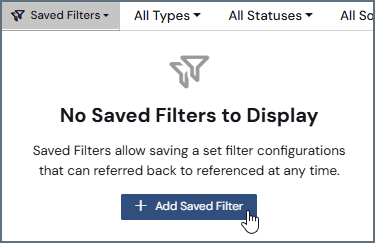 This selection opens the **Add Saved Filter** dialog box.
3. Enter a name for your filter. Then, click **Add Saved Filter** to save the filter and exit the dialog box.
After you save the filter, the filter name appears in the **Saved Filters** list, as shown in this example:
This selection opens the **Add Saved Filter** dialog box.
3. Enter a name for your filter. Then, click **Add Saved Filter** to save the filter and exit the dialog box.
After you save the filter, the filter name appears in the **Saved Filters** list, as shown in this example:
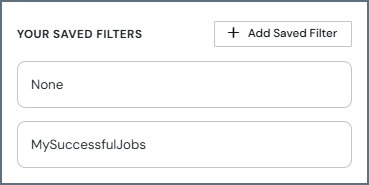 Then, you can choose that filter from the list any time that you want to apply it.
### History Tab
The **History** tab displays history information about jobs that you have run. The table on this page contains three columns with details about your jobs:
* **NAME:** Lists the name of the job, the source and destination connectors, and the job type.
* **RUN DATE:** Specifies the run status (**Successful**, **Failed**, or **ERROR**), the date and time that your job ran, how long the job took to run, and the number of rows that were affected. If an error occurs, the error message is displayed in this column.
* **INSTANCE ID:** Specifies the instance identifier (Id) that ran the job. This Id is important for clustered environments because it indicates which machine executed the job.
On this tab, you can also manage your job histories in the following ways:
* You can organize your job history list in ascending or descending order for the **RUN DATE** or **INSTANCE ID** columns. To order the columns, simply click the up (↑) and down (↓) arrows next to the column by which you want to sort.
* You can filter the history table by job type, status, source connection, and destination connection. Unlike other tabs, the **History** tab does not allow you to reset or save filter options. The only way you can clear a filter and return to the full table of jobs is to click the **Jobs** icon in the navigation bar.
* You can export the job history to your local machine by clicking the **Export History** button (upper right of the window). You can choose to export a history over 1, 2, or 5 days.
* You can edit settings for a job, download the history log, or obtain details by clicking the options menu (**...**) at the end of a job row and selecting the option that you want.
Then, you can choose that filter from the list any time that you want to apply it.
### History Tab
The **History** tab displays history information about jobs that you have run. The table on this page contains three columns with details about your jobs:
* **NAME:** Lists the name of the job, the source and destination connectors, and the job type.
* **RUN DATE:** Specifies the run status (**Successful**, **Failed**, or **ERROR**), the date and time that your job ran, how long the job took to run, and the number of rows that were affected. If an error occurs, the error message is displayed in this column.
* **INSTANCE ID:** Specifies the instance identifier (Id) that ran the job. This Id is important for clustered environments because it indicates which machine executed the job.
On this tab, you can also manage your job histories in the following ways:
* You can organize your job history list in ascending or descending order for the **RUN DATE** or **INSTANCE ID** columns. To order the columns, simply click the up (↑) and down (↓) arrows next to the column by which you want to sort.
* You can filter the history table by job type, status, source connection, and destination connection. Unlike other tabs, the **History** tab does not allow you to reset or save filter options. The only way you can clear a filter and return to the full table of jobs is to click the **Jobs** icon in the navigation bar.
* You can export the job history to your local machine by clicking the **Export History** button (upper right of the window). You can choose to export a history over 1, 2, or 5 days.
* You can edit settings for a job, download the history log, or obtain details by clicking the options menu (**...**) at the end of a job row and selecting the option that you want.
 ## Adding a New Job
Adding a job requires preconfigured source and destination connections. After you [define a source connection to your data source and a destination connection to your database](./connections-page), follow these steps to create a new job:
1. Click **Jobs** in the navigation bar to open the **Jobs** page.
2. Click **Add Job > Add New Job**. This action opens the **Add Job** dialog box where you can enter job information.
3. Enter a job name and select the source and destination connections.
## Adding a New Job
Adding a job requires preconfigured source and destination connections. After you [define a source connection to your data source and a destination connection to your database](./connections-page), follow these steps to create a new job:
1. Click **Jobs** in the navigation bar to open the **Jobs** page.
2. Click **Add Job > Add New Job**. This action opens the **Add Job** dialog box where you can enter job information.
3. Enter a job name and select the source and destination connections.
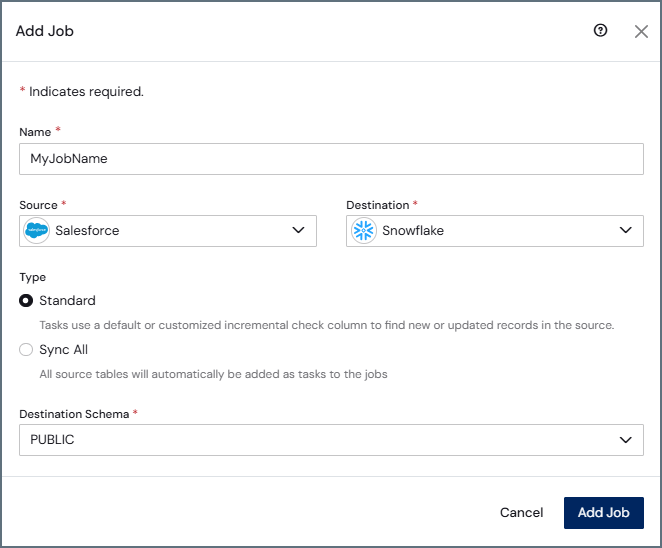 4. Select a job type.
5. Click **Add Job** to create your new job and exit the dialog box.
From your specific job page (**Jobs > *YourJobName***), you can set your job to [run on a schedule](../../jobs/scheduling-jobs), [configure snapshot settings (which control incremental replication behavior)](../configuring-jobs#defining-settings-for-your-initial-replication-job), and [create email alerts](../../jobs/notifications). In addition, you can view your [logs and job history](../../jobs/logging-history) to obtain more information or to troubleshoot errors.
## Cloning a Job
Instead of adding an entirely new job, you can clone an existing job. Cloning a job creates a new job by copying the settings and tasks from the existing job. Follow these steps to clone a job.
1. Locate the job that you want to clone and select **Clone** from the options menu (**...**). This option opens the **Clone Job** dialog box, where you can define what you want to clone.
1. Enter a name for your new job.
4. Select a job type.
5. Click **Add Job** to create your new job and exit the dialog box.
From your specific job page (**Jobs > *YourJobName***), you can set your job to [run on a schedule](../../jobs/scheduling-jobs), [configure snapshot settings (which control incremental replication behavior)](../configuring-jobs#defining-settings-for-your-initial-replication-job), and [create email alerts](../../jobs/notifications). In addition, you can view your [logs and job history](../../jobs/logging-history) to obtain more information or to troubleshoot errors.
## Cloning a Job
Instead of adding an entirely new job, you can clone an existing job. Cloning a job creates a new job by copying the settings and tasks from the existing job. Follow these steps to clone a job.
1. Locate the job that you want to clone and select **Clone** from the options menu (**...**). This option opens the **Clone Job** dialog box, where you can define what you want to clone.
1. Enter a name for your new job.
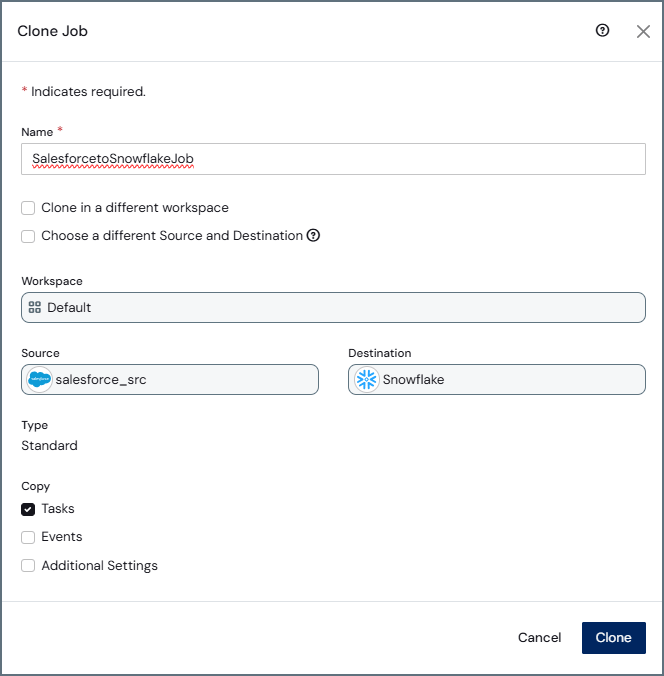 2. (Optional) Select the workspace in which you want to clone the job. By default, {siteNameShort} creates the cloned job in the current workspace. If you want to clone it elsewhere, select **Clone in a different workspace**. When you choose this option:
* The dialog box displays a **New Workspace** drop-down list from which you can select another workspace.
* When you select **Clone in a different workspace**, {siteNameShort} automatically selects **Choose a different Source and Destination**, by default. You also must select the source and destination again. You can select the original source and destination or you can choose new ones.
3. (Optional) Select the **Choose a different Source and Destination** option if you just want to change the current source or destination.
For a cloned job, the new source connection must be of the same connection type as that of the original job. For example, if the original job uses a Salesforce source connection, the new job must also use a Salesforce source connection. However, you can select a different destination connection.
4. Select any of the following optional settings that you want to use.
**Tasks:** Copies all [tasks](../../jobs/tasks/tasks) from the original job. If you use a different source connection, you **must verify** that all the tables you add as tasks exist in your source before you run the job.
**Events:** Copies all [events](../../events/events) from the original job.
**Additional Settings:** Copies alert, logging, and advanced settings from the original job.
2. Click **Clone** to create your cloned job and display it in the job table on the **Jobs** page.
## Adding Labels to Jobs
{siteNameShort} enables you to add labels to jobs, which can be useful for organization and tracking. Labels can be anything that you want, for example, the job priority level (for example,**High Priority**, **Medium Priority**, or **Low Priority**).
To add a label:
1. Click the **Overview** tab on the **Jobs** page.
2. Select **... > Add Labels** from the end of the row for the job for which you want to add a label. This selection opens the ***JobName* - Add Label** dialog box.
3. In the **Search or Add Label** text box, enter the label that you want to add. Then click **Add**.
2. (Optional) Select the workspace in which you want to clone the job. By default, {siteNameShort} creates the cloned job in the current workspace. If you want to clone it elsewhere, select **Clone in a different workspace**. When you choose this option:
* The dialog box displays a **New Workspace** drop-down list from which you can select another workspace.
* When you select **Clone in a different workspace**, {siteNameShort} automatically selects **Choose a different Source and Destination**, by default. You also must select the source and destination again. You can select the original source and destination or you can choose new ones.
3. (Optional) Select the **Choose a different Source and Destination** option if you just want to change the current source or destination.
For a cloned job, the new source connection must be of the same connection type as that of the original job. For example, if the original job uses a Salesforce source connection, the new job must also use a Salesforce source connection. However, you can select a different destination connection.
4. Select any of the following optional settings that you want to use.
**Tasks:** Copies all [tasks](../../jobs/tasks/tasks) from the original job. If you use a different source connection, you **must verify** that all the tables you add as tasks exist in your source before you run the job.
**Events:** Copies all [events](../../events/events) from the original job.
**Additional Settings:** Copies alert, logging, and advanced settings from the original job.
2. Click **Clone** to create your cloned job and display it in the job table on the **Jobs** page.
## Adding Labels to Jobs
{siteNameShort} enables you to add labels to jobs, which can be useful for organization and tracking. Labels can be anything that you want, for example, the job priority level (for example,**High Priority**, **Medium Priority**, or **Low Priority**).
To add a label:
1. Click the **Overview** tab on the **Jobs** page.
2. Select **... > Add Labels** from the end of the row for the job for which you want to add a label. This selection opens the ***JobName* - Add Label** dialog box.
3. In the **Search or Add Label** text box, enter the label that you want to add. Then click **Add**.
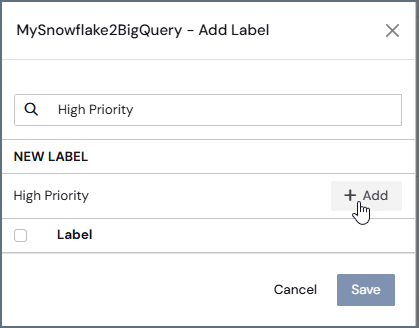 The new text is added as the first label (**Label**), as shown below:
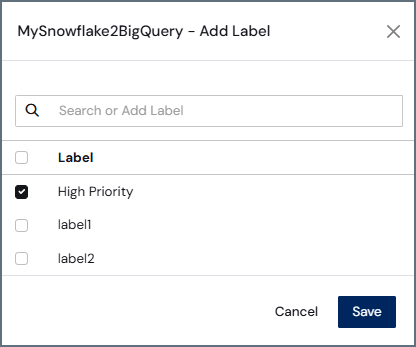 Repeat this step if you want to include additional labels.
4. Click **Save** and your label is added to the **Label** column in the job row on the **Overview** tab.
After you create labels, you can also edit them in the ***JobName* - Edit Labels** dialog box by clicking **Edit Labels** on the options (**...**) menu in the job row.
## Editing Job Settings
After you create a job, you might want to edit the settings and configuration options. For details about editing these settings and configurations, see [**Jobs**](../../jobs/jobs).
## Exporting a Job
You can export a job from the **Jobs** page to a location on your machine.
To export a job:
1. Open the **Jobs** page and click the **Overview** tab.
2. Select **... > Export** at the end of the job row in the jobs table. This selection opens the **Export Job** dialog box.
Repeat this step if you want to include additional labels.
4. Click **Save** and your label is added to the **Label** column in the job row on the **Overview** tab.
After you create labels, you can also edit them in the ***JobName* - Edit Labels** dialog box by clicking **Edit Labels** on the options (**...**) menu in the job row.
## Editing Job Settings
After you create a job, you might want to edit the settings and configuration options. For details about editing these settings and configurations, see [**Jobs**](../../jobs/jobs).
## Exporting a Job
You can export a job from the **Jobs** page to a location on your machine.
To export a job:
1. Open the **Jobs** page and click the **Overview** tab.
2. Select **... > Export** at the end of the job row in the jobs table. This selection opens the **Export Job** dialog box.
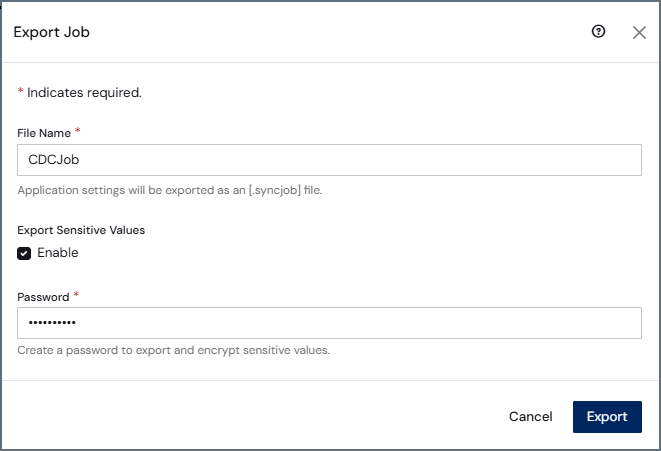 By default, the job name is included in the **File Name** text box and the **Enable** option **Export sensitive values** is not selected. Application settings are exported as a SYNCJOB file (for example, *MySettings*.syncjob).
If you enable the exporting of sensitive values, a **Password** text box is displayed. You must enter a password, which is used to export and encrypt sensitive values. You also need this password if you import the job at a later time.
3. Click **Export** to download your job. {siteNameShort} exports the transformation to your **Downloads** folder. From there, you can move it to any other location on your machine. The resulting SYNCJOB file contains the details of the exported transformation, including the destination, tasks, and additional settings.
## Importing a Job
{siteNameShort} enables you to import a job from your machine to the **Jobs** list.
To import a job:
1. Select **Add Job > Import Job** from the **Jobs** page. This action opens the **Import Job** dialog box.
2. Click **Choose File** to open an explorer window where you can select the job that you want to import. (The job file must be a SYNCJOB file, as shown below.) Then, click **Import** to expand the dialog box.
By default, the job name is included in the **File Name** text box and the **Enable** option **Export sensitive values** is not selected. Application settings are exported as a SYNCJOB file (for example, *MySettings*.syncjob).
If you enable the exporting of sensitive values, a **Password** text box is displayed. You must enter a password, which is used to export and encrypt sensitive values. You also need this password if you import the job at a later time.
3. Click **Export** to download your job. {siteNameShort} exports the transformation to your **Downloads** folder. From there, you can move it to any other location on your machine. The resulting SYNCJOB file contains the details of the exported transformation, including the destination, tasks, and additional settings.
## Importing a Job
{siteNameShort} enables you to import a job from your machine to the **Jobs** list.
To import a job:
1. Select **Add Job > Import Job** from the **Jobs** page. This action opens the **Import Job** dialog box.
2. Click **Choose File** to open an explorer window where you can select the job that you want to import. (The job file must be a SYNCJOB file, as shown below.) Then, click **Import** to expand the dialog box.
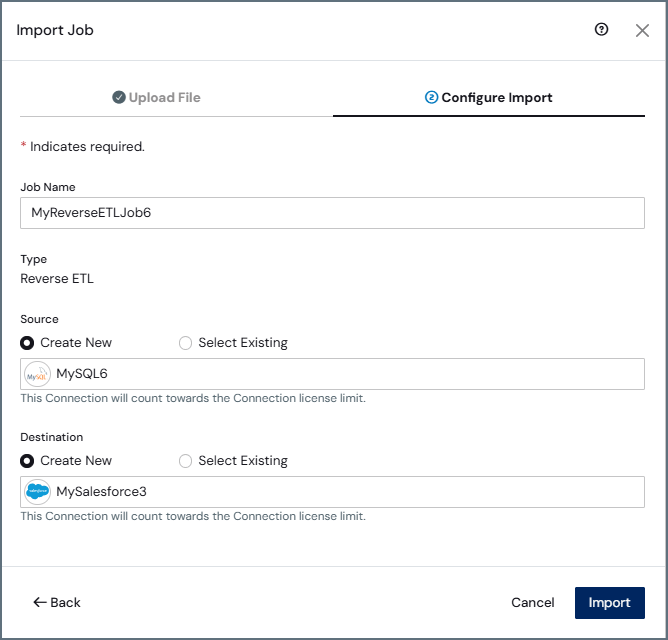 3. Keep the original job name or modify it, as necessary. Then, choose whether to create a new source and destination or to select an existing source and destination.
4. Click **Import** to import the job into the **Jobs** list.
3. Keep the original job name or modify it, as necessary. Then, choose whether to create a new source and destination or to select an existing source and destination.
4. Click **Import** to import the job into the **Jobs** list.
 ## Moving a Job between Workspaces
In {siteNameShort}, a job can exist only in one workspace at a time. However, you can easily move a job from one workspace to another workspace, as follows:
1. Click the **Overview** tab on the **Jobs** page.
2. Select **... > Move** from the end of the row for the job that you want to move. This selection opens the **Move Job** dialog box, which displays the originating workspace.
## Moving a Job between Workspaces
In {siteNameShort}, a job can exist only in one workspace at a time. However, you can easily move a job from one workspace to another workspace, as follows:
1. Click the **Overview** tab on the **Jobs** page.
2. Select **... > Move** from the end of the row for the job that you want to move. This selection opens the **Move Job** dialog box, which displays the originating workspace.
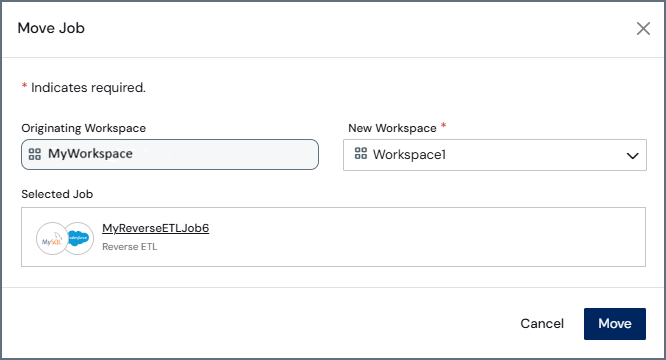 3. Select the destination workspace from the **New Workspace** list.
4. Click **Move** to transport your job to the new workspace.
## Enabling and Disabling the Scheduler
You can enable or disable the schedule via these two methods:
* the **Schedule** column on the main **Jobs** page (for all jobs)
* the **Edit Schedule** dialog box, available in the **Schedule** category on the **Overview** tab of an individual job's settings page
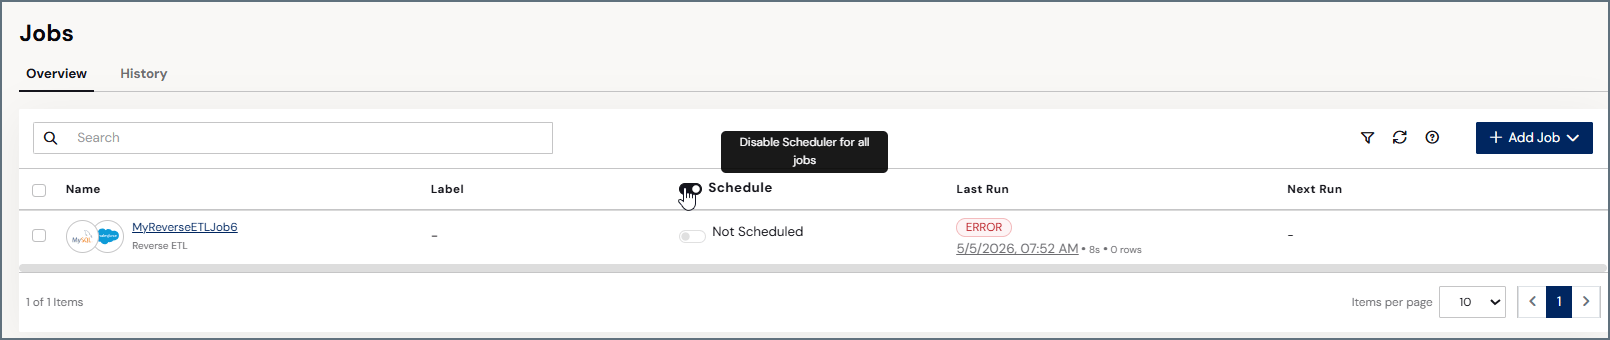
On the main **Jobs** page, you enable or disable the scheduler for all jobs by toggling the **Schedule** button in the **SCHEDULE** column.
3. Select the destination workspace from the **New Workspace** list.
4. Click **Move** to transport your job to the new workspace.
## Enabling and Disabling the Scheduler
You can enable or disable the schedule via these two methods:
* the **Schedule** column on the main **Jobs** page (for all jobs)
* the **Edit Schedule** dialog box, available in the **Schedule** category on the **Overview** tab of an individual job's settings page
On the main **Jobs** page, you enable or disable the scheduler for all jobs by toggling the **Schedule** button in the **SCHEDULE** column.
 ## Starting and Stopping Jobs
You can start a job by positioning your cursor over the entry for the job and clicking the **Run Job** (▷) icon.
When a job is running, you cancel that run by clicking the **Stop Job Run** (■) icon.
## Re-Syncing Job Task Execution
{siteNameShort} provides a **Re-Sync Tasks** option that enables you to rerun all tasks in a job or selected tasks from a defined starting point without modifying advanced job settings.
This feature simplifies the process of reloading data. Previously, resetting a table required manually enabling options such as **Drop Table** or **Truncate Table Data** on the job's **Advanced** tab, running the job, and then restoring the original settings. The **Re-Sync Tasks** option consolidates this workflow into a single action.
**Re-Sync Tasks** options override any replication options that are configured at the job or task level for that run only. After you initiate a resynchronization (re-sync), the selected tasks are queued and executed through the standard job execution flow.
### Accessing the Re-Sync Tasks Option
The **Re-Sync Tasks** option is available in the {siteNameShort} UI at multiple levels, depending on the scope of the operation.
You can access the option in the following locations:
* **Job level:** On the **Overview** tab of the **Jobs** summary page, you can re-synchronize all tasks in a job by selecting **Re-Sync Tasks** from the **...Options** menu (upper right of the window).
* **Task level:** On the **Tasks** tab for a job, you can re-sync an individual task by selecting the task and then selecting **Re-Sync Tasks** from the **...Options** menu (upper right of the window) for an individual task to re-sync a single table.
* **Bulk edit bar:** On the **Tasks** tab, the bulk edit bar appears when you select one or more tasks. Clicking **Re-Sync Tasks** on the edit bar applies that operation to all selected tasks.
In each case, clicking **Re-Sync Tasks** opens a dialog box where you can configure the resynchronization options.
## Starting and Stopping Jobs
You can start a job by positioning your cursor over the entry for the job and clicking the **Run Job** (▷) icon.
When a job is running, you cancel that run by clicking the **Stop Job Run** (■) icon.
## Re-Syncing Job Task Execution
{siteNameShort} provides a **Re-Sync Tasks** option that enables you to rerun all tasks in a job or selected tasks from a defined starting point without modifying advanced job settings.
This feature simplifies the process of reloading data. Previously, resetting a table required manually enabling options such as **Drop Table** or **Truncate Table Data** on the job's **Advanced** tab, running the job, and then restoring the original settings. The **Re-Sync Tasks** option consolidates this workflow into a single action.
**Re-Sync Tasks** options override any replication options that are configured at the job or task level for that run only. After you initiate a resynchronization (re-sync), the selected tasks are queued and executed through the standard job execution flow.
### Accessing the Re-Sync Tasks Option
The **Re-Sync Tasks** option is available in the {siteNameShort} UI at multiple levels, depending on the scope of the operation.
You can access the option in the following locations:
* **Job level:** On the **Overview** tab of the **Jobs** summary page, you can re-synchronize all tasks in a job by selecting **Re-Sync Tasks** from the **...Options** menu (upper right of the window).
* **Task level:** On the **Tasks** tab for a job, you can re-sync an individual task by selecting the task and then selecting **Re-Sync Tasks** from the **...Options** menu (upper right of the window) for an individual task to re-sync a single table.
* **Bulk edit bar:** On the **Tasks** tab, the bulk edit bar appears when you select one or more tasks. Clicking **Re-Sync Tasks** on the edit bar applies that operation to all selected tasks.
In each case, clicking **Re-Sync Tasks** opens a dialog box where you can configure the resynchronization options.
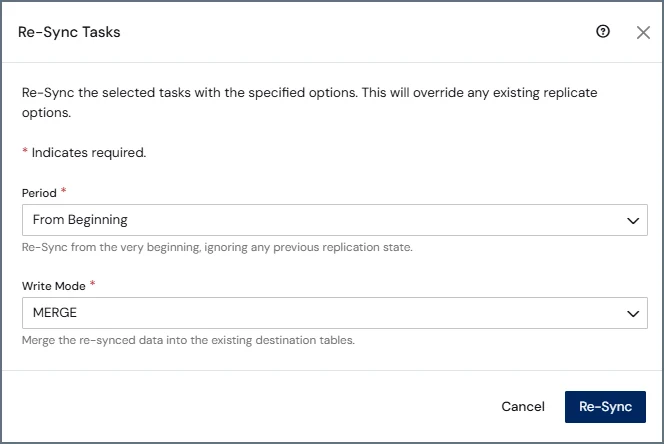 ### Configuring Re-Sync Task Options
Click **Re-Sync Tasks** to open the **Re-Sync Tasks** dialog box, where you can configure the following options:
* **Period:** Specifies where you want the resynchronization to begin:
* (Default) **From Beginning:** Resynchronizes all data from the beginning and ignores any previous replication state.
* **From Position:** Starts resynchronization from a specified point that is defined by a date or a number. When you select this option, the dialog box displays additional options:
* **Start Value Type:** Specifies the type of starting value. You can choose from the following types:
* **Data-based:** Requires a date in the **Start Date** field as the starting position.
* **Number-based:** Requires a numeric value that defines the minimum position from which you want the replication to begin. When you select this type, you must enter the minimum integer value for where you want to begin replication.
* **Snapshot Interval:** Specifies the number of rows by which data should be partitioned during retrieval.
* **From Now:** Begins resynchronization from the current point in time.
* **Write Mode:** Specifies how existing data in the destination table is handled during resynchronization:
* (Default) **MERGE:** Merges incoming data with existing data in the destination table.
* **TRUNCATE:** Removes all rows from the destination table before resynchronization, but the table schema is maintained.
* **DROP:** Deletes the entire destination table and re-creates it before resynchronization.
### Supported Job Types
Availability of **Re-Sync Tasks** options varies by job type. The **From Beginning** and **From Now** options are available for all supported job types. The availability of **From Position** and **Write Mode** depends on the job type, as shown in the following table:
| Job Type | From Position | Write Mode |
| :-----------------: | :-----------: | :-----------: |
| Standard / Sync All | Supported | Supported |
| CDC | Not supported | Supported |
| Reverse ETL | Not supported | Not available |
## More Information
For more information about {siteNameShort} jobs and how they work, see [Jobs](../../jobs/jobs).
### Configuring Re-Sync Task Options
Click **Re-Sync Tasks** to open the **Re-Sync Tasks** dialog box, where you can configure the following options:
* **Period:** Specifies where you want the resynchronization to begin:
* (Default) **From Beginning:** Resynchronizes all data from the beginning and ignores any previous replication state.
* **From Position:** Starts resynchronization from a specified point that is defined by a date or a number. When you select this option, the dialog box displays additional options:
* **Start Value Type:** Specifies the type of starting value. You can choose from the following types:
* **Data-based:** Requires a date in the **Start Date** field as the starting position.
* **Number-based:** Requires a numeric value that defines the minimum position from which you want the replication to begin. When you select this type, you must enter the minimum integer value for where you want to begin replication.
* **Snapshot Interval:** Specifies the number of rows by which data should be partitioned during retrieval.
* **From Now:** Begins resynchronization from the current point in time.
* **Write Mode:** Specifies how existing data in the destination table is handled during resynchronization:
* (Default) **MERGE:** Merges incoming data with existing data in the destination table.
* **TRUNCATE:** Removes all rows from the destination table before resynchronization, but the table schema is maintained.
* **DROP:** Deletes the entire destination table and re-creates it before resynchronization.
### Supported Job Types
Availability of **Re-Sync Tasks** options varies by job type. The **From Beginning** and **From Now** options are available for all supported job types. The availability of **From Position** and **Write Mode** depends on the job type, as shown in the following table:
| Job Type | From Position | Write Mode |
| :-----------------: | :-----------: | :-----------: |
| Standard / Sync All | Supported | Supported |
| CDC | Not supported | Supported |
| Reverse ETL | Not supported | Not available |
## More Information
For more information about {siteNameShort} jobs and how they work, see [Jobs](../../jobs/jobs).